Blue Atlas Cedar rehab - Inherited tree

Deep Sea Diver

Imperial Masterpiece
Messages
5,214
Reaction score
10,793
Location
Bothell, WA
USDA Zone
8b
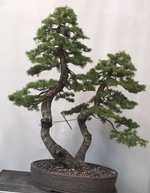
This Blue Atlas Cedar bonsai is one of the many trees owned by my Father in law. It was a full cascade then..

A couple years before Dad passed this tree (amongst others) was given to his oldest son. My better half and I repotted it over five years ago. Since then hadn’t seen the tree. A couple weeks ago he asked us to take eight of the trees, including this BAC. It’s at least 30 yoa.

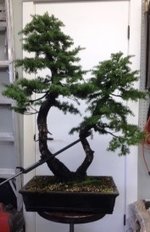
Hasn’t been repotted since and has had minimal maintenance…. As one can see seven years of little work and the tree sprung up to almost a semi cascade. Sorry about the not great photo.

IMG_1846.jpeg

Secen years tree needs attention in a number of areas. Rebending, pruning and repot.

The first big job is to bend the trunk back into a full cascade. Not going to be an easy bend as-the main trunk has fattened up considerably over the years. Also BAC’s are notoriously sparingly beasts

This job called for raffia and double #6 wire. If we had some #4 would have laid one strand on it!

We both worked together laying out the raffia and wiring the trunk. We tried getting a complete bend on of the trunk right off but found out this job was going to need a guy wire and multiple attempts at bending. So we bent as much as possible tied it off, waited an hour and repeated three times. Here’s where we ended up.

FullSizeRender.jpeg

The plan is to come back in a couple weeks and try to bend more again.

cheers
DSD sends
 
Cool tree. Wish there were more of these on Bnut as they are such beautiful trees but there doesn't seem to be a lot of information floating around on techniques.

Is yours grafted? I killed one of these very early on in my bonsai journey when i bent it too much and it died the next year. I have another now that I am working on but it is grafted and sort of an eyesore. I have another i started from seed that I need to grow out.

Do you have a calendar of work that you follow?
 
Good question. Neither of the BAC appear to be grafted. These trees tend to be hard to get… until they aren’t.

Presently we treat these similar to other Cedars and Spruces out here

Repot in Feb-April when buds begin to push open…,
Fertilize April through August / Sept depending on heat and lightly forward through the year,
Thin/Prune April/July as indicated
Thin to silhouette in Fall as indicated
Wire Sept-Nov

As this specimen has not been managed properly, the usual scenario will be altered slightly… minimal thinning, maximizing growth.

cheers
DSD sends
 
Last edited:
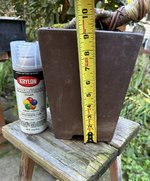
My wife the potter wants to know the pot dimensions (lwh) and I’d like to know the diameter of the base and total length of the main stem (trunk). Hard to judge any of this without some form of reference such as a beer can or ruler.
 
So sorry, regretfully, no beer cans here. The kids all take them home after parties.

Anyways here’s what I have to offer.
Trunk width 1 1/8 ish
IMG_0162.jpegIMG_0160.jpegIMG_0161.jpeg

The tree was purchased and styled at the old Bonsai Northwest about 14; years ago. No clue age, but guess at least 20 years from my knowledge of John Mitch’s trees back in the day.

Possibly looking to up pot, so if your better half is making these 1 1/2 to 2” wider and 3/4” taller, let me know, you might get a quick sale.

Cheers
DSD sends
 
The plan is to come back in a couple weeks and try to bend more again
#4 is available if required. Not sure about the shipping cost but I have plenty in stock. More of a 45 to 60 degree angle on the wire would protect the trunk better. Another aid would be to lay wire longitudinally under the raffia to protect the outside edge. I have found this added touch very useful in severe bends.
Do you have access to a Bonsai Jack? Simplifies the process and allow for slower progression with finger tip control on the pressure!
Fulcrum - pre-carved to desired shape can be very useful in this situation along with rebar.
Just a couple of thoughts. You may be aware of all of the above. In that case ignore my comments.
Nice project, well worth the time and care you are taking.
 
So sorry, regretfully, no beer cans here. The kids all take them home after parties.

Anyways here’s what I have to offer.
Trunk width 1 1/8 ish
View attachment 514876View attachment 514877View attachment 514878

The tree was purchased and styled at the old Bonsai Northwest about 14; years ago. No clue age, but guess at least 20 years from my knowledge of John Mitch’s trees back in the day.

Possibly looking to up pot, so if your better half is making these 1 1/2 to 2” wider and 3/4” taller, let me know, you might get a quick sale.

Cheers
DSD sends
Thanks but it might be a while before I get a pot, she is just recovering from a broken wrist and she isn’t sure when she can get back into her workshop. However, it will just be a slab build instead of wheel thrown so I’ll keep nudging her. Have you ever had any issue when repotting the tree? I’ve heard everything from don’t touch the roots to go slow about cutting them.
 
Only reported this tree once and it had not been repotted in years….

….and herein lies a story I’ve rarely shared…… either we were very lucky timing wise or BAC’s can take more abuse than folks seem to report…

So here’s the story…

Yes we did have a great deal of trouble doing the repot process. The tree just wouldn’t come out ….the roots were wedged so tight and the media wouldn’t move out except the top 1/2”. Ended up pounding a thin flat steel bar with a rubber mallet all around, trying to bang the roots loose all the way to the bottom…. And $@&!!@ still wouldn’t come loose!

So my better half pulled on the towel wrapped trunk while I jammed a high pressure water jet in the drain hole and eventually pulled the pot loose. It took 15 minutes of hard pulling and we both ended up soaking wet and one of us on or rear end on the ground !

The neighbors gathered around the perimeter of our front lawn all thought this entire event was great fun.

No tree, even the very biggest trees at PBM or the ones long in the pot, have ever given us that kind of trouble unpotting. It was amazing.

Anyways I did reduce the roots at least 20% and the media was a bark:pumice:lava media. So when the BAC eventually came out of the pot the bark had deteriorated so the rest just fell out, leaving the tree mostly bare rooted. So I mixed some of the old media in with h the new media and crossed my fingers tightly.

…. Surprisingly the tree responded well based upon my brother in laws input… but he’s not a bonsai guy … we didn't see the tree until a couple weeks ago.

The BAC’s foliage condition has deteriorated a bit, since last I saw the tree… due to poor pruning practice.

Cheers
DSD sends
 
That is an interesting story. I pulled my new one out of the pot today and it took some good tugging and banging on the sides of the pot to get it out. The amount of roots was impressive but all I did was knock off a couple inches of loose soil from the bottom of the root ball and then potted it back up in a 2” wider pot with some bonsai soil. I plan to do a HBR repot next spring, hopefully into a cascade pot if I can get my wife working again.
 
As a newcomer to the practice of Bonsai BAC strike me as something of a final boss sort of tree. They are absolutely magnificent but from a horticultural and training perspective, extremely intimidating. I am tooling around with some very young trees and basic ideas in my journey but in the back of my mind I hope someday to get to work on and appreciate a BAC of my own. This one looks to be in good hands if you and the better half are willing to wrestle it out of its pot with a power washer!
 
Second Effort today. Looked up a Bonsai Jacks as @River's Edge suggest and almost pulled the trigger. First went outside and thought through the situation… Testing the tree, discovered bending wasn’t the only issue.

The angle of pull on the guy wire was one issue So tested this idea by using a 5mm wire aluminum wire around the ‘tail’ midway down and across the pot. Then pulled the tail into position towards the pot. Tail came into position.. Then retied the guy wire. After releasing the aluminum wire the tail went out again, but not as much.

So guy wire angle is part of the issue. Ran a second guy wire and tied this off, then tightened the initial guy wire . (Using the aluminum wire to assist again) The result was much better. Tail still not straight down, but much better. See below.

IMG_0177.jpeg

IMG_0175.jpeg

Need to reposition the lower guy wire and finish the job. Am going to wait awhile before the next effort as things are very busy staging for wintering over.

Until then the tree is in the ‘cold’ greenhouse.

Cheers
DSD sends
 
Last edited:
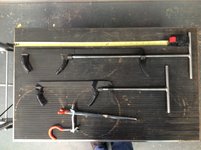
Good Work. An old school alternate wiring method for gradual tightening is the double wire tie down. Then using a peg to slip between the two wires and gradually turn to tighten the wire further. With this method one typically uses smaller diameter copper wire 14 gauge. This method can be used to tighten gradually over time if you wish to give the material time to relax between sessions. It is also a method that allows for better bending and tightening control with the first bend. The disadvantage is it is a two person method. One person holds and twists the wire ends to begin with as the other person makes the bend with hands or fulcrum and bar. Once the bend has been executed to the first stage, then the "peg" is used between the wires to finish the job. Here is a sample to illustrate my wordy explanation. The double vertical wire is in position to bend the left lower branch. Placing a small bar or peg midway between the wires and turn. This tightens slowly and creates a very strong anchor to hold the bend. Note similar pads in place to protect the bark on trunk or branch. For smaller branches simply use aquarium tubing for protection by threading the wire through the tube. At the end where you twist the two ends together the tube is cut with a slit in the centre of the tube. This provides protection for both ends. Just a couple of extra techniques that can be used in similar situations. And a picture for those who may be wondering what a bonsai jack looks like. Two sizes of Bonsai Jack and a branch bender. Most useful with older material and Yamadori. Initial work on my twin trunk allowed me to position the two trunks 8 inches closer than when collected.
 

Attachments

  • bf jacky.jpg
    bf jacky.jpg
    12.9 KB · Views: 96
  • IMG_0184.JPG
    IMG_0184.JPG
    31.3 KB · Views: 88
  • IMG_1479.JPG
    IMG_1479.JPG
    170.7 KB · Views: 96
Really nice technique examples to keep in one’s seabag of tricks @River's Edge !

These are very helpful. I like the double wire technique a lot.. Maybe able to use this with the wire around the pot/tail.

Actually thinking about just leaving this wire on too. One downside is this guy wire would have to be removed during next spring repot. Its possible the lower guy may be problematic during repot too… have to think that issue through in spring.

Also a bonsai Jack is on my Christmas List 😎

Thanks again!

Cheers
DSD sends
And taking your time over several stages will allow you to refine it just the way you like it. The current wiring and guy wires will work fine. Be prepared to take them off and reapply as necessary and or convenient. If the planting angle changes, then the wire anchors should either be removed or ensured that they do not put pressure on shifting the root ball. Alternately, allow the root ball to secure itself and work further on additional bending in a year or two. My inclination would be to settle the planting angle and tree for a year or two. Finesse the wiring later on. That does not prevent finer wiring and pad formation in the meantime.
 
I think I actually liked it better at the 45 degree angle.

This project is on a very long journey, especially considering BAC’s propensity to spring back. (Also see @River's Edge above)

Still a lot to do on this job, repotting, pruning, secondary and tertiary wiring. Time will tell.

cheers
DSD sends
 
Last edited:
This project is on a very long journey, especially considering BAC’s propensity to spring back. (Also see @River's Edge above)

Still a lot to do on this job, repotting, pruning, secondary and tertiary wiring. Time will tell.

cheers
DSD sends
Understood. I have a 5 footer that is still straight as a bean pole which will get bent next spring. I plant to do that work first and in a couple of years move it to a ceramic cascade pot. That should give my wife time to get back to her workshop and roll out some slabs. In the meantime it helps to see someone else working in a similar project. David in Australia has a YouTube channel bonsai worx with a couple of Atlas Cedar videos:


Drilling the Pot

Noticed today the cascade pot doesn’t have four corners drainage/wiring holes, only two. These extra holes will be needed to securely tie down the tree this spring. Also to improve drainage during PNW rainstorms, like those coming every two days right now … also possibly for future guy wires.

Anyways, here’s the process for drilling with a tree in the pot. For pots without trees inside, here’s one thread example.

First wrap media and top of pot tightly with towels etc if turning pot on side. Also have drilled pots with trees planted inside in the upright position from the bottom. This operation usually takes two people for safety purposes.

IMG_0196.jpegIMG_0189.jpeg

Assemble tools. Drill, diamond bit (Mostly use Dewalt here, but not always), spray bottle.

IMG_0190.jpeg

Mark position of ‘hole’. Start drilling on a 45* angle at high speed.
(Note loose aluminum tie down wire. Stretched from trunk bending. Steel/copper doesn’t do this.)

IMG_0191.jpeg

Once pot scored, slowly move bit to normal position. Keep at high speed, medium pressure, let the bit do the work.
Be sure to spray pot and bit!

IMG_0194.jpeg

Pull bit out to check progress and spray hole and bit. It helps to observe progress by seeing how deep the bit is in the pot. The compare the bit depth to-the drain hole depth as a guide.

IMG_0193.jpeg

When nearing the pot’s inside edge, keep up speed, decrease pressure to avoid chipping the inside of the pot.
IMG_0195.jpeg

btw if one is hesitant to drill pots, it’s good to recall high quality pots to ceramic milk jar lids have been drilled after the fact for centuries to improve drainage. The Black Pondo podcast has a really good interview of Matt Ouwinga from Kaede bonsai-en where he speaks to this point.

Often old Chinese pots mid 20th century and earlier weren’t made with proper drainage. Some old pots we’ve worked with even have the drain hole(s) raised up a bit. This creates perpetual puddling in the low spots of the pot bottom. Seen two high quality trees with dead roots exactly mirroring these low wet areas in the pot bottom.

Something to check?

cheers
DSD sends
 
Back
Top Bottom