You are using an out of date browser. It may not display this or other websites correctly.
You should upgrade or use an alternative browser.
You should upgrade or use an alternative browser.
What did you do today? Show us Pic Required
- Thread starter Underdog
- Start date

The Barber
Chumono
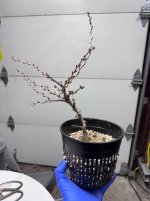
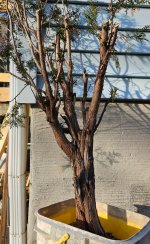
On Gatorade break #2...moved into the swamp. Trying to see what it's like being @Cajunrider  willow oak (Quercus Phellos) way bigger under the muck...I'll show yall in a bit when I pot her up
willow oak (Quercus Phellos) way bigger under the muck...I'll show yall in a bit when I pot her upWulfskaar
Masterpiece
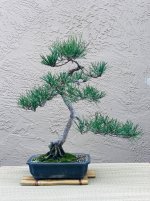
(Yesterday) I tortured my DAS. I got sloppy with the wiring in a couple places though.


My thread for this tree.
My thread for this tree.
The Barber
Chumono
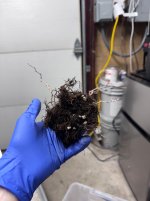
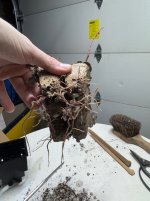
On second thought I think that's not a willow oak, but a black willow, salix nigra. Bark isn't right. Boy does it have the roots though.

Baron von Smoogle
Yamadori
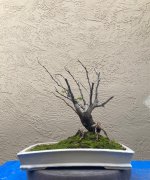
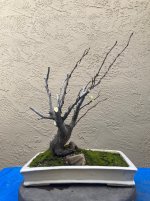
I am trying to decide what to do with my Thuja occidentalis. I have some back budding starting at the tops of the trunk chops where I have drawn the foliage pads on the left side, so I can hopefully start growing out some branches. The apex on my drawing is too big but that can be fixed as I grow the tree. The tree was dug from the neighbors yard two years ago. I plan to repot it into a shallower board box soon. Most of the current branches (long and skinny) are another foot above the top of the photo.
Attachments
pandacular
Masterpiece
What you should probably do is nothing! Looks much too weak for further work.I am trying to decide what to do with my Thuja occidentalis. I have some back budding starting at the tops of the trunk chops where I have drawn the foliage pads on the left side, so I can hopefully start growing out some branches. The apex on my drawing is too big but that can be fixed as I grow the tree. The tree was dug from the neighbors yard two years ago. I plan to repot it into a shallower board box soon. Most of the current branches (long and skinny) are another foot above the top of the photo.
Checked out some of my trees in the snow.

Baron von Smoogle
Yamadori
Thanks, I hadn't planned to actually do anything other than a repot into a shallower container. Since it's a bit too cold to actually do anything with my trees, I was sitting here thinking of the future. I may not even do the repot this year.What you should probably do is nothing! Looks much too weak for further work.
Checked out some of my trees in the snow.
View attachment 582075
vancehanna
Omono
Adamski77
Chumono
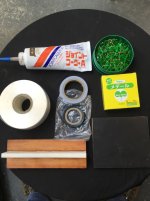
What’s in the bags? Normally have seen and used grafting tape to wrap…Chose a lower quality JBP tp practice grafting on! Better possibilities for design with more branches! One of the few times you get a branch where you would like it.
RJG2
Masterpiece
Sphagnum to keep the humidity up.What’s in the bags? Normally have seen and used grafting tape to wrap…
River's Edge
Imperial Masterpiece
The bags contain a small portion of damp sphagnum moss to maintain humidity levels for the needles and help them retain their health until the cambium begins to join together. This reduces damage from wind desiccation. Depending on the location one may wish to use a piece of tape on the bag to shade the scion from direct sun. This is particularly useful in hotter climates. ie: California.What’s in the bags? Normally have seen and used grafting tape to wrap…
The process for maintaining humidity is to use a syringe to inject additional water as required. The observation key is to watch for condensation inside the bag, When the condensation disappears add some moisture. Once the scions buds begin to extend you know the graft is taking. At this point one begins to slowly open the bag to adjust the scion to lower humidity levels. It is important to take this step slowly, but also in time to allow the growth to proceed.
hope the comments help.
The other use for the tape is to put your initials on when learning how to complete the grafts.Some b-nutters who will go unidentified had a habit of putting other people initials on theirs and switching scions. Trying to determine who actually was ahead in the competition between students became complicated.
Last edited:
Orion_metalhead
Masterpiece
Dont do anything. That thuja should be let grow until at least fall unrestrained and fertilized well.Thanks, I hadn't planned to actually do anything other than a repot into a shallower container. Since it's a bit too cold to actually do anything with my trees, I was sitting here thinking of the future. I may not even do the repot this year.
Tax: Admired the new growth on my recently chopped poinsettia:

The Barber
Chumono
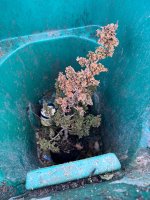
Getting the trees I collected today potted up, this guy barely fit into an Anderson flat. Been looking for a bigger American hornbeam to carve into a hollow trunk design. Feeder roots aren't terrible, should recover fine, had worse root systems thrive after collecting.

Kievnstavick
Chumono
Already repotting I see. I am still waiting to start mine maybe next month or so. I got done repotting my tropicals sometime last week.A couple of repots and also up-potted a batch of maple volunteers.
This year I'll be repotting some savings grown in those rootmaker pots you pictured. I'll be sure to share what I observe. I have a few cuttings and a few grown from seed trees that have been in their rootmaker pots for a full year now.
For the picture tax:

A tiny mushroom I found while doing some winter pruning that I practiced my macro photography skills on. Wish I came out better, but it is acceptable enough. For size reference, that piece of pumice is around 1/4in
pandacular
Masterpiece
The new greenhouse kicked a few things off early, but my chojubai and cherries have been pretty the last few years too. Probably have a few young azaleas that I can pot up this weekend as well.Already repotting I see. I am still waiting to start mine maybe next month or so.
Picture tax…finally binned my least favorite tree (only the top was dead but the bottom wasn’t pretty!)
Attachments
Adamski77
Chumono
as always extremely helpful… thank you. Might try both ways see what works better for me…The bags contain a small portion of damp sphagnum moss to maintain humidity levels for the needles and help them retain their health until the cambium begins to join together. This reduces damage from wind desiccation. Depending on the location one may wish to use a piece of tape on the bag to shade the scion from direct sun. This is particularly useful in hotter climates. ie: California.
The process for maintaining humidity is to use a syringe to inject additional water as required. The observation key is to watch for condensation inside the bag, When the condensation disappears add some moisture. Once the scions buds begin to extend you know the graft is taking. At this point one begins to slowly open the bag to adjust the scion to lower humidity levels. It is important to take this step slowly, but also in time to allow the growth to proceed.
hope the comments help.
The other use for the tape is to put your initials on when learning how to complete the grafts.Some b-nutters who will go unidentified had a habit of putting other people initials on theirs and switching scions. Trying to determine who actually was ahead in the competition between students became complicated.
Weta
Shohin
General tidy up day, noticed the neighbours cactus was about to flower and thought I'd get some pics once open, ended up being night pic's. 

Maiden69
Masterpiece
Frank, have you tried the paraffin wax warp method? I've seen a few people (Ryan included) that use that instead of the bags. I am going to give grafting a next year and debating which method to use.The bags contain a small portion of damp sphagnum moss to maintain humidity levels for the needles and help them retain their health until the cambium begins to join together. This reduces damage from wind desiccation. Depending on the location one may wish to use a piece of tape on the bag to shade the scion from direct sun. This is particularly useful in hotter climates. ie: California.
Japonicus
Imperial Masterpiece

I had to go
Top step too short for length of tool bag
River's Edge
Imperial Masterpiece
I have, I find it a more finicky method of sealing the gaps. Also it can depending on temperature seep in to the cracks and impede the cambium match. I prefer the latex caulk, it is easier to apply and less likely to seep into areas that would create a barrier to the cambium. Does not penetrate the cracks , just seals to prevent desiccation. The picture below shows my typical grafting supplies. The caulk is the tube top left.Frank, have you tried the paraffin wax warp method? I've seen a few people (Ryan included) that use that instead of the bags. I am going to give grafting a next year and debating which method to use.
Attachments
Similar threads
- Replies
- 15
- Views
- 3K