Interestingly, poplar is neither a hardwood nor a softwood. Some call it a "mid-wood" because it is an angiosperm (hardwood) with very light wood that falls below many conifers on the hardness scale (softwood). Even crazier is that if you are talking Tulip poplar (the tallest tree east of the Mississippi and the source of most "poplar" lumber) it isn't even a true poplar - it is in the magnolia family
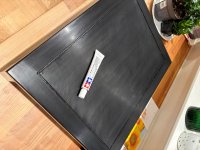
I find the best thing to use on soft woods is an alcohol based dye.
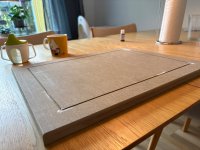
This is dyed poplar. Regular stain would turn out splotchy and ugly.
Great job on that stand btw, I’ve made a couple and they aren’t easy!
Hey Thanks! Didnt consider this obviously. So the center panel should not be fastened at all then? In other words, can you lift it off and replace it with your stands?Stand maker here, just back from vending at the Nattonal. Stand looks great, but a word of advice in your construction. That center panel and groove around it are not strictly for aesthetic. The center panel should “float” in your picture frame boarder. This allows for expansion and contraction of the wood with different relative humidity levels. Without this “float”, and with your frame glued directly to the edges of your center panel, the woods expansion will put a lot of internal pressure on your glued miter corners. Those joints are very weak as they are end grain to end grain, and will break from the pressure of an expanding center panel. I made my first few stands like yours and some failed just as I describe. You should also consider reinforcing the miter with a sole of some kind, in addition to the floating center!
I see, more tools will be needed thenThe centre panel is usually trapped in grooves of some sort - so it cannot come out but is still free to expand and contract as humidity changes.
For very small panels this is less important as the differential expansion is so small. The bigger the centre panel is, the more important an expansion joint becomes.
I also add decorative splines which help reinforce the mitre joints at each corner.
@Berra Would it be OK if @stewarjm192 added some photos of the stands he makes to this thread. We obviously did not get to the show to see his work there.
Tools are a router table and a few bits. A slot cutter for your outer pieces, and a rabitting set to cut the rabbit around the center panel. Reinforcing the miter is another story and can be done a number of ways I do mine on the router table with a 1/8th bit, but will probably move to a table saw jig when I have the time to do itI see, more tools will be needed then
Yes sure, I don’t plan on expanding this thread more anyway
This is correct. And usually, I will “pin” the panel in a few spots to hold it in place and prevent it from shifting around freely. Wood generally moves most across the grain, rather than along it, so you can pin the panels in the groove of your picture frame with a drop or two of glue on the panels end grain, allowing the side a of the panel to expand, but holding the panel in placeThe centre panel is usually trapped in grooves of some sort - so it cannot come out but is still free to expand and contract as humidity changes.
For very small panels this is less important as the differential expansion is so small. The bigger the centre panel is, the more important an expansion joint becomes.
I also add decorative splines which help reinforce the mitre joints at each corner.
@Berra Would it be OK if @stewarjm192 added some photos of the stands he makes to this thread. We obviously did not get to the show to see his work there.
with so nice first outcome? i doubtJust one… more… table… I can quit this new hobby when I want![]()