Building taper - when to chop and create a new leader

apr

Sapling
Messages
35
Reaction score
29
Location
Scotland
Hi Bonsainuts


When I first started about a year ago, I assumed, like most beginners probably do, that if I got my hands on an acer or oak, or any kind of sapling, that if it was 2ft tall and I wanted a 2ft tall trunk, that it was a case of waiting for it to thicken.


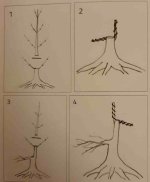
As I've studied more I have come to learn that taper is built through successive chop trunks, rewiring of new shoots to create each new trunk segment, as shown in Meriggioli's fantastic book below:

20250426_212749.jpg

I feel like I can begin to see in my own trees (practically saplings), the places where I want to chop and begin building the next part of the trunk.

My question and problem understanding, is how to begin to tell where to make these chops on more developed material (pics below)

Does this come with time, experience and patience ? (My guess is yes).

For example, I'm considering purchasing something like this, to have something a little further in development to improve my skills:

Screenshot_20250427_095535_Brave.jpg

Or this:

Screenshot_20250427_095756_Brave.jpg

To my inexperienced eye, the first tree has some good movement, some taper, perhaps a little inverse taper half way up the trunk, but there are several branches in the apex that could be the next leader.

The second piece of nursery stock has great movement (to me) and I feel like both trees could be worked as they are, into lovely trees - but I'm having trouble seeing where or how cuts would be made to take these two examples of nursery stock, towards something like this (below), where there is obvious taper and building of each trunk section.

20250427_102459.jpg

(Another amazing tree in the Meriggioli book)

I hope what I am asking makes sense. It would be easier to explain what I mean verbally but Unfortunately I can only make it to my local club a handful of times per year and am reliant on books, this site, YT.


Thanks !
 

Attachments

  • 20250426_212749.jpg
    20250426_212749.jpg
    78.6 KB · Views: 37
  • Screenshot_20250427_095535_Brave.jpg
    Screenshot_20250427_095535_Brave.jpg
    140.6 KB · Views: 34
  • Screenshot_20250427_095756_Brave.jpg
    Screenshot_20250427_095756_Brave.jpg
    13.7 KB · Views: 7
  • 20250427_102459.jpg
    20250427_102459.jpg
    37.7 KB · Views: 6
  • Screenshot_20250427_095756_Brave.jpg
    Screenshot_20250427_095756_Brave.jpg
    13.7 KB · Views: 9
  • Screenshot_20250427_095756_Brave.jpg
    Screenshot_20250427_095756_Brave.jpg
    13.7 KB · Views: 31
My question and problem understanding, is how to begin to tell where to make these chops on more developed material (pics below)

Does this come with time, experience and patience ? (My guess is yes).
You’re asking the right questions I think. Likely, people wouldn’t make trunk chops on material you’re showing, but if they do, it’s to remove a defective section or to add another section of trunk that would add some movement and taper. Both of these techniques are the same. Pick the spot where the trunk becomes straight and uninteresting, and cut there. Ideally it will have small shoots to continue the growth so you’re not hoping for some growth in the right spot and hoping against dieback.

I have never had great results wiring up a new leader like your diagrams show. Usually the wiring constricts growth, and another shoot overpowers the wired one, so when I do chop a trunk, I try to prune it at a point (node) that already has shoots growing as the diagram shows, but skip the wire. The new leader will ultimately head up, and the side branch can be pinched short so it doesn’t get too big.

So try a few chops and watch the result, it isn’t too tough to figure out. I have found that taking photos and referring back to them is a great way to quickly study the slow effects of work like this.
 
It’s interesting that the clips shown in these diagrams is always a straight chop. I never see a am angled chop shown really.
 
I have never had great results wiring up a new leader like your diagrams show. Usually the wiring constricts growth, and another shoot overpowers the wired one, so when I do chop a trunk, I try to prune it at a point (node) that already has shoots growing as the diagram shows, but skip the wire. The new leader will ultimately head up, and the side branch can be pinched short so it doesn’t get too big.
These responses are priceless. Many of us don’t have the years of experience needed and we rely on texts. Great to have the hands on experience responses to better guide us.
Likely, people wouldn’t make trunk chops on material you’re showing, but if they do, it’s to remove a defective section or to add another section of trunk that would add some movement and taper.
I have a Chinese elm (attached) that I feel should basically be cut in half to get much better taper and movement. I’ve had it for two years, haven’t changed my opinion, and still haven’t mustered the courage to chop.
 

Attachments

  • IMG_8784.jpeg
    IMG_8784.jpeg
    561.2 KB · Views: 76
Likely, people wouldn’t make trunk chops on material you’re showing
Brian is pointing you in the right direction. Take a moment and look back at picture one in your post. Start with material that looks more like this as suggested in the book.
I have never had great results wiring up a new leader like your diagrams show
This has been my experience as well, I find it works best to wire loosely or restrain for shorter periods of time to gain direction with our restricting the growth pattern. By restrain I often use a zip tie, straight piece of heavy wire loosely wrapped on the new shoot. If the wire is not left on too long or if it is unwrapped and rewrapped loosely again one can get the result without restricting growth. I have on more than one occasion used a larger straw to guide the growth of a shoot as it emerged from the trunk.
Most importantly, realize that one can plan ahead and wire up or down the shoots for direction and movement before cutting the trunk. often using wedge cuts to begin healing sections that will be chopped later!. Adaptations of the Ebihara method discussed in treatment of larger cuts and scars.

To add to the discussion I would suggest that attention be directed to nebari development each time the tree is repotted in the early stages of development. Remember that this is easier too accomplish if starting with younger material. Often it is better to avoid starting with a larger trunk for this reason. In Japan the development of Bonsai was traditionally done in stages with nurseries focussing on developing seedlings properly, the next one growing trunks, the next stage development of primary branches and basic structure with the very best ones moving on to Bonsai masters for refinement and styling.
If we reflect on the various skills, and time frame the picture comes clearer. Lots of time involved and beginning with younger material for best results!
If I was going to start a maple from nursery material in North America I would look for the best one I could find that is in the age range of less than ten years.
Two critical components would be the nebari, ( relatively even distribution of roots on the flatter side ) And the flare of the base with some interest in the first foot of the tree.
Making chops on more developed material involves selecting the spot where the improvement in the existing material will make the most difference. often involves going back in stage of development a lot.
The most obvious spot is when the trunk becomes straight as Brian suggests, often it can be a section of inverse taper. Other aspects to watch for involve.
competing trunks of similar size, branches too large for their position on the trunk. And frequently how far back should one cut to avoid poorly healed scars or damaged sites from lost branches.
Note that the choice of a flat cut or angled cut is dependant on the style being developed. Formal upright or informal upright!
Just a few extra thoughts for the discussion.
 
  • Like
Reactions: e~b
Interesting discussion!

'I have never had great results wiring up a new leader like your diagrams show. Usually the wiring constricts growth, and another shoot overpowers the wired one, so when I do chop a trunk, I try to prune it at a point (node) that already has shoots growing as the diagram shows, but skip the wire. The new leader will ultimately head up, and the side branch can be pinched short so it doesn’t get too big.'

@Brian Van Fleet I never thought the wire could restrict growth on the new leader, makes sense though.

I had initially, loosely wired up this leader on this Beech.
20250423_200458.jpg

You've made me rethink and switch to guy wire.
Screenshot_20250427_170401_Gallery.jpg

I want to thicken the leader up as much as possible, to create a convincing trunk line. So ive left this branch long to power thickening down its length.

But you're suggesting to cut lower right away, to maybe here. So only this section gets thicker, if I understand correctly? Or maybe doesn't apply in this case? This branch is quite thick, but I see the upper part more as sacrificial so just thought it would make more sense to let everything grow.
20250427_170331.jpg
 
Thanks for the replies everyone.

Good to know I am on the right track to some extent. I definitely have seen why nursery material is often not the best to start with. Nebari.trunk, then take it from there.

I know there are mixed opinions on growing from seed but I can definitely see why it has several advantages, even if it takes forever.

I think I'll experiment with some chops on younger material like the diagrams and see how they go and try and get myself some material like I've posted as well
 
Back
Top Bottom