atlarsenal
Omono
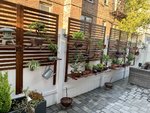
I added some more bench space this weekend. ")


@CWTurner It’s held up by a beefy metal bracket and 2 x M8 expanding bolts per side. Same with the shelf itself, there’s a welded and gusseted powder coated metal frame under the wood held to the wall with 4 x M8 anchors. Neither the shelf or the pergola are coming off the wall anytime soon@SeanS
That's pretty cool looking. Nicely done.
But to my eye you need a couple more cross pieces on the pergola. And how are those brackets anchored into your wall. Seems to me that it might just pull some of your wall out.
The "floating" look of the pergola is interesting, but I think a couple of braces would help strengthen it, and would actually give it a better look.
CW
")


Sorry, the beef is locking the to board with 4 bolts and to the wall with only 2 bolts, and worse, the footprint of the 4 bolts is double or more what the 2 bolt footprint is, spreading the load much better between the 4 bolts verses the 2 bolt pattern. It is an architecturally poor design that will fail at some weight. There are different kinds of forces here. The bolts are very strong in "shear", that is, in resistance to being broken perpendicular to the shaft of the bolt. They are almost impossible to break that way, but the forces exerted here are mostly "in tension", that is, the forces downward on the surface at some point or weight will be transferred and will be shared by resistance to shear and resistance to tension and will act on the weakest resistance to force, in this case pilling out of the wall.@CWTurner It’s held up by a beefy metal bracket and 2 x M8 expanding bolts per side. Same with the shelf itself, there’s a welded and gusseted powder coated metal frame under the wood held to the wall with 4 x M8 anchors. Neither the shelf or the pergola are coming off the wall anytime soon
I didn’t want anything too bulky, I’m in a small townhouse/condo with a 40m2 garden so I wanted my bonsai area to be compact and minimalist. A friend of mine that does custom fabrication projects made it up for me.
I hear you on the cross members on top. I’m having some custom shade net panels made up this week. 1 will go across the top of the pergola. The other will be a side panel which I’ll have up most of the time on the left hand side from the pergola down to the bottom shelf. The third panel will be a similar hanging panel for the front which I can attach when it rains heavily or in winter to protect from frost. All black 40% netting. All panels will have eyelets one each corner and will be attached with stretch cord or something similar which will be hooked onto screws on the top of the pergolas, out of sight. The idea is they’ll be easily and quickly attached or removed.
I’ll post up some update pics once all done.
View attachment 287484
View attachment 287485
View attachment 287486

Sorry, the beef is locking the to board with 4 bolts and to the wall with only 2 bolts, and worse, the footprint of the 4 bolts is double or more what the 2 bolt footprint is, spreading the load much better between the 4 bolts verses the 2 bolt pattern. It is an architecturally poor design that will fail at some weight. There are different kinds of forces here. The bolts are very strong in "shear", that is, in resistance to being broken perpendicular to the shaft of the bolt. They are almost impossible to break that way, but the forces exerted here are mostly "in tension", that is, the forces downward on the surface at some point or weight will be transferred and will be shared by resistance to shear and resistance to tension and will act on the weakest resistance to force, in this case pilling out of the wall.
The die is cast here, so you will need to keep large pots close to the wall where the forces will act straight downward (in shear). Smaller pots further out on the shelf will be OK. Keep large weights away from the outboard edge to reduce their leverage which transfers downward forces into tension forces which will peel the bolts out of the wall. Adding an angled foot attached to the outboard edge of the shelf angled back to butt up to the wall at the base of the wall will solve this problem as long as the weight on the shelf is limited to some amount not for me to specify.
View attachment 287517


Fred Flintstone would be very proud of you. Nicely created.
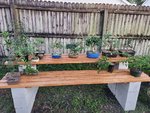
Got my shade netting (40%) up this weekend, finishing off my small townhouse bench.
The front shade panel will be off most of the time, it’s more for thunder storm protection in summer. We have heavy thunderstorms with hail where I live in South Africa.
View attachment 290420View attachment 290421
Top panel
View attachment 290422
All panels are attached with 6mm bungee cord and have my own DIY quick release mountings
View attachment 290423
I had it custom made. I found a shade netting company that does all sorts of shade netting and sports netting (like batting cages, tennis courts and indoor sports arenas) and just sent them my plans with the dimensions I needed. I wasn’t sure if they’d do such a small job but they were more than willing and had it done in less than a week.I love this bench and set up. Looks like a real attention to detail!
Where did you get shade cloth that size or did you have to custom make it for your space?