You are using an out of date browser. It may not display this or other websites correctly.
You should upgrade or use an alternative browser.
You should upgrade or use an alternative browser.
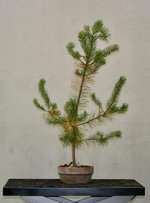
Scots pine - height reduction
- Thread starter Diggumsmack2
- Start date
Shogun610
Masterpiece
You may have been better suited to not have removed that top foliage , but any branches at a whorl where there is more than 2. Then using a thicker gauge aluminum wire to get a bend in the trunk.
Wires_Guy_wires
Imperial Masterpiece
Do it!
Young scots pines tend to want to bud on that trunk if you time the cut right. But it's no guarantee at all. Whatsoever.
Fun learning material though. And you can always cut back to those first branches if all else fails.
I would however, select less straight material in the future. I know they're hard to find, but they'll pay themselves back tenfold in the amount of pleasure you get from them.
Diggumsmack2
Yamadori
I should have included trunk diameter in the post. I will have to measure it. I know bending anything is possible, I just felt in this particular tree, the trunk was already thicker than I wanted to attempt doing any bends.You may have been better suited to not have removed that top foliage , but any branches at a whorl where there is more than 2. Then using a thicker gauge aluminum wire to get a bend in the trunk.
Diggumsmack2
Yamadori
Awesome.Do it!
Young scots pines tend to want to bud on that trunk if you time the cut right. But it's no guarantee at all. Whatsoever.
Fun learning material though. And you can always cut back to those first branches if all else fails.
I would however, select less straight material in the future. I know they're hard to find, but they'll pay themselves back tenfold in the amount of pleasure you get from them.
Yeah if you look closely at the photo, there are a handful of buds already near the ground level on the trunk. Thank-you
leatherback
The Treedeemer
This young one will bend easily. 2 strands of 5mm alu will probably do it.the trunk was already thicker than I wanted to attempt doing any bends
I would consider a very low chop and use the two bottom branches, buuut.. That depends on your development horizon. If less than 10 years, do not chop low.
JeffS73
Shohin
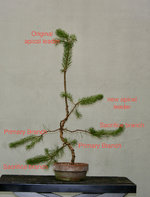
I'd keep the material above the purple line as sacrifice, and wire one branch below the purple line as my next trunk section and future sacrifice. Give it some more movement than the lower bit. Bear in mind when you repot, you can change the planting angle to add 'movement' to that first trunk section. In spring I would reduce the branches below purple line to the wired one and the tiny one. An heir and a spare. Keep the lowest branches for now.
I did exactly what you did with the top, cut it off, but you just took a 3L V8 and turned it into a vespa scooter for a year or two.
I did exactly what you did with the top, cut it off, but you just took a 3L V8 and turned it into a vespa scooter for a year or two.
Diggumsmack2
Yamadori
This young one will bend easily. 2 strands of 5mm alu will probably do it.
I would consider a very low chop and use the two bottom branches, buuut.. That depends on your development horizon. If less than 10 years, do not chop low.
Here is a photo with U.S. Quarter to gauge the size of the trunk at ground level. Not disagreeing with you, but maybe the night photo was deceiving.
Also, note the buds pushing out nice and low. Which gave me cause to want to go lower with the chopping lower than I already have.

leatherback
The Treedeemer
You're right. It is thinner than I thought!Here is a photo with U.S. Quarter to gauge the size of the trunk at ground level. Not disagreeing with you, but maybe the night photo was deceiving.
River's Edge
Masterpiece
I would allow the tree to respond to the most recent cut back. You can always make a further cut next year. two advantages to waiting.I already removed the material above the red line. After looking at what's left, I'd like to go further, to the purple line. Bad move? The tree has been undisturbed for 1 year in the current box and is very healthy. Any input?
View attachment 403849
1. you will have new opportunities with extra bud back visible during next growing season.
2. you will have additional foliage to continue the speed of development instead of slowing it down considerably more.
Keep in mind that the back budding is valuable for being able to select branch positioning on the trunk and wiring out for direction. Easier to deal with than original bar branches as in this case. The original branches may have their best use in providing additional apical sacrifice leaders or sacrifice branches.
One step I would take at this time is to wire two of the branches in the second whorl. One up for trunk continuation and taper, One down for possible first branch. I would also keep a third out to the side for sacrifice and thickening the base more. I would remove the other two branches. The lowest branch is best for the possible first branch. I cannot tell this from the picture which one. The highest branch in the whorl would be the better choice for future trunk line upwards. One in the middle is best for a possible sacrifice branch. ( easier to remove and hide the scar between the lower branch and upper branch.)
Keeping the third for a sacrifice branch is an option. Do so only if you think you can manage it without creating too much swelling and or inverse taper. In other words be sure to remove before it creates a problem. You do have the two lowest original branches for sacrifice to thicken the base.
Just some thoughts for your consideration.
Alain BERTRAND
Mame
Be careful to root rot if you further reduce it without repotting.
Potawatomi13
Imperial Masterpiece
Why not develop much bigger trunk first of all  ?
?
River's Edge
Masterpiece
The OP indicated that they already cut to the red line. So the best opportunity for that option left the train station with the first reduction, next option will be if another apical leader is selected and let grow for a few years to take the place of the first trunk. Then it will only work well once sufficient branching and foliage is re produced to replace the removed foliage that would have fuelled the growth of the trunk. That is why I suggested wiring up one branch for that purpose.Why not develop much bigger trunk first of all?
It can have a double benefit of developing a thicker trunk and introducing taper! Slower progress than initial trunk pushing thickness but taper is a great characteristic to add in development.
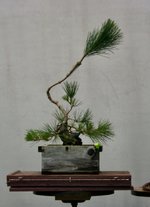
The faster method would have been to retain the top portion but wire off to the side, also wire a branch up to become a new apical leader while keep ing the original trunk out of the way of developing the lower design portion. Similar to the example below, a young JRP.
Attachments
Last edited:
Glaucus
Omono
Only trunk chop after you are satisfied with the trump thickness.
Reduce branches from a node to 2 to avoid spoke wheels that create reverse taper.
Direct growth energy into a sacrificial branch(es) while keeping the other branches short with needles close to the trunk.
Prune mid summer after a period of unlimited growth to induce backbudding.
Pluck needles to weaken the apex/branches that grow too strong.
River's Edge
Masterpiece
If one follows this rule they will have difficulty introducing taper to the trunk during development. Side sacrifice branches are not near as effective as changing apical leaders.Only trunk chop after you are satisfied with the trump thickness
Sometimes it is best to retain three for use as a new apical leader, sacrifice branch and a primary branch. One still needs to manage the growth to prevent creating a knuckle or reverse taper. One needs to remember that when the sacrifice is removed the shape will change and if there is sufficient space or height between branches on the whorl this is very doable.Reduce branches from a node to 2 to avoid spoke wheels that create reverse taper.
At other times it is best to retain one for a primary branch and just continue the trunk line.
The design should come first rather than the rule.
I have found the greatest response to occur if pruning just after new candles fully extend their needles during the first flush of the year! Pruning during late summer and early fall works as well. Combine with wiring out and down for even better back budding response. The key being the removal of auxin, allowing cytokinins to play a bigger role in growth.Prune mid summer after a period of unlimited growth to induce backbudding.
This can be sufficient at times, however in periods of strong growth it will be necessary to prune side branches on the apical leader to check the apical dominance and also prevent the lower portion of design development from being shaded out.Pluck needles to weaken the apex/branches that grow too strong.
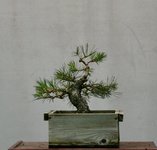
Case in point. Design for a smaller tree with thicker base and taper. This involves several trunk, apical leader chops over a number of years. Final trunk thickness is achieved after several steps, not just during the initial trunk as apical leader. The two pictures below are a sample of that approach during rough development.
Attachments
Glaucus
Omono
Ah, that method may give better but slower results. If you trunk chop, of course you are going to slow things down. And if you don't trunk chop, you need to use sacrificial branches. I agree that they will not fatten up as quickly as a sacrificial apex.
To me, after a trunk chop you will need quite some time for the new trunk to match the thickness of the old trunk, but with taper. And for the scar to heal. And then you probably need to do it a third time. So expecting the base of the trunk to fatten up more after you did a trunk chop is kind of counter-intuitive. But from your pictures, I wouldn't call that a true trunk chop. It is more like a more advanced hybrid technique by realizing the actual apex of your pine will very unlikely be the true apex. So you manage it's strength by considering both the future apex and the overall trunk taper.
And then if you use both, you need 3 instead of 2, true. Sacrificial apex, future apex, and branch.
Do Scot's pines have two growth flushes for you? I experimented with several pruning timings over a few years and with just a few trees. But I found that pruning off the new growth after it had some time properly hardened off to produce energy gave the best results. We don't have the longest summers here, so a late prune gives more backbuds but gives them less time to properly mature before the end of the growing season. Probably later in the summer, the pine has more sugars stored to respond more strongly to pruning. If you prune off candles while they are still soft but opened and elongated, the pine may have to backbud while still in an energy deficit. It will bud, but less on older wood.
Diggumsmack2
Yamadori
After reading all comments, I ultimately decided to leave it alone. So no further cut back was done. I really appreciate all the inputs.I would allow the tree to respond to the most recent cut back. You can always make a further cut next year. two advantages to waiting.
1. you will have new opportunities with extra bud back visible during next growing season.
2. you will have additional foliage to continue the speed of development instead of slowing it down considerably more.
Keep in mind that the back budding is valuable for being able to select branch positioning on the trunk and wiring out for direction. Easier to deal with than original bar branches as in this case. The original branches may have their best use in providing additional apical sacrifice leaders or sacrifice branches.
One step I would take at this time is to wire two of the branches in the second whorl. One up for trunk continuation and taper, One down for possible first branch. I would also keep a third out to the side for sacrifice and thickening the base more. I would remove the other two branches. The lowest branch is best for the possible first branch. I cannot tell this from the picture which one. The highest branch in the whorl would be the better choice for future trunk line upwards. One in the middle is best for a possible sacrifice branch. ( easier to remove and hide the scar between the lower branch and upper branch.)
Keeping the third for a sacrifice branch is an option. Do so only if you think you can manage it without creating too much swelling and or inverse taper. In other words be sure to remove before it creates a problem. You do have the two lowest original branches for sacrifice to thicken the base.
Just some thoughts for your consideration.
River's Edge
Masterpiece
Correct it is best to wait for them to stand out and harden off for best result.If you prune off candles while they are still soft but opened and elongated
After reading all comments, I ultimately decided to leave it alone. So no further cut back was done. I really appreciate all the inputs.
Hope you don't mind all the additional detail, often I add extra for others reading who may be considering a similar situation. Even if the original poster is going along a slightly different path.
Diggumsmack2
Yamadori
Absolutely not a problem. That's what I was asking for.Correct it is best to wait for them to stand out and harden off for best result.
Hope you don't mind all the additional detail, often I add extra for others reading who may be considering a similar situation. Even if the original poster is going along a slightly different path.
Here's were I left it off, just now need to deal with the whorls.


River's Edge
Masterpiece
So my thoughts on that.just now need to deal with the whorls
On the second whorl from the base with four branches, I would wire one up and one down, removing two others at this time. Leaving the rest of the tree the same for the next growing season. There will be plenty of time to make changes as the tree strengthens and develops.
Using the last picture I would remove the larger left branch, wire up the larger one on the right, then remove the smaller branch between the two that are left. The smaller branch on back left I would wire down. When selecting which branches to keep or remove keep in mind the desire to have branches 360 degree in the design. This means keeping an eye on the whorls above and below the one you are working on. Use this principle also when you are selecting buds to remove or retain for future design branches.
Next concept, when you are wiring consider not just direction ( up/down) but also movement ( side to side ). In the beginning one way is to make the first bend up or down depending on direction desired, next bend to one side, then a bend down and next a bend to the other side. Once you are in the habit of varying the movement you can also add flow with the degree of bends you make.
I am working from two dimensional picture so adjust the concept on the basis of what is actually in front of you. Your vision is the important one, pictures only tell part of the story. They can be very misleading.
Similar threads
- Replies
- 10
- Views
- 631


