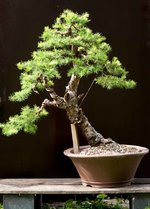
Photographers: Spill your guts here...

Forsoothe!

Imperial Masterpiece
Messages
6,878
Reaction score
9,291
Location
Michigan
USDA Zone
6b
Long, long ago I came across an article (elsewhere) that discussed beauty or handsomeness in people. They had set out to discover what physical traits made people physically attractive to other people. They showed pictures of people to test dummies and asked them to rate them. It turned out people who had "average" features were the most attractive. People with medium noses, eyes, heads, mouths, everything. People from different parts of the world have sort of predictable, prominent features and everyone liked what seems to be crosses between racial and ethnic types. Sort of the face that people say is familiar, "Do I know you? You look familiar." The article also discussed the fact that the camera does, indeed, lie. Like a rug. Slightly bigger features make for better looking faces in photographs, and that's where this thread starts.

I know we all have trees that are good looking in the flesh where you can see the depth of field that makes or breaks a "good" looking tree. Many of these trees photograph like crap. Unremarkable. Plain. Undeserving of a second look. All that in spite of being good or even great trees. We know that there is some science involved in how to make a tree look best and that's where you can help. Bits and pieces, or the whole enchilada. Say anything you want to help us ordinary dweebs.
 
Walter Pall consistently shows great photos of his trees. Some of his techniques:

1. Simple solid colored background.
2. Strong light on the tree, but not on the background.
3. Use both light and dark backgrounds to show different aspects of the tree.
4. Manipulate depth of field so that the tree is in sharp focus and the background is in soft focus.
 
A wider lens will separate the front and the back of the tree and give more depth. But will distort if taken too close. A telephoto will compress the front and back of the tree. A higher aperture (low f number) will give you that out of focus background (bokeh). A small aperture (High f number). Will give you a background area that is sharper. I would think that you should treat bonsai portraits like people portraits. f6 - f8 and a focal length of between 50 and 90mm. Have some distance between the tree and the background. At the higher end of the focal length you will need a large distance from the tree. If using a Black background have the tree in the sun and the Black sheet or board in the shade and expose for the tree. This will effectively black out the background. Use a reflector (anything White or shiny like a sheet or tin foil, some umbrellas have a silver shiny finish on the inside. And always use fill Flash. And lastly, have fun and experiment. This digital age is great, as you can't run out of film.
 
There is no secret to decent pictures. I did spill my guts not this years ago.
Good trees will look good on a decent picture.


20200906-R14A4114.jpg

Ensure plenty of light. This reduces blurring, and ensures good color. If you can, take a picture frm as far away as your camera allows without digital zooming in. Make sure the light comes from the side or front, not straight above of behind. Use a good dark black-drop (Or take pictures at night with a spot on your tree, and your background will turn dark.

If using a camera where you can play with exposure: Shorter exposures (Larger lens openings) reduce blurriness, but also decreases the depth of focus. I like to have shallow depth of focus where I can. To me, it increases the sense of depth in a tree.
 
The info above is based on a full frame camera. If you are using phone then concentrate on getting the light right using reflectors. It amazing what one or two well placed reflectors can do to a photo. And ignore the focal length info as there are so many sizes of sensor on cameras it will not be valid. But the best way is experimenting, but always expose for the tree. Thats what the spot meter is for on your camera or phone. Just point at the green leaves and then set that exposure. If anyone wants more info you can PM me. I'd be happy to help.
 
Not really. I use the same approach when using my cellphone.

Phone picture, but crappy light conditions:
View attachment 343185
Thats, good to know. I don't know much about camera sensors on phones. I assumed that Because an APS size sensor (found on alot of DSLRs) "effectively" gives you a longer focal length than a full frame sensor it would be the same with phone sensors. Maybe the manufacturers work to a standard focal length so as not to confuse the customers. That would make a change!!
 
One thing that is so important and it is simple, but an enigma to most folks is exposure compensation.

As you can see on my photographs a very dark or very light background makes wonders. So why is it that it looks so lousy when folks try it?Bbecause they don't undersea d that their super smart camera is really dumb like a brick, When you put it in front of a bonsai with black background it decides that the black is very dark and therefore the photograph must be exposed less to make it right. The result is a washed out bonsai that often cannot be reuscued. iI you take a very light background the camera decides that this is too light and makes the bonsai much darker. The result is a way too dark tree that looks lousy but you see it so often.

You have to be smarter than the camera. There is something in EVERY reasonable camera, even on your smart phone which is called

EXPOSURE COMPENSATION. You must get familiar with this. It is in the instructions - you bet.

I most of the time correct the automatic exposure by plus 0.7 with white backgrounds and minus 0.7 with black backgrounds. It makes a tremendous difference!!!
 
Last edited:
XPOSURE COMPENSATION. You must get familiar with this. Iit is in the instructions - you bet.

I correct the automatic exposure by plus 0.7 with white backgrounds and minus 0.7 with black backgrounds. It makes a tremendous difference!!!
very good point. Same here.
 
If you're using natural light - morning is best when the sun is low.

I also happen to have a large tree on the right (East) casting dappled sunlight - makes for a nice effect too.

The backdrop is rotated sufficiently that no sun falls on it - this shot shows the whole photo stand I made.

IMG_1322 by Jerry Norbury, on Flickr
 
This might be obvious, but don't set everything up then take your photos, then take everything down. Only to find that what you've looked at on the LCD in FULL SUNLIGHT looks totally different when you get inside and look on your computer. And depending on how much you want to learn the photography side of the hobby, learn about the histogram. This gives you an exact representation of your exposure. But not a lot of people want to get so involved and I understand that. All my photos on here have been taken with an iphone. Maybe in a few years when I have a half decent tree I will take some better shots.
 
This is going well. Thank You, contributors. I will be assembling bits and pieces here into a dot pdf file that I can keep on my phone for reference in the field. 😍
 
This is going well. Thank You, contributors. I will be assembling bits and pieces here into a dot pdf file that I can keep on my phone for reference in the field. 😍
If you are going to do the work and organize it into a pdf, why don't you just post it as a resource on BNut so others can benefit too? Think about it.
 
If you are going to do the work and organize it into a pdf, why don't you just post it as a resource on BNut so others can benefit too? Think about it.
You're reading my mind, but I wanted others to think about this as a tool. I have collected and/or made hundreds of pdf files out of all things imaginable from species ID charts to pH adjusting tables to garden chemical labels, Azalea catalogs, and my gingersnap cookie recipe so I can carry them on my phone. Everything I need to know is in my pocket. This is more and better than my original XT and fits in my pocket!
 
I feel that editing is where the image is made. As a result, this allows me to take pictures with an iPhone XS, no lighting equipment whatsoever, and simple black or white backgrounds, though I can change those colors at will. In the past, I have used 2x2 medium format film cameras (Rollei, and a Mamiya C330), a couple of Nikons (D70s and a D90) and a SONY, but for me, editing is prime. For editing, nothing really compares to Photoshop, in all its various forms. Here's a picture I did last week of my Chojubai White, in flower with my iPhone XS.

chojubai white shape shifter 12-1-20.jpg
 
Back
Top Bottom