You are using an out of date browser. It may not display this or other websites correctly.
You should upgrade or use an alternative browser.
You should upgrade or use an alternative browser.
parhamr contest entry thread
- Thread starter parhamr
- Start date
wireme
Masterpiece
Congrats on your program, however, I think you are going to wish you used the cutting method in the long run. It takes longer for them to develop but the results are better. Good luck...looking forward to see these develop.
But everyone is using the cutting method. With all these seedlings going on here it’s good to see some different methodology here and there for later comparison. I wonder how many trees in total this contest is producing? Pretty cool, twenty years from now there may be a whole bunch of really nice trees around entirely because of this contest.
parhamr
Omono
I’m aiming to show that strong lighting from seed will produce good enough lower growth. I’d like to minimize my labor and the complexity of this operation at large.
parhamr
Omono
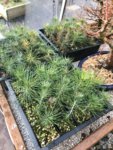
My indoor trees show compact growth, enthusiastic adventitious buds, and strong extension of mature needles:

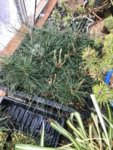
My outdoor trees show extending, juvenile growth and a slower, less vigorous extension of mature needles:

Our weather has been a bit mixed. Warm and sunny days have occurred, but overnight lows have dipped into the mid-40s for a while.

My outdoor trees show extending, juvenile growth and a slower, less vigorous extension of mature needles:

Our weather has been a bit mixed. Warm and sunny days have occurred, but overnight lows have dipped into the mid-40s for a while.
namnhi
Masterpiece
You are ahead of the game compare to mine.My indoor trees show compact growth, enthusiastic adventitious buds, and strong extension of mature needles:
View attachment 196278
My outdoor trees show extending, juvenile growth and a slower, less vigorous extension of mature needles:
View attachment 196279
Our weather has been a bit mixed. Warm and sunny days have occurred, but overnight lows have dipped into the mid-40s for a while.
parhamr
Omono
Fonz
Chumono
Those are some big boys already.
Anthony
Imperial Masterpiece
Great Results !
If you don't mind, what is your fertiliser programme like ?
Good Day
Anthony
If you don't mind, what is your fertiliser programme like ?
Good Day
Anthony
parhamr
Omono
@Anthony outdoors I use a granular organic 5-4-4 product that includes mycorrhiza and additional macro- and micro-nutrients. Its primary ingredients are cottonseed meal, bonemeal, bloodmeal, and guano. I apply moderate amounts (1 tbsp each pot) every 4 weeks. This smells real bad when it rots.
Indoors I use a low-smell liquid synthetic. I just ran out of a 7-8-6 blend and have switched to a 3-2-4 product. I eyeball this mixture at a rate of about 1 oz to 30 ounces of water, which is about twice the labeled strength. I try to apply this once a week or every other week.
Indoors I use a low-smell liquid synthetic. I just ran out of a 7-8-6 blend and have switched to a 3-2-4 product. I eyeball this mixture at a rate of about 1 oz to 30 ounces of water, which is about twice the labeled strength. I try to apply this once a week or every other week.
parhamr
Omono
In mid August I will finally have enough outdoor space to transition the whole lot to full sun. I’m a bit worried about the possibility for sun scald but I am confident I’ll find a workable solution.
parhamr
Omono
August went well. I moved houses on the 3rd and my yard has more sun and space than before. (Full sun from 8 am to 5 pm right now.)
All of my trees are now outdoors and none of them had issues adapting to 90°F days under clear skies.
Tray of fully-outdoor seedlings:

An outdoor seedlings showing decent bud development:


Tray of started-indoors seedlings:

Bud development on a strong specimen of the started-indoors crop:


The widest started-indoors seedling:

The tallest started-indoors seedling: (the odd brown stuff around the whorl is organic fertilizer)

The tallest started-outdoors seedling:

An interesting and promising started-outdoors seedling:

Current summary:
All of my trees are now outdoors and none of them had issues adapting to 90°F days under clear skies.
Tray of fully-outdoor seedlings:

An outdoor seedlings showing decent bud development:


Tray of started-indoors seedlings:

Bud development on a strong specimen of the started-indoors crop:


The widest started-indoors seedling:

The tallest started-indoors seedling: (the odd brown stuff around the whorl is organic fertilizer)

The tallest started-outdoors seedling:

An interesting and promising started-outdoors seedling:

Current summary:
- Zero casualties
- The thickest trunk is 7/32" or about 5.5mm (indoor-started tree)
- The tallest tree is 9" above the soil line (outdoor-started, slightly larger pot)
- Many seedlings have branches 1.5" above the soil line
- I estimate many have about 1" of soil covering the nebari on most
- My monthly organic granular 5-4-4 fertilizing continues
my nellie
Masterpiece
parhamr
Omono
River's Edge
Masterpiece
My suggestion would be to consider overwatering, on the basis that the needles are showing signs of yellowing from the base out and there is pronounced needle browning and drop in the basal area. This is common to young pines without mature root formation. Particularly as the cooler, damper weather begins and they require less than earlier in the season. Also i do not observe any banding that might indicate another common fungal issue of needlecast.One tray has turned an off color. From my reading this is either fungal or dehydration. (I’m guessing fungal)
View attachment 216022
All other trays appear normal.
Simple test would be to back off on the watering and see if the color improves over the next few weeks. I am not ruling out or disagreeing with your suggestion above, just noting what has occurred to me in the past.
Wires_Guy_wires
Imperial Masterpiece
Here too the yellows are from overwatering or lack of air, which go hand in hand. I burned a few holes in the sides of the pots to increase airflow and drainage, that seems to work.
parhamr
Omono
I’ve propped up all of my Anderson flats to ensure better air circulation underneath them.
River's Edge
Masterpiece
That's a real good move. One little trick that i have used is to wire chopsticks or wooden feet on the bottom of the anderson flat before use! This gives them some airflow when using the flats for seed trays. When i use them for larger trees i nest one in the other. The lower one has holes drilled in the sides all around the outer circumference about 1/2 inch up from the bottom. This allows the inner tray to rest up higher drain freely and the bottom tray has side holes to allow evaporation and gas exchange. I use a 1/4 inch bit for holes in the plastic sides of the lower tray. This collected Shimpaku is potted up in the fashion described above. The third little trick i use is to always try to set Anderson flats on a porous surface such as gravel, large wood chips or slatted bench surface.I’ve propped up all of my Anderson flats to ensure better air circulation underneath them.
As Wire-Guys-Wire noted the extra holes in the side of the containers help. I do this when using yogurt containers for seedlings.
Attachments
parhamr
Omono
Mine all went that purple colour as well, it seems to be a reaction to cold weather after some research. I knew Cryptomeria and Junipers did this but have't seen it on mature pines, maybe it's a seedling-pine thing?!
I'll know for sure when the weather warms up!
I'll know for sure when the weather warms up!
parhamr
Omono
Tonight I’ve transplanted five seedlings into 11" colanders. The soil is mostly pumice and lava with some odd akadama. I happen to have a large bin of it sifted right now.


This was a control group in which I’m doing minimal root work. I separated the roots out by hand, spread them flat across a 2" bed of soil, and then top dressed to ensure they’re set into place.
I think I’ll soon apply a top dressing of ground sphagnum, as it was clear the seedlings struggled to use the top inch or two of soil as root space.
With future groups of experiments I’ll be trimming varying amounts of the tap root and adding movement with wire.
Similar threads
- Replies
- 7
- Views
- 1K
- Replies
- 2
- Views
- 185
- Replies
- 2
- Views
- 235
D


