How do you repot an established forest and add trees?

cishepard

Shohin
Messages
375
Reaction score
780
Location
Nanaimo, BC, Canada
USDA Zone
8
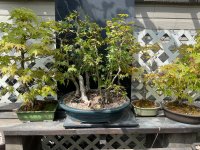
I have an acer palmatum forest that is in need of a repot next Spring and I would like to use a larger pot and add 3 more trees to the grouping (one existing tree died over the winter and will be removed).
I have read that one technique for repotting a forest it to keep the rootball intact, trim and repot as if it were a single tree. But if I want to add trees and make the spacing artistic (ie, some trees quite close together), would I try to tease out individual trees or clumps, to fit in the new ones? Essentially separating all the trees and starting from scratch? Or maybe just cut the root ball into sections and reposition?

Would appreciate some guidance, please.
The forest with the 3 trees to either side that will be added. They will be going into another, bigger, oval pot:

image.jpg
 
Never done it my self but I was at a work shop and watched a repot of a huge trident maple forest. He added trees very simply by just cutting an appropriate size hole in the root mass and place a tree. The trees he added had very small amounts of roots so they could fit easily.
 
Here’s what Bjorn does
I’m a little confused with some of the things he’s doing. It seems like the trees were planted in a mostly organic mix - is that because it’s on a slab? Then he trims some rootballs and fills in the gaps with, maybe pumice? He doesn’t add any trees, but maybe he re-positioned the ones he worked on - it was hard to detect much change. Was he only repotting 1/3 of the forest at a time for some reason, or was the video just to show how to make slight changes?

I think I could easily follow this technique to create “holes’ for my new trees to fit, plus reposition some of the old ones. Thank you for the link @WNC Bonsai : )
 
Never done it my self but I was at a work shop and watched a repot of a huge trident maple forest. He added trees very simply by just cutting an appropriate size hole in the root mass and place a tree. The trees he added had very small amounts of roots so they could fit easily.
I would love to see a video of that workshop!
 
@WNC Bonsai : )
[/QUOTE]

Bjorn had originally completed a moss buildup to form the “side walls” of the forest

….Layers of horizontal and vertical long fiber sphagnum moss with bonsai media interspersed between the fibers and chop sticked in.

So lots of organic material to hold everything together. De rigour for slabs and other free form potting.

The trees were moved around. Pretty much shows the normal process.

This was a fairly simple deconstruction compared to some where the entire forest needs to taken down to 1’s, 2’s and 3’s. These are technically difficult, somewhat challenging for larger compositions… mainly due to fastening the entire forest together piece by pieces.

Sorta like Humpty Dumpty all over again 😉

Here are the before and after images. One can see the spacing is cleaner now.

IMG_3641.jpeg
IMG_3643.jpeg
 
Last edited:
Normal repot for a group is treat the entire group as a single tree- cut around the perimeter and maybe 1/3 off the bottom of the root ball then repot with fresh mix.

It is always possible to separate individual trees from a group. You may need to cut some substantial roots as the roots will be very well entwined.
Renovation often only requires the group to be separated into sections with several trunks in each section so less invasive than separating every trunk. You can see that procedure in the video.
Depending where the new trees need to go you might be able to chop enough roots out of the existing group to insert your new trunk(s) but the trees either side appear substantial. If they are to go into that group I suspect you'll need more than just a couple of small holes. Need to work out roughly where the new trees will fit and whether repositioning or turning any of the existing trunks is required to give a better result. Then plan where to make the cuts to separate clusters or individual trees to achieve the result you want.

I’m a little confused with some of the things he’s doing. It seems like the trees were planted in a mostly organic mix - is that because it’s on a slab? Then he trims some rootballs and fills in the gaps with, maybe pumice? He doesn’t add any trees, but maybe he re-positioned the ones he worked on - it was hard to detect much change. Was he only repotting 1/3 of the forest at a time for some reason, or was the video just to show how to make slight changes?
Not repotting just 1/3 of the forest. The video shows repositioning the other 3 trunks at the right a little further to the back and moving another tree from the rear to the front. Sometimes small changes can make a big difference in how we see a bonsai. He also adds a new tree into the back of the group. You can see the beginning of root pruning a pot shaped root ball but the film misses the part where a new hole is created in the rear of the group planting for that tree to fit in.
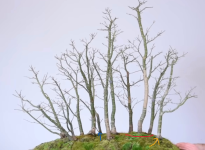
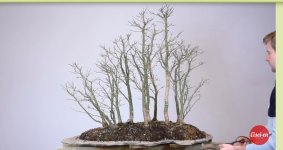
Here I've marked the changes in the photos above.
bjorn 3.png
bjorn4.png
Blue arrow shows the new tree inserted at the back.
Orange shows the tree that was moved from rear to front.
Red marks the group of 3 trunks that was turned and moved a little to the rear.
Not huge changes. The space seen between trunks through to the distance has moved from dead centre to centre right. Trees at right that were almost behind another is now fully visible. (not sure that's an improvement?)

Not sure if the original soil is organic or whether it has just decomposed enough to appear that way. Fertiliser, decomposing roots and leaves and even airborne dust seems to add organics to any mix over time. It may also be that he's taking the opportunity to slowly change soil from an original organic mix to more inorganic.
Trees on rock slabs definitely dry out way more than similar trees in well fired pots. I've found it much better to use a higher organic mix when planting with rocks of any sort.
 
Thanks @Shibui and @Deep Sea Diver for the explanations - much clearer now what Bjorn was doing. Though, his resulting spacing seems more uniform and I agree - is that an improvement? It probably looks different/better in person. Something I want to change in my forest is to clump the trees in a more natural manner. Right now they are too much in just a ring around the pot.
I’m really looking forward to working on this repot in Spring!
 
Something I want to change in my forest is to clump the trees in a more natural manner. Right now they are too much in just a ring around the pot.
This is something that we see in many first attempts at group planting. Something in human brain makes us space trees evenly, like a park. It takes real awareness and concentration to be able to place trees in a group at uneven, natural looking spacing. I've had to rework most of my original plantings for exactly this reason.

It can help to grow trees together in pairs and 3s for a few years before assembling the group. I saw one grower purchase a couple of clump style tridents as the main trees in a group planting for exactly this reason.

Good luck with the forest renovation. Look forward to photos in Spring.
 
Yep. Looking at a 2D image is not the same as reality. Part of the disconnect is a perspective issue. When one realizes the distances front to back are compressed in 2D to look like they are in the same plane

Over time the trunks will thicken, angles will subtlety change and the forest will look more and more pleasing. Also equal spaces can feel ‘right’ too as mentioned earlier.

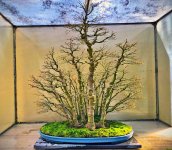
Planting single trees can give false impressions. When trees are clumped together the shadows and light bounce around and give an impression of depth. Here’s an extreme example of this.

Japanese Maple Forest.jpegJapanese Maple Forest.jpeg
Japanese Maple Forest.jpeg
As a side note. That said, actually not sure what ‘natural looks like’. In my experience it’s a personal construct based upon one’s experience with…. mainly with disturbed environments nowadays as folks rarely see actually undisturbed natural environments. I’ve hiked in a number old growth forests where aged trees are seemly equally spaced for miles …as if planted by the some ancient forester… one after another… also seen when hiking in Arizona where the Saguaro’s are lined up similarly. 😉

Cheers
DSD sends
 
It is interesting that both Bjorn’s forest (somewhat) and especially this one has the thickest, tallest trees front and center. My inclination has been to put those in the back, so one can see the smaller trees better, but I understand the perspective they are going for. I think I need to spend the rest of this year studying pictures of forests before tackling my own!
 
the thickest, tallest trees front and center.
Thickest and tallest tree (#1 tree) is typically the focus and front of a forest. But I have seen the rule broken to really cool effect. Someone on this forum did a bald cypress forest with the "#1 tree" on the edge of the planting and it gave it a really cool natural feeling, like looking past a nearby tree into the woods. But I digress, don't mean to side track
 
Thickest and tallest tree (#1 tree) is typically the focus and front of a forest. But I have seen the rule broken to really cool effect. Someone on this forum did a bald cypress forest with the "#1 tree" on the edge of the planting and it gave it a really cool natural feeling, like looking past a nearby tree into the woods. But I digress, don't mean to side track
If you remember which thread that is in, could you please post it? An intriguing idea …
 
The tallest towards the front and tallest toward the back are two established ways of creating forests. These are more formally called “Near view” and “Distant view”.

Looking back in old Bonsai and Penzing books one can see both types of these forests. Each are equally valid interpretations..

However on this side of the pond, at least in recent years, the near view seems to be all the rage.

Sometimes this view brings a fleeting image from the edge of a clear cut forest. Nevertheless each are equally valid,

Cheers
DSD sends
 
Larger trees in front gives perspective IMHO. Close trees appear quite large while those off in the distance appear much smaller. Planting your forest this way forces the viewer to perceive a much larger forest with rear trees way off in the distance. Not sure the large trees in front is depicting the edge of a clear cut though. Even in the middle of a forest we only see the trees in front of us - big ones close by and tapering off into (apparently) smaller trees way off in the distance and to either side. We can't see the trees behind us until we turn then that's a whole new view of the forest.

I'm definitely a large trees toward the front group planter.
 
Good thing about bonsai styling and composition… everyone has their own (I hope 😉) opinions and it’s a good thing, otherwise all we’d see is cookie cutter versions of the same designs!

Since we are discussing forests, have attached two short articles, one by Bill V and and excerpt of Man Lung Penjing (note read in Chinese order) for folks to check out. There are two others, one by Saburo Kato and the other by his son Hotsuji Kato, that were too large for the filter here. If anyone desires to see these two, please PM me.

Cheers
DSD sends
 

Attachments

I would love to read these articles but can’t seem to open them on my ipad- see screenshot below.
I’ll send you a pm and if you could email me all four articles, I would greatly appreciate it! Thank you!

IMG_0314.jpeg
 
Hmm…. Looks like somehow these files were going to the wallet?

Just checked these on an iPad. Both will download correctly.

Cheecrs
DSD sends
 
Thanks!

I heard Carmen is doing an awesome job out there. Gotta get there if I ever get the inclination to travel ‘cross the Mississippi again.

Cheers
DSD sends
 
Back
Top Bottom