You are using an out of date browser. It may not display this or other websites correctly.
You should upgrade or use an alternative browser.
You should upgrade or use an alternative browser.
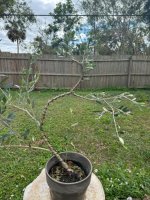
European olive. Keep it or trim it?
- Thread starter Barbells and bonsai
- Start date

JoeR
Masterpiece
Leave it, even if you end up hating it in the future the wound would be easy to heal. I would definitely go ahead and give the whole plant (barring the new shoot) a strong wiring and pruning soon. It's young enough now that you can create great movement, but too much longer and results will not be very good. I'd use two wires spaced evenly apart to prevent cracking and really twist it up. Pruning it would give you more branch options as well, a healthy olive can take quite a beating. Let me know if you need any more guidance.
Barbells and bonsai
Mame
Thank you! Glad I asked, life’s been crazy and although I’ve been maintaining watering I haven’t pruned beyond eliminating knuckles partially out of not being sure if I’d harm it.Leave it, even if you end up hating it in the future the wound would be easy to heal. I would definitely go ahead and give the whole plant (barring the new shoot) a strong wiring and pruning soon. It's young enough now that you can create great movement, but too much longer and results will not be very good. I'd use two wires spaced evenly apart to prevent cracking and really twist it up. Pruning it would give you more branch options as well, a healthy olive can take quite a beating. Let me know if you need any more guidance.
I looked around online and saw an examples of major twisted trunks like the first picture.
I think this tree lends itself to more of the style in the 2nd picture but would really appreciate any styling advice you have. Maybe I am underestimating the changes I can make.
Attachments


Cadillactaste
Neagari Gal
It definitely can use a lower branch on that trunkline. Keep it. It needs some movement. Make sure you've your chosen front set. Then work toward a goal with wiring.
Best of luck to ya.
Best of luck to ya.
JoeR
Masterpiece
You are definitely underestimating the changes you can make, but hey, that's a huge part of the journey that you'll learn over time. It took me probably 4 or 5 years to get bold enough to make the styling choices necessary to really elevate a tree. But i was 12 when i started, 24 now, so alot of that is just being super young, youll learn faster. Olives are resilient though so it's a great species to learn on.Thank you! Glad I asked, life’s been crazy and although I’ve been maintaining watering I haven’t pruned beyond eliminating knuckles partially out of not being sure if I’d harm it.
I looked around online and saw an examples of major twisted trunks like the first picture.
I think this tree lends itself to more of the style in the 2nd picture but would really appreciate any styling advice you have. Maybe I am underestimating the changes I can make.
On a tree this young, really the purpose of pruning would be to remove the terminal buds. Not styling. Terminal buds are at the tip of growing branches. They sort of "soak up" the energy, and like a train, pull all the energy to the top of the tree. Trees in nature want to grow as tall as they can, as fast as they can, because they compete for light. We want the opposite. If we remove the strong terminal buds, it activates the axillary buds that are at the base of leaves all down the tree. Doing this will create more branching options to work with.
When you are too cautious with a tree, you end up not pruning it back far enough to create well placed branches. Keep in mind, the buds closest to the branch tip are the ones that are most likely to activate
As far as styling, it's really just a part of the creative process you learn from trial & error, and copying pictures like you posted. It is young enough you could do something like the first picture. You basically have to learn how to see the future and what the steps you need to take to get there are. Best part IMO. I think I have a picture of a kinzu where you can see this process hang on
I'll trade you a tree virtual for your shoulder routine lol
Last edited:
JoeR
Masterpiece


Cadillactaste
Neagari Gal
Spend time studying the images on the species. Then save them. Look over each one, and note what it is about the image you like.Thank you! Glad I asked, life’s been crazy and although I’ve been maintaining watering I haven’t pruned beyond eliminating knuckles partially out of not being sure if I’d harm it.
I looked around online and saw an examples of major twisted trunks like the first picture.
I think this tree lends itself to more of the style in the 2nd picture but would really appreciate any styling advice you have. Maybe I am underestimating the changes I can make.
I've 3 olives... I can't say if you'll get crazy movement in your tree. Once they are lignified ... they snap. I brought in one I intend to cascade. Many branches are very flexible. One was not as forgiving. I'm not sure of my front until repot. So I only wired the one I feel...will not budge come next year. Subtle movements... might be the direction you need to go. Your flexibility in the branches... will give you an idea of what to look for ...
Barbells and bonsai
Mame
Thank you! I brought the tree in after watering earlier and am going to work on it today.You are definitely underestimating the changes you can make, but hey, that's a huge part of the journey that you'll learn over time. It took me probably 4 or 5 years to get bold enough to make the styling choices necessary to really elevate a tree. But i was 12 when i started, 24 now, so alot of that is just being super young, youll learn faster. Olives are resilient though so it's a great species to learn on.
On a tree this young, really the purpose of pruning would be to remove the terminal buds. Not styling. Terminal buds are at the tip of growing branches. They sort of "soak up" the energy, and like a train, pull all the energy to the top of the tree. Trees in nature want to grow as tall as they can, as fast as they can, because they compete for light. We want the opposite. If we remove the strong terminal buds, it activates the axillary buds that are at the base of leaves all down the tree. Doing this will create more branching options to work with.
When you are too cautious with a tree, you end up not pruning it back far enough to create well placed branches. Keep in mind, the buds closest to the branch tip are the ones that are most likely to activate
As far as styling, it's really just a part of the creative process you learn from trial & error, and copying pictures like you posted. It is young enough you could do something like the first picture. You basically have to learn how to see the future and what the steps you need to take to get there are. Best part IMO. I think I have a picture of a kinzu where you can see this process hang on
I'll trade you a tree virtual for your shoulder routine lol
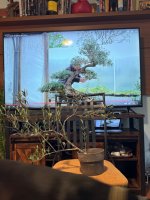
Watching videos now on terminal bud trimming and going to start there. I really like this one and would like to create a similar S curve, wondering if I can make that kind of bend without breaking a branch as @Cadillactaste talked about.
Is this within the realm of current possibilities in either of your opinion?
@JoeR Sent over the shoulder routine as a message

Attachments

Cadillactaste
Neagari Gal
I don't work trees once watered to style. I wait until the water is absorbed.Thank you! I brought the tree in after watering earlier and am going to work on it today.
Watching videos now on terminal bud trimming and going to start there. I really like this one and would like to create a similar S curve, wondering if I can make that kind of bend without breaking a branch as @Cadillactaste talked about.
Is this within the realm of current possibilities in either of your opinion?
@JoeR Sent over the shoulder routine as a message
Barbells and bonsai
Mame
I saw this after I had worked mineI don't work trees once watered to style. I wait until the water is absorbed.

Barbells and bonsai
Mame
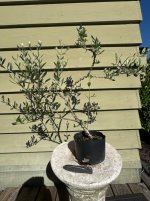
End result for the day. I did snap one branch, not sure if it will survive but I tried to pinch it back together.
Either I killed it or made it cooler, guess we’ll see. Will post updates so other Beans can learn at my possible expense.
Either I killed it or made it cooler, guess we’ll see. Will post updates so other Beans can learn at my possible expense.
Attachments


WIlliam_Butler_Yeets
Mame
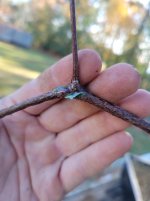
careful there, looks like you might have some wires crossing over each other in the middle section, that's to be avoidedEnd result for the day. I did snap one branch, not sure if it will survive but I tried to pinch it back together.
Either I killed it or made it cooler, guess we’ll see. Will post updates so other Beans can learn at my possible expense.
Barbells and bonsai
Mame
Definitely crossed some wires. In the future I’ll lay the thicker wire down firstcareful there, looks like you might have some wires crossing over each other in the middle section, that's to be avoided
JoeR
Masterpiece
I think you did a good job of mimicking what you put up on the screen, given the softness of the bends this would be best grown out into a larger bonsai or as a literati style. As it is now, anyway.
I see you snapped the branch. In order to give the tree the best chance at healing, I would immediately apply wood glue, electrical tape, cut paste, anything to completely seal off the wound from air. If done soon enough I bet it will heal just fine.
While the branches may have simply been too lignant or woody to shape as much as you wanted, the main reason your branch broke is because:
1) your coils are spaced too close together (they must be close to 45 degrees)
2) you didn't space the two wires out evenly between each other (and crossed wires too) see above
3) the wire wasn't "behind" the bend; it has to be on the outside of the elbow in order to support it.
See the website below to see what I mean about 45 degree coils, it is critical to nail that part down first when learning to wire. Wires are only strong and effective if done correctly. The purpose of two evenly spaced wires here would be to support as much surface area of the branches as possible to prevent cracking. Your wires provided little actual strength being that close together!
Does that make sense?
 bonsaitoday.com
Super appreciate the DM I'm about to check it out
I see you snapped the branch. In order to give the tree the best chance at healing, I would immediately apply wood glue, electrical tape, cut paste, anything to completely seal off the wound from air. If done soon enough I bet it will heal just fine.
While the branches may have simply been too lignant or woody to shape as much as you wanted, the main reason your branch broke is because:
1) your coils are spaced too close together (they must be close to 45 degrees)
2) you didn't space the two wires out evenly between each other (and crossed wires too) see above
3) the wire wasn't "behind" the bend; it has to be on the outside of the elbow in order to support it.
See the website below to see what I mean about 45 degree coils, it is critical to nail that part down first when learning to wire. Wires are only strong and effective if done correctly. The purpose of two evenly spaced wires here would be to support as much surface area of the branches as possible to prevent cracking. Your wires provided little actual strength being that close together!
Does that make sense?
Wiring – Bonsai Today
This is a technique that’s impossible to avoid. You are kidding yourself if you believe that you can create a bonsai by pruning alone...
Super appreciate the DM I'm about to check it out
Barbells and bonsai
Mame
This was a great guide. I have a mirai live account and have seen his wiring guide so knew the olive job was far from professional.I think you did a good job of mimicking what you put up on the screen, given the softness of the bends this would be best grown out into a larger bonsai or as a literati style. As it is now, anyway.
I see you snapped the branch. In order to give the tree the best chance at healing, I would immediately apply wood glue, electrical tape, cut paste, anything to completely seal off the wound from air. If done soon enough I bet it will heal just fine.
While the branches may have simply been too lignant or woody to shape as much as you wanted, the main reason your branch broke is because:
1) your coils are spaced too close together (they must be close to 45 degrees)
2) you didn't space the two wires out evenly between each other (and crossed wires too) see above
3) the wire wasn't "behind" the bend; it has to be on the outside of the elbow in order to support it.
See the website below to see what I mean about 45 degree coils, it is critical to nail that part down first when learning to wire. Wires are only strong and effective if done correctly. The purpose of two evenly spaced wires here would be to support as much surface area of the branches as possible to prevent cracking. Your wires provided little actual strength being that close together!
Does that make sense?
Wiring – Bonsai Today
This is a technique that’s impossible to avoid. You are kidding yourself if you believe that you can create a bonsai by pruning alone...
Super appreciate the DM I'm about to check it out
That being said, I’ve started to get the feeling that although I’m confident I can keep trees healthy, I haven’t pushed them towards bonsai design enough to make it difficult. I was basically just growing trees which is surprisingly fun but not what I’m in this for directly.
So, amidst all of my other projects I decided it’s time to start using my material. I’m sure there will be some casualties along the way but at this point my goal is to start doing and not stress about perfection.
Update on tree health following my brutal subjugation-Surprisingly the tree seems fine. This is after a windstorm that knocked it off a pedestal I had it on and broke the outer pot. Dudes a little tank. New buds emerging from the tip of the branch that broke and all leaves stayed normal condition.
Attachments
JoeR
Masterpiece
That's awesome!This was a great guide. I have a mirai live account and have seen his wiring guide so knew the olive job was far from professional.
That being said, I’ve started to get the feeling that although I’m confident I can keep trees healthy, I haven’t pushed them towards bonsai design enough to make it difficult. I was basically just growing trees which is surprisingly fun but not what I’m in this for directly.
So, amidst all of my other projects I decided it’s time to start using my material. I’m sure there will be some casualties along the way but at this point my goal is to start doing and not stress about perfection.
Update on tree health following my brutal subjugation-Surprisingly the tree seems fine. This is after a windstorm that knocked it off a pedestal I had it on and broke the outer pot. Dudes a little tank. New buds emerging from the tip of the branch that broke and all leaves stayed normal condition.
You'll go through swings. I get busy and often go months not getting to work on my trees, thankfully they do their thing. Progress will just be a little slower
I don't know if I'll ever stop stressing about perfection with the trees, maybe that's good maybe that's bad lol.
For future reference, here is what happens when you snap a branch and immediately apply wood glue. This is a paper bark maple, which, as it turns out- snap at the absolute slightest strain. Little wire scarring, and sort of ugly wounds as of now, but I am positive as it grows out it will be just fine. Tree pouted but is perfectly fine now.
Notice too- where it snapped? The wire was not at the outside of the "elbow" because the branches were in the way. Had wire been there, maybe the snap would be less severe
Attachments

19Mateo83
Masterpiece
I too have an olive I really don’t have a plan for it yet except to let it grow and thicken up. I like the direction you are going with yours, should make a sweet tree in the future…. Also, nice leek! Those are the best knives ever!This was a great guide. I have a mirai live account and have seen his wiring guide so knew the olive job was far from professional.
That being said, I’ve started to get the feeling that although I’m confident I can keep trees healthy, I haven’t pushed them towards bonsai design enough to make it difficult. I was basically just growing trees which is surprisingly fun but not what I’m in this for directly.
So, amidst all of my other projects I decided it’s time to start using my material. I’m sure there will be some casualties along the way but at this point my goal is to start doing and not stress about perfection.
Update on tree health following my brutal subjugation-Surprisingly the tree seems fine. This is after a windstorm that knocked it off a pedestal I had it on and broke the outer pot. Dudes a little tank. New buds emerging from the tip of the branch that broke and all leaves stayed normal condition.
Similar threads
- Replies
- 11
- Views
- 1K
- Replies
- 20
- Views
- 3K
- Replies
- 3
- Views
- 1K