Epos' Japanese Maples

Just to make sure you have the concept of airlayering down..

Roots form ABOVE the area where the bark is removed. So the bark above the cut area needs to be kept humid. THe main reason for keeping the section where the bark and cambium have been removed humid is to ensure the wood does not dry out while the layer is forming roots. The area that you have removed bark from is WAY more than needed and only increases risk of infections, drying out etcetc.

1751542014727.png

If I see this, I am concerned that you have the moss fairly low compared to where it is most needed.
1751542062446.jpeg
 
Just to make sure you have the concept of airlayering down..

Roots form ABOVE the area where the bark is removed. So the bark above the cut area needs to be kept humid.

Thanks! Yeah, I did the first two (big) air layers after watching some YouTube videos which recommended a 4" length of bark. I've since learned that's way overkill. I did know the roots would form above the cut, so I made sure to stuff extra sphagnum moss around the bark above the cut before wrapping it up.

The leaves above one of my smaller air layers had all dried up and disintegrated to the touch, so I cut that one off. Like the one I broke off on accident the other day, it too has formed a callus above the cut, but no roots yet. I trimmed it back to about 8" and stuck it in the covered bucket with the other one. It has no leaves, so I don't have high hopes for it.

These smaller ones were mostly for experimenting, so I'm not worried if some don't make it. Still have five or so of the smaller ones left on the tree, in addition to the two big ones.
 
The two Shindeshojo air layers I put in a bucket with coco coir and perlite have sprouted some new growth! They don't have any roots yet, but hopefully that will come next.

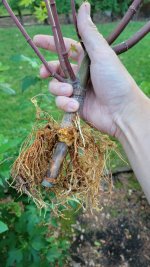
I also removed another small Shindeshojo air layer from the tree today as its leaves were drying like the one a few weeks ago. Great news, it has roots! They're still small and need to time to develop before planting, so I'm trying to figure out the best way to do that. Maybe a small pot with some sphagnum moss and and some diluted liquid nutrients, and moved inside during the hottest part of the day.
 
I also removed another small Shindeshojo air layer from the tree today as its leaves were drying like the one a few weeks ago. Great news, it has roots! They're still small and need to time to develop before planting, so I'm trying to figure out the best way to do that. Maybe a small pot with some sphagnum moss and and some diluted liquid nutrients, and moved inside during the hottest part of the day.
I have 2 airlayers removed from my tree because.. well, just because to be honest (I was separating airlayers and I wanted these two gone too so I could continue with the stockplant). Those two had no roots. I am treating them as large cuttings. Removed the leaves and planted in a pot, sheltered position out of wind and sun. But.. We have a weather swap and it is a nice 20c with rain at the moment, so perfect for keeping these alive a few more weeks in the hope of getting some roots.

For next time, just leave them on longer of you feel they do not have sufficient roots to make it.
For your cuttings: Consider just leaving them alone in the cutting tray till spring.
 
For next time, just leave them on longer of you feel they do not have sufficient roots to make it.

One of them I broke off by accident, and the other two were struggling with all their leaves dead and crispy. I think they'd stopped getting sufficient water from the roots. They were in pretty direct sun as they were some of the top branches, so I decided to remove them while they still had some life in them. The rest of my air layers, the ones showing no signs of deterioration, are all still on the tree :)
 
I placed the air layer with roots in a shallow saucer, filled around the roots with damp sphagnum moss, then wrapped in plastic.

Planning to leave it inside for a week or so, then check in on the roots.

20250729_130200.jpg
 
I placed the air layer with roots in a shallow saucer, filled around the roots with damp sphagnum moss, then wrapped in plastic.

Planning to leave it inside for a week or so, then check in on the roots.

View attachment 608187
I'd be interested to see if you're little contraption work's well. I have two shishgashria maples I'm airlayering one has a fare amount of roots the other just callused over so I recut the callus took off the clear airlayer ball and fitted a larger pot of substrate over the cut site. I'm hopeful roots will be present before fall get rolling around because it's a little too cold in Ohio to overwinter an airlayer and the tree is to massive to put in my greenhouse.
 
The five or so small air layers still on the Shindeshojo seem to be ready! I removed two today, and they have nice root growth considering the small cups I used for the air layers.

I trimmed them to remove about 2/3 of the leaves and stuck them in some water. Tomorrow I'll plant them in fabric pots to spend the next year or so beefing up. Planning on sticking them in a shady spot and moving inside during any extreme heat for the first month or so while the roots develop.

20250806_194821.jpg20250806_195352.jpg20250806_195402.jpg20250806_195522.jpg20250806_200155.jpg20250806_200251.jpg
 
I removed the last three of the small air layers today. Two had nice roots, one had dried out leaves with no roots, though the moss was still damp. Stuck that one in the humidity bucket.

I also planted the two I removed yesterday in fabric pots. I used a mix of peat moss, perlite, doug fir bark, worm castings, azomite, and some Happy Frog JPM fertilizer. Threw in some beneficial bacteria and fungi as well. Filled the pots 90%, then cut circles out of some disposable compressed wood serving trays. Hopefully that will help these bad boys develop a nice nebari. Put some more soil mix on top and held things in place for now with some little stones.

20250807_193124.jpg20250807_193244.jpg20250807_194857.jpg20250807_194901.jpg
 
Today I removed the upper of the two air layers I did on the main trunk of my Shindeshojo. It has prolific root growth, and I probably could have made untangling them a bit easier had I removed it sooner. I also could have made my job easier by chopping up the sphagnum moss when starting the air layers, but I didn't know that trick at the time. No matter. I took my time and got the roots untangled with minimal damage. I then planted the new tree in a 7 gallon fabric pot. This time I put a couple Douglas fir offcuts from the woodshop an inch or two under the roots. I put a thin layer of soil on top of the fir, then did my best to spread the roots out. More soil on top and some rocks to hold things in place until it establishes itself. Sorry for the poor quality of the last few photos. It was getting dark.

20250820_183741.jpg20250820_183920.jpg20250820_184024.jpg20250820_184112.jpg20250820_190842.jpg20250820_191455.jpg20250820_201237.jpg20250820_201425.jpg20250820_202602.jpg

It has rather expansive foliage. I'm wondering, should I trim it back a bit, or leave it as is for now? My goal is to fatten it up a bit more. Also, I think I'll take another air layer off the top of it next year as I have three nice branches to choose from to continue the main trunk.
 
Here's a few better photos of the newly christened Shindeshojo from yesterday. I've dubbed the donor tree SDJ1 and the first air layer removed SDJ2, making this SDJ10.

20250821_164723.jpg20250821_164718.jpg
 
Today I lopped off the lower of the two air layers on the main trunk of the Shindeshojo (now dubbed SDJ1). This was the last Shindeshojo air layer to be removed. It too had an excellent root system. I hadn't packed the sphagnum moss quite as tight in this one, making the roots easier to separate.

20250821_164744.jpg20250821_164757.jpg20250821_165102.jpg20250821_165107.jpg20250821_165116.jpg20250821_172050.jpg20250821_191332.jpg

Same planting strategy as the one from yesterday. 7 gallon fabric pot, some thin Douglas fir offcuts 1-2" under the roots.

20250821_193635.jpg20250821_194044.jpg

I present:

SDJ11

20250821_194923.jpg20250821_194928.jpg20250821_195454.jpg
 
I trimmed the cut on the top of SDJ11 (where SDJ10 was removed) so it's less perpendicular to the trunk and flows into the top two branches. Then put some cut paste on it.

20250821_215409.jpg20250822_094718.jpg
 
I did a bit of pruning on SDJ11 to remove excess branches where I don't want the trunk fattening up too much. I think next spring I'll air layer the trunk above the second branch and let the second branch be the new trunk to best accentuate the slight leftward movement of the trunk. I think if I keep the section above the second branch, it's too straight.
20250824_184541.jpg

Did some cleanup pruning on SDJ10 too. I'm thinking I should probably cut off one of the two thicker branches at the top, and let the other become the main trunk. I'm still undecided.

20250824_184525.jpg
 
Won't the stones prevent the water from properly hydrating the base? What are they for? 🤔
 
Won't the stones prevent the water from properly hydrating the base? What are they for? 🤔

I'm using the stones to stabilize the tree until the roots can grow out and provide a good foundation. They also helping to flatten the roots out after they grew in all directions in the air layers. They're small and numerous enough that the water just runs around them and saturates the base quite well :D

Hopefully I'll only need the stones for a few weeks.
 
Following up on my post from yesterday, I realized I need not wait until next year to do more air layers. There's still time this year, and even if they don't take, I can just leave them in place.

With that realization, I did another layer on the remaining trunk of SDJ1 (my nursery tree).

20250824_193046.jpg

I also placed an air layer beneath the top node of SDJ11:

20250824_200841.jpg

I think after work today I'll do an air layer on one of the two branches on the top of SDJ10. They're pretty similar, so I'm not sure it matters too much which one to keep, but I'm open to suggestions!

20250825_125217.jpg
 
I decided I'd remove the smaller branch from SDJ10, as I preferred the arrangement of the remaining branches that way.

20250825_191952.jpg20250825_192011.jpg20250825_193031.jpg
 
Back
Top Bottom