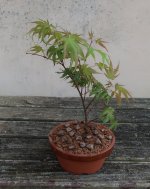
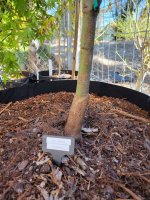
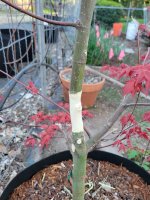
Where to air layer this Shindeshojo?

Epos7

Sapling
Messages
31
Reaction score
47
Location
Washington
USDA Zone
7b
I bought this Shindeshojo at a local nursery a few weeks ago and plopped it in a bigger pot. It's grafted, so once it finishes leafing out, I aim to air layer it. I think I can get two, maybe three trees out of it.

My question is, am I better off making the first air layer right above the graft, or near the top of the tree? Should I start at the graft and work my way up, or start at the top and work my way down? Obviously I'll only be doing one air layer at a time, so I expect I'll only do one or two this year.


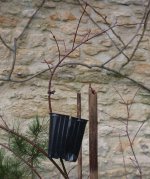
Shindeshojo 20250416_132611 copy.jpg
 
I've never tried airlayering trunks, but it works.
I air layer small branches, in spring, and they produce roots in summer..
I prefer air layering small branches because the are flexible and i can give them curves (i prefer curves than a straight/stiff trunk :cool: )

End of february ->
acer palmatum arakawa 2024 02 27 (4).JPGacer palmatum arakawa 2024 02 27 (5).JPG

End of May ->
acer palmatum arakawa 2024 05 28 (3).JPG

August : the tree grow again, i'll probably have new roots in the pot ->
acer palmatum arakawa 2024 08 01 (1).JPGacer palmatum arakawa 2024 08 01 (4).JPGacer palmatum arakawa 2024 08 01 (5).JPGacer palmatum arakawa 2024 08 01 (7).JPGacer palmatum arakawa 2024 08 01 (9).JPG
 
am I better off making the first air layer right above the graft, or near the top of the tree?
If you start low and work your way up you have the benefit of lots of foliage to get roots started. So it may root faster.
BUT
It will be another year before you can consider a second airlayer, as the new roots first need to get well established and the plant neds to build up reseves. In slow cases, you might need to wait 2 years.

I would go top to bottom.
Or, if confident in airlayering.. One can do multiple airlayers at the same time, as long as plenty of foliage remains for each individual layering segment.

When layering, ensure the first 2-3 inches are interesting and fitting the future vision for the plant. Or, as @clem suggests, take layers thin enough to still be manipulatable.
 
It's grafted, so once it finishes leafing out, I aim to air layer it.
The graft appears to be invisible so why the need to layer?

Re getting more trees, I'd also go top down. Not only because you'll need to wait for recovery with bottom up layers, but also because leaving the current roots to feed the tree means the lower trunk will continue to grow and thicken during the years while you get your layers.

I would have no hesitation in putting 2 layers at once to get 3 trees. If each layered section has branches and leaves then successful rooting is possible.
 
Grafting is not, in and of itself, bad for bonsai. Good grafts are no problem.
We encourage root grafting to improve nebari. We encourage thread and approach grafting to add branches to bonsai so grafted bonsai are no problem.
I have a number of grafted trees as bonsai that I challenge anyone to pick the grafts. It is likely that some award winning bonsai are grafted in one form or another but, because we can't see an obvious graft union we assume they are not.
Bad grafts are a problem and may require some fix.

If it shows up visually, not good. If nobody can see, no problem so, IMHO, it does not matter if your tree is grafted or not. It only matters if the graft is visually unattractive.

It does look like a pretty clean graft. The most obvious part about it for the time being is the brown bark below the graft and green above. Given time, it's all going to be brown so will blend in better.

I read even a clean graft can change and look much worse in the future, so I had planned to remove it. If that's not the case I have no issues keeping it, either.
 
I would have no hesitation in putting 2 layers at once to get 3 trees. If each layered section has branches and leaves then successful rooting is possible.

This is good to know. I may do just that!
 
I read even a clean graft can change and look much worse in the future,
That happens occasionally and those few occasions give grafts a bad name. It is far more common for grafts to blend in more as time goes on but those grafts don't get noticed so we only hear about the bad ones.
Problems seem to become apparent when the tree is still fairly young. It's not like a graft will suddenly start to swell at 20 years.
There's a slight change in diameter at your graft point. I'd develop the lower section for a few more years to see if that appears to be increasing or not. It's relatively quick and easy to layer at a later date if you feel that's necessary and layering later won't interfere with developing the trunk and branches.
 
After reading through this thread, I realized I need not wait any longer. I went ahead with the double air layers as suggested.

Top:
shindeshojo top layer 20250418_183417 copy.jpgshindeshojo top layer20250418_183354 copy.jpgshindeshojo top layer 20250418_191149 copy.jpgshindeshojo top layer 20250418_191515 copy.jpg

Middle:
shindeshojo middle layer 20250418_185529 copy.jpgshindeshojo middle layer 20250418_185549 copy.jpgshindeshojo middle layer 20250418_190128 copy.jpgshindeshojo middle layer 20250418_190553 copy.jpg
 
Hard to see from the pictures, but ensure the bark above the cut area is well wrapped with substrate. Roots come from the bark NOT from the area that you have cut.
 
hello, don't take this the wrong way, but for me, you airlayed some parts of the tree that aren't very interesting because no tapper, no curves and long internode (no bud will emerge on internodes -> no branche)...

When you airlayer, try to find an interesting part of the trunk, to keep, in the future, a good project.

For example, i would have selected this part of the trunk ->
___________DSCN150.jpg

And it is still time to airlayer a small branche to compare the results. The small branche will probably be more interesting because flexible and short internodes... So i advise you to air layer 1 or 2 small branches :cool:
 
Another tip for layering:
Cuts do not need to be horizontal or at right angles to trunk.
Most bonsai look much more dynamic where the lower trunk does NOT grow vertical. Lateral roots at right angle to trunk will dictate a vertical trunk. Cutting at an angle will give roots on teh same plane as the cut which will enable the new trunk to emerge from soil at an angle. As a bonus the angle cut also gives a wider trunk base.
maple2.png
 
Hard to see from the pictures, but ensure the bark above the cut area is well wrapped with substrate. Roots come from the bark NOT from the area that you have cut.

Yep, I stuffed some extra spag moss in there after putting the plastic on top. I am tempted to move my wraps up a little bit to be extra sure. I assume the cut part doesn't need to be covered?
 
hello, don't take this the wrong way, but for me, you airlayed some parts of the tree that aren't very interesting because no tapper, no curves and long internode (no bud will emerge on internodes -> no branche)...

When you airlayer, try to find an interesting part of the trunk, to keep, in the future, a good project.

For example, i would have selected this part of the trunk ->
View attachment 593014

And it is still time to airlayer a small branche to compare the results. The small branche will probably be more interesting because flexible and short internodes... So i advise you to air layer 1 or 2 small branches :cool:


Dangit! Oh well, at least the top section should be interesting. I could also air layer off the section you highlighted next year, as there is a middle branch that could become the trunk for the section below it:

shindeshojo 20250419_104812 copy.jpg
 
My main reason for covering that is that it might dry out quickly. I normally do not peel such a large segment of trunk
How much to peel? I watched a few YouTube videos that suggested about a four inch section. I suppose that's to be extra safe that the phloem doesn't repair itself.

I just went back and stuffed some more spaghnum in the wraps. The bark above the cut is definitely well surrounded by spaghnum.
 
Normally about twice the diameter of the branch is recommended.
If you remove the cambium properly, there is not much risk of bridging for most species.
 
And it is still time to airlayer a small branche to compare the results. The small branche will probably be more interesting because flexible and short internodes... So i advise you to air layer 1 or 2 small branches :cool:

I took this advice and did 5 more air layers on small branches. Should give me plenty of Shindeshojos to play with.
 
Back
Top Bottom