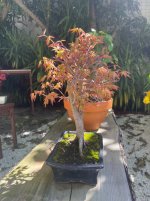
Styling advice for a newly acquired maple

isaaquitas

Mame
Messages
104
Reaction score
18
Location
Portugal
Hello everyone,

Last year, I posted a similar question and received some invaluable advice from the experts on this forum—thank you again! My previous maple is looking great now, and I’ve shared an updated picture of it.

I’ve recently acquired a new maple, which I’ve also posted. I believe it has potential, but at the moment it looks a bit bushy and disorganized. I’d really appreciate any tips or suggestions on how to style it. If possible, I find diagrams with arrows extremely helpful for understanding styling ideas.

Also, when is the ideal time to start fertilising these trees? I am confused as some websites say as soon as growth starts, and others say to wait until growth slows. Can I also prune the maple from last year, or should I wait a bit more?
 

Attachments

  • IMG_8419.jpg
    IMG_8419.jpg
    209.9 KB · Views: 85
  • IMG_8417.jpg
    IMG_8417.jpg
    219.4 KB · Views: 71
  • IMG_8416.jpg
    IMG_8416.jpg
    190.4 KB · Views: 68
  • IMG_8415.jpg
    IMG_8415.jpg
    293.7 KB · Views: 71
  • IMG_8413.jpg
    IMG_8413.jpg
    327.1 KB · Views: 63
  • IMG_8412.jpg
    IMG_8412.jpg
    273.4 KB · Views: 59
  • IMG_8418.jpg
    IMG_8418.jpg
    219.6 KB · Views: 85
Start with the roots and work your way up and out. Before the leaves emerge in early spring, prune the roots until you have an even nebari, with roots emerging all at the same level. In the meantime, let the trees grow. You want bushy plants with plenty of vigor.

Since you're still working on growing your trees, you'll want to start fertilizing early. With certain species, we restrict fertilizer early in tue season while they're in refinement, so the growth stays under control.
 
I do not remember which maple you've posted before so I don't know which one you want help with this time. Need to make it simple for us simple people to understand.

Fertiliser use depends on what you want to achieve and that's often related to what stage your tree is at.
My guess is that delaying Spring fertiliser is aimed at more mature trees because we don't want the branches to grow and thicken too much at that stage. It may also be aimed at trying to reduce internode length in Japanese maples which tend to grow really strong shoots with long internodes in Spring.
Much also depends on how healthy your trees are. Reducing fert can starve a tree and undo all the good work if you reduce too much. I prefer to fertilise then control the growth and internodes with pruning when dealing with developing Japanese maples..
Thanks, I would like style advice on the orange one.
 
First, look for the best view of the nebari. In this case, first pic looks best, final pic is OK but the other 2 views show very uneven and unattractive roots. It may be possible to remedy the worst views.
Second, look for most attractive view of the trunk. In this tree, the trunk divides into several thick sub-trunks. Hard to pick a best view as the new leaves obscure some of the detail and always hard to see what's what from 2 D photos. Pictures 3 and 4 look OK. Unfortunately the view in pic 1 is a bit too narrow. Try turning the tree a little in either direction to get a different look between the sub trunks above the main fork.
Third, look at branching. Very difficult to see where branches start and grow to in pictures. You should look at the tree to find where better branches grow to the sides and to the back at different levels from the trunk. Try to avoid opposite branches.
Four and Five: Features (nothing special here) and Faults - that really high root would count as a fault IMHO so try to hide it or eliminate it. V shaped fork can sometimes not look great but often a slight turn one way or the other can rectify the catapult look.

Unfortunately this tree does not give us a single great view of the tree so you will probably have to make compromises between roots, trunk and branching to give a reasonable tree rather than outstanding.

Some options:
1. Keep it as is. Just keep trimming to develop a more dense, rounded canopy.
2. Develop to make picture 1 as the viewing front. Wire and grow the branches up and out to create foliage planes and branches to create a rounded canopy.
jm 5.png

3. This side appears to give a nice curving view of one trunk. To develop this would require extensive remediation work and pruning. Check for better roots below that high one. If there are existing roots under there, chop that offending root right off to reveal lower root spread. If no decent roots below consider layering to develop better roots. Probably need to remove the other sub trunk and/or some existing branches?
jm 6.png

As with all internet based advice, I cannot see the real relationship between the trunks and branches so ALWAYS check that the advice given actually correlates with the real tree before making substantial changes.
 
Start with the roots and work your way up and out. Before the leaves emerge in early spring, prune the roots until you have an even nebari, with roots emerging all at the same level. In the meantime, let the trees grow. You want bushy plants with plenty of vigor.

Since you're still working on growing your trees, you'll want to start fertilizing early. With certain species, we restrict fertilizer early in tue season while they're in refinement, so the growth stays under control.

First, look for the best view of the nebari. In this case, first pic looks best, final pic is OK but the other 2 views show very uneven and unattractive roots. It may be possible to remedy the worst views.
Second, look for most attractive view of the trunk. In this tree, the trunk divides into several thick sub-trunks. Hard to pick a best view as the new leaves obscure some of the detail and always hard to see what's what from 2 D photos. Pictures 3 and 4 look OK. Unfortunately the view in pic 1 is a bit too narrow. Try turning the tree a little in either direction to get a different look between the sub trunks above the main fork.
Third, look at branching. Very difficult to see where branches start and grow to in pictures. You should look at the tree to find where better branches grow to the sides and to the back at different levels from the trunk. Try to avoid opposite branches.
Four and Five: Features (nothing special here) and Faults - that really high root would count as a fault IMHO so try to hide it or eliminate it. V shaped fork can sometimes not look great but often a slight turn one way or the other can rectify the catapult look.

Unfortunately this tree does not give us a single great view of the tree so you will probably have to make compromises between roots, trunk and branching to give a reasonable tree rather than outstanding.

Some options:
1. Keep it as is. Just keep trimming to develop a more dense, rounded canopy.
2. Develop to make picture 1 as the viewing front. Wire and grow the branches up and out to create foliage planes and branches to create a rounded canopy.
View attachment 590524

3. This side appears to give a nice curving view of one trunk. To develop this would require extensive remediation work and pruning. Check for better roots below that high one. If there are existing roots under there, chop that offending root right off to reveal lower root spread. If no decent roots below consider layering to develop better roots. Probably need to remove the other sub trunk and/or some existing branches?
View attachment 590525

As with all internet based advice, I cannot see the real relationship between the trunks and branches so ALWAYS check that the advice given actually correlates with the real tree before making substantial changes.
Thanks
 
Back
Top Bottom