Juniper Nana Styling Advice

greener

Seedling
Messages
6
Reaction score
6
USDA Zone
7b
Hey!

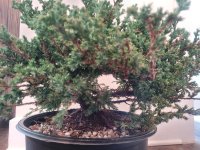
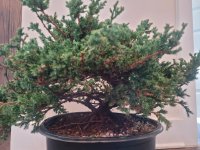
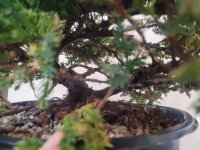
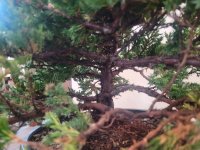
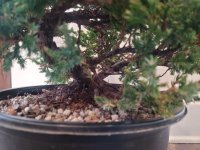
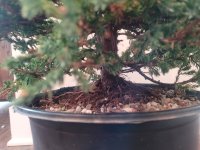
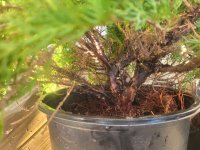
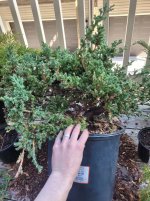
I picked up this juniper for really cheap this winter at one of the home depot "we don't want this anymore" sales. Last weekend I did a HBR repot (haha actually more like 1/3 BR), and a little bit of trimming just to clean it up a bit. I know no styling for a year at least, but it's fun to think about what I'll do next. I'd love any suggestions/ thoughts you might have on what direction to take this in.
 

Attachments

  • 20250301_120829.jpg
    20250301_120829.jpg
    263.1 KB · Views: 98
  • 20250301_120833.jpg
    20250301_120833.jpg
    332.5 KB · Views: 89
Hmm.. take off all the brown stuff, then go through each branch and take off all branchlets on the bottoms. Finally clear all the media off until you get to the nebari all around.

Then repost with a better back drop from four sides.

Cheers
DSD sends
 
How are you defining "branchlet" ? One thing I worry about is cutting something off and then going back to be like "damn I wish I still had that I could grow it out"

Thanks!
 
That's a decent sized nana. I was expecting a stick in a pot. I'll bet there are some nice options hidden under there.
 
Branchlets = the smallest branching, often wood hasn’t formed (in most cases). Of healthy Nanas will grow those back…to be trimmed off in next spring. Once again 😉

To make this a respectable bonsai a whole lot will need to be taken off.

For example, half of the side branchlets will likely need to be pruned off to give the bonsai the“no bar branches” or alternating fishbone effect…. And most if not all.. vertical branchlets.

Then there is shortening the major branching… creating kinds etc etc

Cheers
DSD sends
 
I know no styling for a year at least
With these nanas I wouldn't worry about that, the pics I'm showing here goes from nursery pot to styling to bonsai pot in one session. The only concern I had was not reducing the roots too much with the first potting, the reason I used a deep pot for this one. The first two pics shows the front and back before the work. third pic shows the styling out of the pot so I could see exactly what I had to work with and the style I chose. Then finally in the pot. Last pic is what the tree looks like today, 3yrs work from start to todays look. :cool:

_DSC3081_pe.jpg
_DSC3085_pe.jpg
_DSC3088_pe.jpgIMG_1529_pe.jpg
Screenshot 2025-03-13 at 2.58.14 PM.png
 
An interesting side note, the back side had a branch hanging out that was really worthless since it was never seen. I noticed though that it was partially buried in the soil and had some roots growing out of it. The first pic shows the area I'm referring to. Last year I clipped the branch and at repotting I removed it from the soil and potted it into a cascade pot, another tree for the collection as it is coming along nicely with the most recent pic shown. :)_DSC3085_pe_pe.jpg
IMG_0035_pe.jpg
 
With these nanas I wouldn't worry about that, the pics I'm showing here goes from nursery pot to styling to bonsai pot in one session. The only concern I had was not reducing the roots too much with the first potting, the reason I used a deep pot for this one. The first two pics shows the front and back before the work. third pic shows the styling out of the pot so I could see exactly what I had to work with and the style I chose. Then finally in the pot. Last pic is what the tree looks like today, 3yrs work from start to todays look. :cool:

View attachment 586805
View attachment 586806
View attachment 586807View attachment 586808
View attachment 586809
damn, that's a good looking plant!
 
ok, I tried to implement the suggestions -- cut out branchlets and dead stuff, solid color background.

Right now I'm thinking maybe something like the sketch? But I'm not sure which secondary branches I should keep

Would love any advice / outside opinions 😅
 

Attachments

  • 20250308_130647.jpg
    20250308_130647.jpg
    395.1 KB · Views: 35
  • 20250308_130636.jpg
    20250308_130636.jpg
    336.6 KB · Views: 25
  • 20250308_130407.jpg
    20250308_130407.jpg
    290.3 KB · Views: 24
  • a_possible_future.jpg
    a_possible_future.jpg
    464 KB · Views: 26
  • 20250308_130620.jpg
    20250308_130620.jpg
    468.9 KB · Views: 29
  • 20250308_130431.jpg
    20250308_130431.jpg
    319.2 KB · Views: 26
  • 20250308_130315.jpg
    20250308_130315.jpg
    295.7 KB · Views: 20
  • 20250308_130242.jpg
    20250308_130242.jpg
    295.9 KB · Views: 21
  • 20250308_130225.jpg
    20250308_130225.jpg
    330 KB · Views: 25
An interesting side note, the back side had a branch hanging out that was really worthless since it was never seen. I noticed though that it was partially buried in the soil and had some roots growing out of it. The first pic shows the area I'm referring to. Last year I clipped the branch and at repotting I removed it from the soil and potted it into a cascade pot, another tree for the collection as it is coming along nicely with the most recent pic shown. :)View attachment 586812
View attachment 586813
oh huh. Related question -- I have a different plant that I think could be split up into 2-3 smaller junipers. Is there any special technique to it or I can I just like, split it down the middle? Is there a better time of year to do that?
 

Attachments

  • 1000008896.jpg
    1000008896.jpg
    353.7 KB · Views: 41
oh huh. Related question -- I have a different plant that I think could be split up into 2-3 smaller junipers. Is there any special technique to it or I can I just like, split it down the middle? Is there a better time of year to do that?
For me, I don't do any root work on my junipers past April 1st, but then I'm in Texas and the weather is already warming up a lot by then. As for you splitting the tree apart, you would have to be careful of not losing too much bark for obvious reasons. Plus you would have to make sure you have plenty of roots for each separated trunk. Mine worked out well because I had an abundance of roots on the separated branch. :)
 
Back
Top Bottom