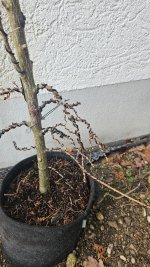
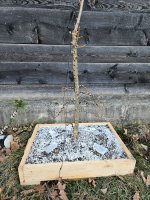
Progression Thread for my Moyogi style Japanese Larch (Larix kaempferi)

Messages
112
Reaction score
106
Location
Munich, Germany
USDA Zone
7-8
Hey everyone,

In this thread I will document the further progression of my Moyogi (Informal upright) style Japanese Larch.

Some minor details of the tree:

price: 58€ (including shipping)
date of purchase: october, 2023
source: https://www.baumschule-aurea.de/Japanische-Laerche-Larix-kaempferi-100-125-cm-im-5-Liter-Container

The wanted style for the tree:

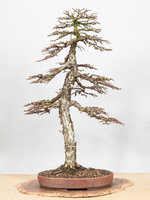
Reference 1:

DSC_0366.jpg

Reference 2:

bonsai_galerie_038.jpg

Hope you enjoy this progression, and can get something out of it / find it helpfull for your projects!

Cheers
Raffael
 
Last edited:
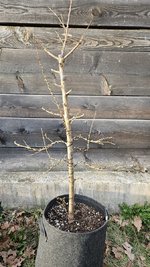
2. February 2024:

The Tree was Top chopped and sealed.

20240202_151700.jpg

4. March 2024:

The apical growth (and also minor, definitely not needed growth) was removed, to further give strength to the lower branches
The new leader was wired upwards and brought in position to grow on for the next few years
Wire was applied to the lower branches to give the subtle movement

20240303_165636.jpg

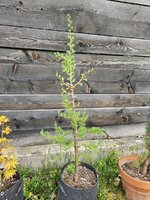
10. April 2024:

leafout in spring, looking quite majestic!

20240407_090004.jpg


Further plan:


For the year 2024 the tree will stay in the 13 liter mesh pot, and will be fertilized heavily, and left to grow freely.
 
Last edited:
Are you going for Formal Upright? or Informal? Your two examples are bit different.

Have you thought about wiring the main trunk to get a bit of movement into the trunk while it's still young? Formal uprights aren't easy to build for beginners, as I'm told.
 
I wired some curves into mine as they grew and now it has set which is good because once they start to thicken up I don’t think you’ll have much success. These do fatten very quickly and prefer to grow straight as an arrow so you have to start training early unless you like splitting thr trunk in order to put in bends.
 
Are you going for Formal Upright? or Informal? Your two examples are bit different.

Have you thought about wiring the main trunk to get a bit of movement into the trunk while it's still young? Formal uprights aren't easy to build for beginners, as I'm told.
Im going for a somewhat informal upright look, but somehow also formal upright, not totally straigth!

Yes, I have, however I thought to myself, since im striving for more of a formal tree.
The bend for me is alright!

Personally I dont even think, theres a japanese term for what Im striving to create, because the first reference tree isnt really completely formal upright but also not informal, you get what I mean haha
 
I wired some curves into mine as they grew and now it has set which is good because once they start to thicken up I don’t think you’ll have much success. These do fatten very quickly and prefer to grow straight as an arrow so you have to start training early unless you like splitting thr trunk in order to put in bends.

My goal mainly is the first reference tree, therfore I dont really want more bends in the lower section...
 
05. June 2024:

overly long shoots were pruned, to induce backbudding / ramification on lower branches.
Wire that was applied on 04. March 2024 was removed.
Lower wound was recut and sealed again.

Tree is left to grow on freely for year 2024, fertilized heavily on a 4 week schedule with Saidung Ultra (8:4:5).


20240605_100813.jpg
 
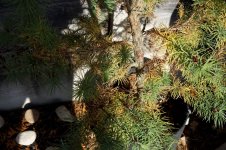
An Update:

Photo from 28. August 2024
20240828_120749.jpg

Since the last update, only a few overcrowded branches were cut back, also ones that shaded out lower weaker growth were cut out.
Next plans are as follows:


February / March 2025:

Rewire the tree to the following development plan.
Ive wrapped my head arround it a few times and seem to find it for the best solution.
Right Photo was from late february 2024.

Screenshot 2024-10-26 162537.png

The black rounded branch is the current sacrifice, which I will let run to thicken the trunk, it is not cut back.
It probably doubled in size and diameter this year.

The green branches are gonna become either back branches or sacrifices for further thickening.


March / April 2025:

Tree will be repoted into a 27-45 Liter growbox (60cm x 45cm x height), depending on how much of the roots I can safely take of.
Also nebari will be worked on.

Next updates are gonna be:

before and after wiring in february / march 2025
repotting and nebari work in march / april 2025


Cheers Raffael
 
Last edited:
As of today, a small Update:

I just wanted to show the thickening on the sacrifice branch i started this year, it has more than 2.5x in height and 3x in diameter.
At the beginning of the year it was probably same size (maybe a bit smaller) as the two cut branches left and right to it, i use for anchoring.
Heres a pic.

_DSC2667.JPG

I suspect, it will catch up to the thickness of the main trunk in about 1, maybe 2 years, then the thickening of the main trunk will really start to kick in!
Also some more pics from winter storage (it looks slightly slanted, since last years i didn't check the angle I put it in correctly, therfore its a bit of to the left => will correct in upcoming repot).

_DSC2666.JPG_DSC2668.JPG

For reference heres also a photo of my reference tree, however in earlier stages of development, its a rough guide (stylewise) of how I will wire mine (at least the first trunk section), coming february

6049646033_32c2545045_o.jpg

Ive also now switched to my Sony Alpha for pictures on every of my threads for better clarity!

Cheers
Raffael
 
Another update

yesterday and today (17.12.2024 - 18.12.2024):

I took the time to wire the tree completely and place branches, since It is fairly frost free and warm here today, and I couldnt wait till february.

Here are some photos:
20241218_093911.jpg20241218_093917.jpg20241218_093922.jpg
I wired everything, completely, sections that needed to be thickened werent cut back, the branch tips of these where wired upwards, to become more apically dominant.
For the rest I cut back a bit => to induce further backbuding on the inner part of branches, because right now some are a bit to leggy for my tast.
Bear in mind, this is the first complete styling for this three. However I really like what im seeing, especially If you compare firstly my wiring technique (it improved drastically since last year), but also the speed at which the branch pads have developed.

Heres a close look at the main branches:
20241218_093930.jpg20241218_093934.jpg20241218_094007.jpg

I also placed some back branches (the ones i intended to use as sacrifice). I will keep this and try to incorperate them into the design, I can always cut the of later or jin them.

20241218_093949.jpg

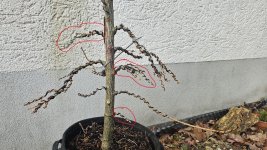
Note that the branches marked In red arent particullary needed for my design, however I wired them for these reasons:

- Keeping the branch ready as fallback if another branch dies
- if intended to be used as jin, the got good shape to them and dont look to static

That is also the reason I cut them shorter, since they arent really developed, but kept growing, so I can use them as fallback later or jin / completely remove them when im ready.
However I think till these decisions need to be taken, it will take some time.

20241218_094007.jpg


We are far from beeing finished and I will continue to post any major changes of the tree here.
The next tasks:

February / March 2025:
- Reduce the rootmass to a certain amount
- Repot the tree into the large flat growbox I built for it this fall.
- fertilize heavily from march (2 weeks after repotting) till september / oktober

other tasks like summer cutback and wire removal will follow, anually I will also work on the branching.

However for now my main goals are to let the sacrifice run freely, to thicken the trunk properly.
Get the lower branches to thicken appropriately, so we get a ascending branche thickness from bottom to top.
Get a good Nebari.

Branch ramification will follow later.

And always remember only if you work on your trees repetitive (spring repot, summer triming, fall / winter cleanup, wiring and triming) we will get to the desired result.
Youre trees wont develop themself, so work on them 😉.

Wish you a nice christmas season!

Raffael
 
Hey Raffael,

Nice documentation.
My recommendation would be to take a good look at the branch attachments.
With young material like this it should be very much possible to get the branches to angle down right at the trunk, rather than go up and down.

Do you know the size / thickness of your reference larch? I feel it might be significantly.
Hey Jelle,

Thanks for the input.
Ive noted the problem with the branch attachments, especially the bigger left branch could be angled a bit more (somewhat like the upper right branch).

Size reference is as follows (A photo of the reference tree):

I think it has to be at least 80-90 cm high, with a trunk diameter at the base of 6-7cm.
Therfore height / trunk diameter ratio is arround ~14:1 if we assume the tree is 85cm height and has a trunk diameter at base of 6cm.

DSC_0372.jpg

For my composition I just measured it for knowing good proportions, beeing that my final height of the tree would be at 3/3 while the first branch is at 1/3 final height.
Since my first branch sits roughly at 20-22cm height, my final composition will be 60-66cm height roughly. If I want somewhat of the same ratio (14:1), I get a trunk diameter (if height is 60cm-66cm) of 4,2-4,7cm.
However I dont want to be to mathematical, therefore i aim for ~5cm diameter, at thickest.

Heres a image of the current trunk diameter. Its arround 2,7cm, note that currently there is arround 4cm of trunk hidden in the earth, nebari is arround at this level, thickest point is 3,2cm directly over nebari.
The tree was also styled to the "nebari level". When styling it today and yesterday, I had removed the top of the soil till the nebari was visible.
However verify my measurements again this coming spring, when repotting it into my growbox.
I will also make a new "photo series" and update then.

20241218_150721.jpg
 
Last edited:
Spring 2025 post repotting update

yesterday (07.03.2025):

I repotted the larch into its new home for the next 3-5 years, assuming the pot will holdup that long ;).
For anybody wondering this is the stage the buds were at.
First branches showing green, most are still in the "golden tips phase".

20250307_172822.jpg

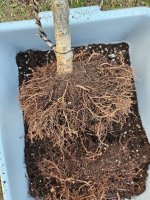
Here are some pictures of mid repot:

20250307_171959.jpg20250307_172002.jpg20250307_173915.jpg

Root pruning looked more dramtic than it actually was, I didnt need to remove any overly thick roots, because there were fairly fine roots only...
In total, if i had to guess, i removed maybe 30% - 40% of the total root mass.
Root ball is now at a hight of approx. 8,5cm = 3,34 inches, of course the hight will get reduced in further repots from now on.

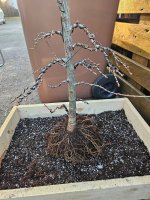
Here are some pictures in its new pot / box

20250307_172819.jpg20250307_172817.jpg20250308_075042.jpg

Nebari doesnt look to bad for now, however theres a long way to a truly great nebari, which I hope will happen in its new container.
What I liked: I didnt see any uncorectable flaws in the root structure so far, no circling, overly thick or inward growing roots. Most are nicely combed out in a radial fashion.
The nurserymen and woman did a great job in containierizing it, i guess.

If your wondering what soil mix this is:

Roughly:
2 Parts => peat free, high quality, organic soil mix (containing bark and so on)
3 Parts => perlite
1 Part => pumice
1 Part => lava

Ive had good experiences with using perlite so far only.
I especially like using it for its light weight, good airation properties and of course the rediciously cheap price compared to other inorganics.

As said before, the tree will get regular prunings in the following year, slowly trimming branches where needed and rewiring in fall.

Heres a sort of pruning plan I will follow for the growing season 2025:

Green areas are left mostly unpruned
Orange sort of middle way
Red on the heavier side

I do this so we get the branch "thickness hierachy" correct over the next few years, while at the same time increasing ramification.

heatmap.jpg

The big sacrifice of course will be left untouched, so we can get to the desired trunk thickness.
Only minor energy balancing will take place, not not loose vitality of the lower branches.

Pruning updates will follow year throughout, as well my annual fall styling / wiring revamp.

See you then!

Cheers
Raffael
 
I think most folks hold off for a little bit after repotting to apply fertilizer. Putting it right on can add stress to an already stressed plant and you also run the risk of burning newly developed roots or retarding root growth altogether.

The tree is looking great so far! I do love a nice larch. It will be cool to see this develop.
 
Oh yeah shure already noticed that earlier, fertilizer cakes are off already, didn't know why I put them on. I usually wait a month or so after repotting...

Thanks for the Feedback :)
 
Back
Top Bottom