Phasing work on my Shimpaku Juniper

just from a quick search on here, I found this tree. The trunk line with it's crazy twists and turns does really remind me of this little tree I have. Thanks for the inspiration and the history. I think I'll go put this tree on a few blocks to see if I can pull the cascade vision out of it, this could be a really great design.
Here is a single line cascade example from Taikan Ten in Kyoto 2015. Jim created similar with multi-line.ky95.JPG
 
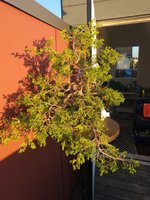
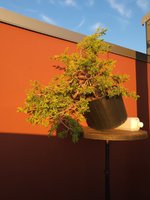
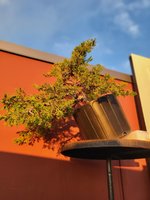
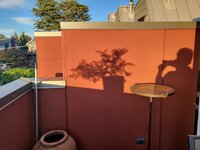
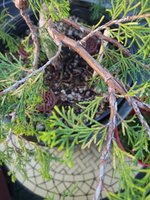
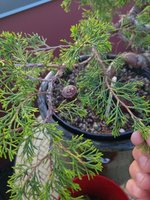
I decided to take some pictures after trying to visualize Frank's suggestion. I think they speak for themselves, my poor photography aside.
20230719_201501.jpg20230719_203439.jpg
The best part? After seeing it at this angle, I no longer feel as pressed to prune or wire. I think you basically nailed it!
 

Attachments

  • 20230719_203529.jpg
    20230719_203529.jpg
    255 KB · Views: 33
  • 20230719_203643.jpg
    20230719_203643.jpg
    146.1 KB · Views: 24
  • 20230719_204239.jpg
    20230719_204239.jpg
    154.8 KB · Views: 21
  • 20230719_202814.jpg
    20230719_202814.jpg
    132.1 KB · Views: 31
I decided to take some pictures after trying to visualize Frank's suggestion. I think they speak for themselves, my poor photography aside.
View attachment 499122View attachment 499123
The best part? After seeing it at this angle, I no longer feel as pressed to prune or wire. I think you basically nailed it!
I see potential for a three line cascade, the key will be the wiring and bending to optimize the trunk line and curving cascade to the front. The cascade lines can mimic and complement the curves in the basic trunk and upright portion, Introduce both movement and direction consistent with the foundation of the trunk line movement. The initial wiring will play a large part in the execution of this design.I would suggest seeking some experienced and well trained help to make the most of this opportunity. This is not a task for a one hour meeting or group workshop. Good results would likely require 3-4 hours from a well trained individual. Combination of raffia, branch wire and anchor wires.
And all of this after selecting the best front, planning the initial work and establishing a root ball for the best planting angle.
a two to three year plan!
Very important to recognize the value in visualizing and planning before action. Happy to note you are prepared to consider the options first.
 
I think you're absolutely correct. I said I plan to take the tree to the workshop, and I will regardless, but likely just to get some input from those in attendance. Diversity of opinions and perspectives can only be a good thing.

One of the slight flaws with this tree currently that worries me prior to it's initial design is that quite a number of branches run close to one another, and shade each other out. I was thinking about adding some wire or props to separate pieces like these to promote back budding and let more light through the foliage. Thoughts on that idea? The examples are smaller pieces, but this same principle could be applied to some larger pieces as well.
 

Attachments

  • 20230628_210444.jpg
    20230628_210444.jpg
    221.9 KB · Views: 23
  • 20230628_210343.jpg
    20230628_210343.jpg
    237.2 KB · Views: 32
I think you're absolutely correct. I said I plan to take the tree to the workshop, and I will regardless, but likely just to get some input from those in attendance. Diversity of opinions and perspectives can only be a good thing.

One of the slight flaws with this tree currently that worries me prior to it's initial design is that quite a number of branches run close to one another, and shade each other out. I was thinking about adding some wire or props to separate pieces like these to promote back budding and let more light through the foliage. Thoughts on that idea? The examples are smaller pieces, but this same principle could be applied to some larger pieces as well.
Foliage is light and airy at this point, does not appear condensed. I would simply ensure that the plant receives full sun, is not crowded and rotate on a regular basis.
This is not a flaw in my mind, simply ample opportunity to select the best remaining branching when design becomes the focus. If you are comfortable with choosing appropriate sizes and locations for retention you could thin somewhat at this point. Used on the photos I would not concern myself, I would prefer to retain extra foliage to fuel the recovery after repot in the spring.
When you take it to the meeting get some help identifying the type of foliage to remove and the type to retain. Just removing the weak and or hanging down foliage will thin out the foliage considerably. I would not prune strong healthy foliage at this point.
 
I've already taken pass at removing weak foliage, as well as undesirable growth such as tops, bottoms, and crotches. It could likely use another set of more experienced eyes looking it over.

Thanks again for your help and insights! Very much so looking forward to the repot now.
 
My initial thought for this tree is a dramatic multi line. cascade similar to the work of Jim Gremel. So I would approach the repot and container from a different point of view. retaining more depth and also width initially until the right root ball formation could be created for the best planting angle and display of nebari. Slower approach designed to create the cascade potential out of the initial trunk movement.
Hi Frank, I was reading back over this thread and came across this point that I would love some additional insight on. My initial plan was to repot into a 16" by 5" deep Anderson flat. This would certainly maintain the width of the rootball, but not the depth. It seems that you are suggesting something deeper, and I am curious what container you would suggest in this case. Thanks!
 
Hi Frank, I was reading back over this thread and came across this point that I would love some additional insight on. My initial plan was to repot into a 16" by 5" deep Anderson flat. This would certainly maintain the width of the rootball, but not the depth. It seems that you are suggesting something deeper, and I am curious what container you would suggest in this case. Thanks!
Normally when I am working on changing the planting angle quite a bit, I prefer a deeper container so I do not have to mound up a portion above the lip line of the container. Just a consideration, may not be necessary in your case. Another way to handle the same thing is a custom grow box to accommodate a different shape. If you follow any of the projects Michael Hagedoorn gets involved in you will be familiar with that method.
I was thinking ahead to the possible use of a deeper pot for a cascade style in the traditional sense. In more recent times the table is higher and a more standard pot is often used. Not every enthusiast has the high display tables though. Sometimes it is easier to use the traditional deeper cascade pot that is higher and narrower. Thus the need for a change in the root ball development, not just for a planting angle change.
Hope that clarifies the comment.
Best of luck.
 
Thanks, it really does clear it up. I'm really not a fan of the appearance of tall cascade style pots, but I'm open to it if I find the right one and/or my tastes develop. I think a custom grow box might make sense, possibly planting it 8"+ inches deep. I think I'll keep both my options open and your advice under consideration once I check out the roots come spring.
 
I stumbled upon a post with a Hagedorn custom grow pot, and wow, that's a really interesting technique.


I found this whole reading up on mountain hemlock, as it's native to the region and heard it described as a species that has a reputation as similar to J. procumbens, that it's too easy. (too easy? count me interested). It seems like Anton Nijhuis is a master at collecting these things--always awesome to learn about professionals doing great work in our neighborhood.
 
Hi Frank, I was reading back over this thread and came across this point that I would love some additional insight on. My initial plan was to repot into a 16" by 5" deep Anderson flat. This would certainly maintain the width of the rootball, but not the depth. It seems that you are suggesting something deeper, and I am curious what container you would suggest in this case. Thanks!
Here is a pretty nice plastic pot sold by Stuewe and Sons. It is a heavier pot than Anderson Flats and is 13X13x8" deep. Very nice pot and works well for deep roots. The bottom grate is of larger size than one generally uses in bonsai but you can overlay with 1/4" hardware cloth or the plastic drain mesh for bonsai pots that one can buy in sheets. Click on "stackpath" below

 
Hi @pandacular I like your shimpaku. Here on BN usually referred to as Kishu or Itoigawa.
I only have Kishu presently.
Frank's your go to guy here, and I agree with everything he's said so far except for the taller
cascade pot, which you also do not like. They're the most difficult to get the soil watered properly
and the easiest to blow or get knocked over.

I'm only responding to back up Franks input, and discourage extra work on foliage prior to repotting.
I nearly lost my cascade Spring 2018 (j.procumbens) when I repotted it the year following
a 2017 September thinning. I've had this one 15-20 yrs from a 1 gallon nursery can.
1690901367157.png
It seems to be sensitive to repotting, as I just moved it into its 1st bonsai pot this Spring made by Sara Rayner.
It had been in a wooden cascade pot I made for it a few years. It is sulking a bit again, but I intentionally
did not do much foliage work on it last year in preparation of this years repot. Then after the repot, I got
the worst spider mite infestation on all my junipers I'd ever had. Thankfully, I had left the foliage untouched last year.

There are some standard cascade pots on Etsy. More squarish than tall that would work perfectly.
I have this one https://www.etsy.com/listing/110404...m=56c9bace&ref=search_recently_viewed-2&frs=1
8.5 x 5.5 interior, I believe. If you build one, consider teak, mahogany or at least cedar, for more than 1 or 2 years use.
Obviously, a pond basket would be similarly shaped and much cheaper. I have a kishu in one now, and it really likes it.

DSC_0171.JPG
The pond basket has very similar measurements to the linked pot above on Etsy.
This should allow for any angle change you might be inclined to make
whether you follow through with it or not. The plastic can be cut to accommodate
any trunk(s) that the change up might trespass on the rim.
(Note: the cut rim would need to have the side below reinforced for handling sake.
Like tying a shoe with wire through the "mesh" like holes.
 
They're the most difficult to get the soil watered properly
and the easiest to blow or get knocked over.
I agree that these issues exist. Both are easily overcome with the use of correct particle size inorganic free draining bonsai mix and similar particle size granite layer in the bottom of the pot for weight. Lots of ways to solve those issues. Tall stands with shorter pots must also be protected, secured and placed to prevent accidents.
The cost of show stands often deter enthusiasts from full cascade display whereas the taller pots are often a more economical choice. It is very practical to drill additional holes in taller vase like pots and make use of them for cascades.
I love the look of cascades on taller stands, I just have difficulty justifying the purchase of the stand for limited use. After all, they would not be suitable for day to day use in my climate. If the day comes that I have a show worthy cascade then I will go stand shopping or give one of the local artisans a call.
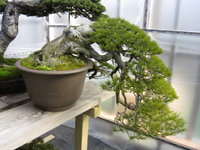
Whichever way is chosen securing the tree, container and stand requires careful consideration. During development a medium depth pot and the edge of a display bench works well. Below is a pine cascade being developed and maintained daily in this manner. Just for an example.
 

Attachments

  • IMG_1220.JPG
    IMG_1220.JPG
    187.6 KB · Views: 23
I agree that these issues exist. Both are easily overcome with the use of correct particle size inorganic free draining bonsai mix and similar particle size granite layer in the bottom of the pot for weight. Lots of ways to solve those issues. Tall stands with shorter pots must also be protected, secured and placed to prevent accidents.
The cost of show stands often deter enthusiasts from full cascade display whereas the taller pots are often a more economical choice. It is very practical to drill additional holes in taller vase like pots and make use of them for cascades.
I love the look of cascades on taller stands, I just have difficulty justifying the purchase of the stand for limited use. After all, they would not be suitable for day to day use in my climate. If the day comes that I have a show worthy cascade then I will go stand shopping or give one of the local artisans a call.
Whichever way is chosen securing the tree, container and stand requires careful consideration. During development a medium depth pot and the edge of a display bench works well. Below is a pine cascade being developed and maintained daily in this manner. Just for an example.
Ah the display. See my mind doesn't work that way as I don't have anything as precious jewels like the pine you posted :)
Mine sits as you've shown, or on my railing next to the stairs and I have never displayed a tree outside of my porch.
I just really wanted to support your plans and input for
@pandacular s shimpaku.

Would a taller narrow pot help develop basil flare as well as a vessel with a wider opening?
I think the nebari would be driven downwards in a narrow pot, but I've only had and used one such pot.

@Japonicus , i'm curious what the depth of that pot your procumbens is in. Looks like a really nice tree!
The pot shows up on pg 4.
Measures approximately 7x7x4" I.D.
I think this is the thread where Adair refers to the tall narrow pots being more an issue than the more squat ones to water evenly. As I stated before, I just wanted to echo Franks input on holding off on foliage removal.
Downwards growing tufts of foliage, or foliage that requires more strength than it is supplying, is better gone sooner than later, but to thin or remove good foliage, even what is to be removed in a couple of years (does not conform to plan or slightly crowding) should remain. Consider it all solar panels, and the roots will take from them that remain now, when you repot. 4 months till December, so Springtime really will be here before you know it.
 
The pot shows up on pg 4.
Measures approximately 7x7x4" I.D.
As a testament to your work, I thought the tree was at least twice that size until I saw the picture of you holding it! Fantastic tree, wow.

My tree is currently quite larger than that, but I do like the proportions/visual mass of that pot. Took some measurements of my tree:

pot is 10” r x 7” deep at soil

tree is 16” above soil and 30” wide at its widest point

trunk is 1” across at the soil level, but about 1.5” at the big pretzel twist
So you read Adairs input on tall narrow pots?

chrome_screenshot_1690918810189.png
I believe my wooden grow pot was 7.5" tall before the Sara Rayner pot. The transition to 4" was simple down the road.
BTW I had to cut that wooden pot off the root mass. Actually I used a pair of channel locks to bust the pot apart to get it out.
Also, I have a shimpaku that stayed in a round plastic pot for 12 years. In that time I may've turned the pot upside down once, emptied the soil, flipped back over and replaced. Never did a proper repot in that time.
Honestly the green plastic can had become Sun rotted and wasn't helping the juniper at all.
So, just be patient with this as Frank applauded, and it will pay you back.
I paid no more than $25 for this in 2008. I'm going back to NEB again this Fall. They import from Japan and have a permant quarantine hoop house. At least they did.

I will give one piece of advice on being patient. You can ignorantly be too patient...in some circumstances as I have been.
Not removing flaws after recovery. I used to shape the pads on my junipers mostly by pinching. This allowed flaws to develop vertically. I let shoots grow up out of the pad, creating yet other pads. A pad built on a flaw, is a flawed pad. So, one, don't primarily pinch to thin or shape junipers. Two, removing flaws before they become set in their ways can save, would have saved me years in correcting some of the pads on my juniper.
 
As a testament to your work, I thought the tree was at least twice that size until I saw the picture of you holding it! Fantastic tree, wow.
Thank you, but nothing as nice as Franks pine.
It is about 28.5" from apex to apex as the crow flies, err the spider drops.
 
Where are people buying kishu juniper from? I'd buy cuttings off people at this point.
 
Back
Top Bottom