Opinions on re-doing a trident maple chop in late August.

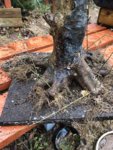
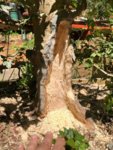
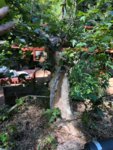
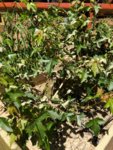
Well, this was another one of my big project trees that was touch and go for all of the spring and early summer. The tree sat for over 3 months without any new leaves, and the leaves on portions of the tree, including the smaller trunk, dried up. It was only in late June when the tree started pushing a few new leaves, and it's currently growing like gangbusters... which is a good thing. It was obvious the smaller trunk was dead, and portions of the trunk chop at the top would need to be redone, and I'm going to need extreme vigor and growth to close these wounds. Working the chop sights was done with hand tools this time around as I couldn't afford to damage any of the hard won new growth. That wound along the trunk is close to a foot long tip to tip and took about 90 minutes to clean up. I'm hoping the rolling callus actually adds interest to the trunk and may influence the future front. For now, some light wiring as allowed and lots of fert, sun and water. Stay tuned...IMG_2595.JPG IMG_2594.JPG IMG_2596.JPG IMG_2620 (1).JPG IMG_2621.JPG IMG_2622.JPG
 
Hmm... that's a shame. Can get something nice tho.
Will you be hollowing it all out? I can imagine it will take decades to heal over completely.
 
Yes let that tree grow, grow, grow! You might even think about putting this guy in the ground and forget about it. I suppose if all else fails you might want to carve it and turn it into a feature?


I can imagine it will take decades to heal over completely.


Not necessarily. I he can get it to grow vigorously without cutting back, it can just take a few years to heal it completely. I think this might be best accomplished if planted in the ground.
 
Yes let that tree grow, grow, grow! You might even think about putting this guy in the ground and forget about it. I suppose if all else fails you might want to carve it and turn it into a feature?


Not necessarily. I he can get it to grow vigorously without cutting back, it can just take a few years to heal it completely. I think this might be best accomplished if planted in the ground.
Thanks Serg. I'm wanting to see how the rest of this growing season unfolds, and then I'll need to see the roots next year. I'm planning to do a bunch of root grafts and would prefer to manage them in a pot, but if I'm unimpressed with the healing that occurs over the next few months, I'll have to rethink that. Luckily, I'm getting lots of new, vigorous shoots spread around the trunk chop, and there's already callus forming where branches lower down on the trunk were removed a week ago. I really believe I can get both wounds to close fully within 4-5 years, maybe sooner, if this one stays healthy.
 
So, the long range forecast shows low temps in the 40s and good rain chances every day. I decided to work this one because I knew it needed lots of root grafts and needed to get it done before the buds on the seedlings began to swell. As you can see, I did a few...?. It looks like a train wreck right now but it’ll get better...???.
8F100FB9-FFD0-4A67-895A-FF1770D831F5.jpeg5EF91C86-BD1A-435A-A54E-DEDC5D79E027.jpeg0E39A3C5-C7C8-4D28-B539-395F8E60EBC9.jpeg83841F57-634A-4F29-B617-23533AB0E233.jpegBFAF0A50-C2D6-4691-9F95-AF7AAC27BA92.jpeg
 

Attachments

  • 5BDAC45D-E0D8-47E0-A9D1-5368DB3066C7.jpeg
    5BDAC45D-E0D8-47E0-A9D1-5368DB3066C7.jpeg
    604.6 KB · Views: 42
Stinks you had to do such a invasive surgery on that one side.
I've not given up on these yet, but I had one for a few seasons I really enjoyed. Until a bad siting in storage dealt it an Ace of spades. Mediocre, but I liked it...:confused::confused::mad::mad::mad::mad::D:D:D:D:D:D:D:D

DSC00062 (1).JPG
 
So, I decided to carve out the deadwood on the side of this one as it's become apparent the wound would never heal.
IMG_0847.jpg

This guy was like "Don't do it!!"
IMG_0846.jpg

That's when I said "Gotta do it!" 10 minutes later, I had this...
IMG_0848.jpg

20 minutes later....
IMG_0853.jpg

Then, I started on the top... Later this summer, I'll do a bit more work, likely with a dremel and a power drill.
IMG_0854.jpg


IMG_0851.jpgIMG_0849.jpg
 

Attachments

  • IMG_0850.jpg
    IMG_0850.jpg
    469.8 KB · Views: 24
  • IMG_0855.jpg
    IMG_0855.jpg
    554.6 KB · Views: 18
  • IMG_0852.jpg
    IMG_0852.jpg
    542.1 KB · Views: 18
Last edited:
What bits did you use to do this? I see them in the picture but I don't know the name. Also, great timing. Another thread for me to read at work!

Edit: I think I've seen this tree in person at Marc's.
 
What bits did you use to do this? I see them in the picture but I don't know the name. Also, great timing. Another thread for me to read at work!
Those are kutzall carbide burrs...https://kutzall.com/collections/burrs. They come in different shapes and sizes and the extreme profile removes LOTS of wood quickly. I used a terrier bit to get further into the trunk and to do some of the finer carving at the base.
 
This is just like working on any other sculpture or a painting. You have to take some risks, keep trying things, knowing it could turn out great in the end or be a bomb and discard it. Either way, /you/ learn from it. Certainly we are too by watching your posts. While I love the trees and don't want to kill them, I think it's also good to be a little daring and push the limits. I know that I have certainly learned a lot more a lot faster than if I sit around being too timid to try things. So good on you! I hope this tree not only makes it but turns out to be a real show stopping crusty old chap with lots of character for you.
 
Those are kutzall carbide burrs...https://kutzall.com/collections/burrs. They come in different shapes and sizes and the extreme profile removes LOTS of wood quickly. I used a terrier bit to get further into the trunk and to do some of the finer carving at the base.
just got 2 bits b/c of this post! thx!
 
Those are kutzall carbide burrs...https://kutzall.com/collections/burrs. They come in different shapes and sizes and the extreme profile removes LOTS of wood quickly. I used a terrier bit to get further into the trunk and to do some of the finer carving at the base.
F'it. these thinks look awesome...upped my order to 4. lol
 
when carving, best to get a variety of bits for convincing deadwood or cleaning rotten segments
 
F'it. these thinks look awesome...upped my order to 4. lol
Between my 1/4" die grinder and my dremel, I've got at least 10 of these. I probably use the wheel shape in the die grinder the most to hog off the wood, and the ball on the dremel for hollowing out the wood.
 
As if I didn't already have enough dremels, flex shafts, and bits ... I will need some new bits for taking out lots of wood fast. Thanks for sharing that info. Those are some wicked bur tools!
 
Between my 1/4" die grinder and my dremel, I've got at least 10 of these. I probably use the wheel shape in the die grinder the most to hog off the wood, and the ball on the dremel for hollowing out the wood.
Ya, the first one I got was the sphere. I also got the wheel shape (saw burr), the cylinder and the taper burr. I see people using the wheel one all the time so I know I needed that. The others will help to create different diameter cuts/hallows so that when I hallow something out it will look varied in shape/natural
 
Back
Top Bottom