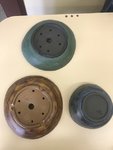
Need opinions on my pot

Thanks for illuminating.

Just remember this is Illumination with a Sorce light, which, now that I think about it, is really just realizing the difference between "truth truths" and "true ifs".

Like the arguments we have here because everything is true and everyone is right, same arguments about pottery.

We argue because people speak in absolutes with their truths. When really those truths are only true if other things are in place. "True if ..."

I like to find the "truth truths". The things that override everything else. The real cause, the real prevention, the real nature, the real science, the thing that happens regardless of previous interaction. The one Real truth.

I think that's why people have such a problem with me, because this thing exists and I recognize it. Then they think I have these absolutes, when really I don't hold these things as absolutes, they are just the knowledge that guides other knowledge.

Like we know water makes a tree grow, but there is still no less than...
Wow, there's 86,400 seconds in a day, can you imagine how many different watering patterns one could come up with? Millions!

No one is going thru millions of patterns so we get "close enough" and pour at those times.

Some of these Truth truths are not as easy to see as "plants need water".

And some of the process does require a bit more delving into in order to squeeze out each last drop of what is possible.

People talk about how this is Horticulture and Art. I would argue it is one in the same since, if I am an artist, and my medium is horticulture, I will learn to push it to the very limit, that edge where successful art comes from, and this means manipulating horticulture as if I was the tree. It's only when these lines are blurred, the artistic lines follow.

Oh...pottery ...

Let that be illuminated, to watch out for the "true ifs".

One important truth truth is this.

Every individual clay. Every individual glaze, and therefore, every individual clay and glaze combination has its own "perfect" firing schedule.

So the more different things we throw in a kiln, the larger we are just striving for the closest average, so everything comes out ok, rather than one thing being fired perfectly.

This means automatically our pottery is at less than 100%.

Just like we can't work over some crazy schedule to water every three seconds at 50psi then 37psi for 5 seconds, then a minute of, then 4....blah blah...

We can't technically fire 2 different Clay's to perfection in the same kiln.

The question is, how far is our clay and glaze from perfection, if we are in a community kiln.

Exploiting the "true ifs".....

Oh damn, hey @Peter44, cone packs on every shelf! But even before that, you may be able to find out if your rounds got put on the hottest shelf. Maybe you can get on a cooler shelf! Ask the kilnmaster.

"It's warping"...
True If...it's on the hottest shelf. Move it.
True If...you don't add something. Mix it.
True if...you use that clay. Change it!

Also @Peter44 Standard actually just changed all their literature on the 266 and 710 which is their dark Manganese Colored body from Cone 5/6 to 4/5 with best results at 5.
It is HIGHLY possible than the source of Manganese has changed across the board and rather than change entire formulas, they have just lowered the recommended temperature. This could have went unnoticed by the folks running the studio.

Just remembering it is odd it said cone 5.
Especially since they are probly firing to 6 correct?

Sorce
 
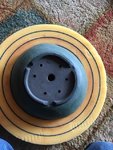
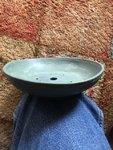
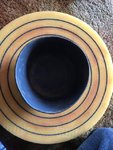
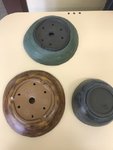
Thanks for all of the input and discussion. Here are some pictures of the pots that I mentioned. They are worse than they look but you can see what I'm talking about. I find that the studio has boxes of cones in many different temp ranges but don't use them. I will build some clay holder with 3 different cones...4, 5, 6 in them and use in the next glaze firing to see what is going on. I will probably ditch the clay I have been using (Laguna WC394-SB red) and switch to another clay. I will also handle the clay differently and keep it as flat as possible when moving. After wedging, then rolling out the slab, then using a drywall tool to compress and get all bubbles out (both sides), I drape the plaster molds and then form it to the molds with my hands pushing in and up a bit verses in and down which would stretch the clay. Then trim off excess a little long. Understand that the mold draped with the clay with a smaller piece of 2X under it is on a wheel I then keep working the wet clay tight against the mold with my hands until it has taken that shape. I smooth out everything with a rib or drywall tool, build and install feet, bore drain and wire holes, then flip it over on to foam to protect legs and trim the top and maybe add a band around at the top. I leave the mold in the clay as long as possible and only remove when clay is getting pretty ridged, but not dry of course. I then flip in over on to the top and then use some small foam pieces and maybe some blocks to put around the pot to make sure it stays round. Then dry slowly covered pretty tight. I flip the pot every day to make sure both sides are getting dry...newspaper under and over to help drying. About the third day start opening up the plastic a little and let it get dry. Understand that I have taken the pot home initially after it was first made so I can work on it anytime day or night. Doing all of this and getting warped pots is very discouraging and I need to solve that problem soon. It has to be something simple or everybody would have the problem. The pots I have been building lately are heavier/thicker and most have a band around the top for support. Post pictures of them later. I will not fire them until cone tests are done. Help/advice always appreciated. Thanks, Peter
 

Attachments

  • 60339992118__EB28B6BD-D75E-408E-AA12-BD396E47F6D1.JPG
    60339992118__EB28B6BD-D75E-408E-AA12-BD396E47F6D1.JPG
    95 KB · Views: 24
  • 60340011929__78222E5C-9CF8-4701-BB31-B62C4A2E6CE8.JPG
    60340011929__78222E5C-9CF8-4701-BB31-B62C4A2E6CE8.JPG
    106.3 KB · Views: 22
  • 60340016681__95637E46-EA98-4886-B37D-C111B01F21C0.JPG
    60340016681__95637E46-EA98-4886-B37D-C111B01F21C0.JPG
    78.9 KB · Views: 21
  • IMG_0115.jpg
    IMG_0115.jpg
    36.5 KB · Views: 21
  • IMG_0116.jpg
    IMG_0116.jpg
    35.7 KB · Views: 25
pushing in and up a bit verses in and down which would stretch the clay.

Love that☝️! This is the mindset we have to stay in to always do everything right.

This is still fundamentally wrong and detrimental to your mission....
After wedging, then rolling out the slab, then using a drywall tool to compress and get all bubbles out

Wedging IS the stage to remove bubbles.
If you don't want to wedge, (no one does) I would again recommend a Standard clay if at all possible. They use better vacuum pumps than anyone and the Clay is useable directly from the bag.

Ribbing will show all the air bubbles, mask them as you slide over a bit, but without adding more clay, the hole is still there, only less visible, and smaller.

You can take a pin tool, and ream them out to a cone shape (small as possible) and form a cone of Clay thicker than the hole, wet it, and the water forced the air out. You can cut off excess and keep ribbing. But this becomes extremely tedious, and without appropriate wedging, you will never be sure you have cured them all.

Worse, on a molecular level, "memory" is quite real, so any ribbing outside of the final form is, in a sense detrimental, unnecessary at least. Provided you pack your molecules (rib as the above quoted!) In the final form.

Ribbing is essentially the packing and stacking of molecules. Strength. Tighter bonds. Making "memory".

Drying myths.

Important to note, especially with groggy clays....
I've "slow dried" or the more appropriate "evenly dried", or attempted rather, and have had things break.
Where leaving them out to their own devices has been perfectly safe.

Lately, I have been taking advantage of the shape of the bonsai pot, which we must do since it is a bitch at every other level, and simply letting them dry out in the open, recently, directly under hot boiler pipes.
The feet elevate the bottom enough, that I have been getting a good wave of drying. Even the non groggy clay has been ok.

See the ombre of dry?20200216_092943.jpg

I think putting something in a humidity box to even out the water is more important than
Drying slowly, or covered. Leaving stuff covered may have even come from a dude that accidentally left his stuff covered once and it was ok so drying covered became a thing...? When he was only temporarily covering them to even them out in the first place.

Feet feet bo beet..

It's also extremely important to allow them to dry on a surface which they can shrink and not snag. I use paper. Paper over glass is prime.

Minimal foot contact with shelf is key.

If you look at Japanese pots, you will quickly see how little contact with the table most popular feet have. This is for no other reason besides they fire well, I'm sure of it.

Having minimal and ONE contact point on each foot is important.

You can see if a foot has three places to snag on a shelf while shrinking, how easily a warp will happen.

I bet you can set a panel of glass over your pots as they are upside down, and read where the feet contacted the shelf, snagged, and pulled the pot walls. With enough study, you can figure out exactly what the kiln is doing to your wares.

Maybe @RKatzin can show is a pic of that red pot foot! That was the last foot I had break due to NOT rounding a foot and lessening contact points.

Sorce
 
I think it is a handsome pot. Would make a great cascade or semi-cascade me thinks.
 
sorce I need to understand what you are saying...

1) why should I not push in and up just a bit when forming the clay to the mold. I don't want to push in and down and stretch the clay so that it is thinner at the rim.
2) I did not mention it but I do start the drying process by covering tightly and letting the moisture get to the same level for 1-2 days
3) I'm not sure I understand the minimal contact from feet to shelf thing. They dry on drywall boards with news paper on them. All edges on my feet are rounded and nothing to snag. I am doing ok while the pots are drying, and through bisque @.04, it's the glaze at cone 5 that warps them
4) I disagree with you that wedging takes out all of the bubbles/air pockets. With new clay, that might be almost true but still has bubbles after wedging. I poke needle pin in the holes and either compress with dry wall tool or press down on the area with a finger and rub hole closed. The second method works better for me. When working with scraps and bits and pieces, wedging is way more difficult, and air bubbles are more prominent. I almost won't work with old clay anymore because of that.
5) Is standard clay a brand or what? Why is it so much better?
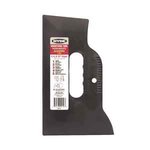
6) This is a drywall tool that I use to compress, smooth slabs, and get out the bubbles. If I used one of those small ribs it would take way longer. It is about 8-9" long and one can easily put good pressure down if needed.

Help appreciated, Peter
 

Attachments

  • ca4a8186-c227-40fe-96d3-3d548c680472.jpg
    ca4a8186-c227-40fe-96d3-3d548c680472.jpg
    4.8 KB · Views: 17
1 is good! Your train of thought to not stretch the Clay is excellent, I very much agree with your reasoning there.

2. I just went into drying because there are myths, I'd try leaving one out to see what happens.

3. Do place a plane of glass over the bottom, to see actual contact points. I'm guessing these whiter areas are where they made contact with the shelf. Of course I'm guessing, but you can see how these green dots kinda puzzle into the warping.Capture+_2020-02-16-21-51-46.png
Red looks like connect points again, with a small plane of glass you can actually see what contacts where. You see how if one grabs in the kiln, while 3 other points shrink and glide freely, the snagged one creates the warp. Just like we can deform a solo cup by placing pressures in uneven areas.

4. Properly wedged clay has no bubbles. I am not correct in saying this, I am respecting thousands of years of Tradition.

Truth truth, traditional Potteries, I mean the ones built on the clay deposits, they were wedging wetter clay.
I don't think Laguna Clay is doing any sitting around, it's quite popular, but all the clay we use is just that bit drier. We also wedge on stuff that is too absorbent, drywall, regular plaster (as opposed to plaster mixed specifically for a wedging table), etc etc etc, the clay is too dry before we can wedge it properly.
Or our technique is poor. Or both. Usually both.

Wedging is like watering.

5. Yes, I worked for Standard. Out of Pennsylvania, so it's not exactly close. But for what not having to wedge is worth... especially for a slab/hand builder, it very well may be worth the $/time exchange.
The owner is a most humble feller, this is why you won't find any large advertisement about the clay being better.

It is solely about the better vacuum pumps on the pugger.

Speaking of puggers Peter!
Perhaps a PeterPugger for a Peter before he Peter's out from to much kneading...ahem!

6. See 4!
If you think about the void and the rib coming over the top, you can see there is no more material available to fill the void. Unless we really smash it down, but then we have uneveness.

Thank you for the discussion, it keeps me on my toes.

Sorce
 
Bisque fired at 04, glazed and fired at cone 5...yes, but with different clay. The clay mentioned above is very sandy/groggy and has lots of iron. I will not make anymore pots with it as I have other clays to work with.
 
Also, Is there a foot mold that I could buy somewhere?
 
I would really venture to guess that the warping is because the kiln is firing a little higher than the clay wants to be fired. (Not going into the cone discussion, just that there is probably a clay out there that has a better range of firing. My favorite is good from 5-10) I am not nearly so careful with my slabs when moving them. I do try to avoid letting them stretch and when they do, re-ribbing them and compressing as much as possible. When moving slabs off the roller or transferring them for working, they are plastic and move. I get warping on pots too. More on rectangular pieces with sides wanting to lean inward, and it is something I just try to live with. And when you put a tree in it, you notice those things a lot less. I'd say your regime of slow drying is good. The general it sounds like you are taking precautions that are good ceramics practices. I really thing that the clay you are using is the main issue.

I did a 19" suiban that warped with the outer edges going upward and the flat bottom warping off the board by a 1/4 on the edges. This was during greenware. As is continued to dry, it flattened out just as it dried, fired both rounds and still flat, so no idea what the cause was. Clay is mysterious and part of doing ceramics is learning to embrace the faults.
 
I wended ( if that is such a verb) through a lot of the posts... here are my thoughts.

I recently watched a video of a japanese slab builder who stated that he only rolls out slabs (mostly) and compresses in one direction. While this forces him to use a bit more clay and trim edges back to keep the final slab within his desired dimensions he felt that this minimized the amount of curling/warping in his pieces. Also, he doesn't touch them- he doesn't really flip them (also one direction, so he is not picking them up to rotate them), all of which could theoretically create memories.

Roundness- not sure if you've heard of the trick of placing something round- a bowl, funnel, cup... in your circular object to correct, and/or maintain the roundness of your pieces. They can be left there into hard-leather hard stage...

As for the "sticking"... it doesn't seem to take much friction at all to create issues. At any point in time it would seem. Other solutions to firing issues is a layer of silica. I clean up my feet at all stages to ensure they are "pretty. I don't think rounding is mandatory- plenty of solid blocky feet and everything is well behaved.

Mn-rich clays are infamous for bloating- not warping so much. Usual remedy is keep it at ^5

Drying... I think even drying is important, speed of which is less than important. If you can create conditions (been watching Pottery Throwdown) that allow quick drying great, I think uneven drying is the enemy that sets up peculiar forces within the clay. Also I don't know that flipping so frequently is the best thing. Maybe experiment with every day vs. every other. I've talked to pot makers that did not do an initial flip for several days.

If a change of clay eliminates your problems then at lest you know its not your process.
 
I recently watched a video of a japanese slab builder who stated that he only rolls out slabs (mostly) and compresses in one direction. While this forces him to use a bit more clay and trim edges back to keep the final slab within his desired dimensions he felt that this minimized the amount of curling/warping in his pieces. Also, he doesn't touch them- he doesn't really flip them (also one direction, so he is not picking them up to rotate them), all of which could theoretically create memories.

Is there any way you could share the link to this video if you can track it down? I’d love to watch it. I’m struggling to understand what you are describing when you say he only compresses in direction? Like he doesn’t rotate the slab at all between each time he runs it though the slab roller? Or he doesn’t further compress the slab with a rib after using a slab roller?
 
Is there any way you could share the link to this video if you can track it down? I’d love to watch it. I’m struggling to understand what you are describing when you say he only compresses in direction? Like he doesn’t rotate the slab at all between each time he runs it though the slab roller? Or he doesn’t further compress the slab with a rib after using a slab roller?
While he says he normally uses a roller, in this video he hand rolled. Let me go dig around.
 
plenty of solid blocky feet and everything is well behaved.

Reckon having multiple contact points could help too huh....like a small piece of a L rectangle foot snagging, shrinking .006, another piece then catching, taking .008 shrink and so forth, so a large grip and rip never happens.
Spreading that inevitable snag across more small points.

As useful as a single 🛷 sled contact point on a taller foot.

Certainly kiln wash matters. I think mine is average, it's standards.

I think using a foot trick, and excellent kiln wash is mandatory over x shrink, and special tricks mandatory over that.

Sorce
 
Nothing in ceramics needs to glide as much as a bonsai pot.

Any other large ceramic object has a tiny foot! So shrink doesn't really matter.

Shrink kills!

Sorce
 
Nothing in ceramics needs to glide as much as a bonsai pot.

Any other large ceramic object has a tiny foot! So shrink doesn't really matter.

Shrink kills!

Sorce

I agree. What seems like a miniscule bit of friction is multiplied when you are at 2000 degrees.

But.

Look at all the flat bottom nanbans and such.... Lots o' surface area...

I have never had an issue with any flat bottoms... except one 25# scoop pot. (f@# U Dale for being right) which cracked in like nine places because it could not shift and shimmy.

...usually my issue is with seams... my shelves are well washed. never had to use sand although I've thought about it.

Now that I'm thinking about it, I wonder if warpage is a slab thickness issue?
 
That Imperfect surface area works to divide those small snags, so nothing big happens. Like L feet. At least I guess.

It is a very fine line yes? Between many small snags and one inch long snag, especially at temps. To me, there's nothing you can do for those things! Dale was lucky to a huge degree! Maybe even to the bad karma feeding! Oh no!

Thick slabs?
Myth!
You know how "curves in a tree lesson as the tree grows", same reason waves are hidden in thicker slabs, it's just harder to see thru the thickness.

Yeah seams. Score deep! I am falling into a good score everything pattern, the little orange xiem scorer, it's dulling on me but fantastic! Hmmm...it depends of course, cuz wet enough and I believe scoring is bad!
But if I forget, I'll score thru it all and clean it back up, haven't had a seam pull in a while. Seamin!

I used sand on my last biggins. Meh. No problems.....but nothing else to go on.

Slab thickness....
Oh yeah too...it'll effect warpage, bit lotta it depends'. I think if @Peter44 goes thicker with that clay, it'll bloat. That carbon won't escape the thicker wall, and it'll be nice and straight/round, and full of bloats!

Any other clay and thicker cures the problem.

More jumping thoughts....the nanban and other.... Imagine if a shelf is slight concave (sagging) a nanban is safer...
Than if the sagging shelf was freshly flipped, and is the convex.

If there is calculateble truth behind the #25, I would investigate that. Plus kiln wash.

Great chat!

How's yer beast?

Sorce
The kiln? Still working on making pots fast enough to fill it! :) Waiting on my son/electrician to get me a hook up in our shop building giving me an actual "studio" to work in. It is a different plug configuration than my smaller kiln. Right now I work out of the living room and garage so having a dedicated space will be kind of cool!...
 
Back
Top Bottom