You are using an out of date browser. It may not display this or other websites correctly.
You should upgrade or use an alternative browser.
You should upgrade or use an alternative browser.
Kintsugi Pot Repair
- Thread starter lieuz
- Start date
-
- Tags
- kintsugi lacquer pot repair
JudyB
Queen of the Nuts
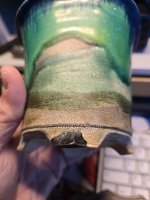
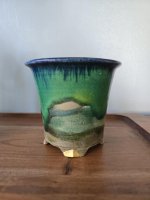
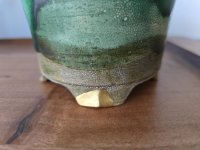
I love this sooooo much. I have a pot that is under a tree currently that needs this very thing!After a few months, the repaired foot came out pretty nicely.
I wanted to show the before and after showing the break and the repair. It was pretty cool posing the pot to see if I could match some of the shots from the owner.
Disclaimer** The pot was cleaned with just water. The pot just dirty with dirt, the owner cleaned it before shipping it and I gave it another quick rinse for good measure.
View attachment 583324
View attachment 583325
View attachment 583326
View attachment 583327
lieuz
Chumono
Here is another project with another broken foot. This is a Bushuan pot with a broken foot. I added some holes so I could add some reinforcement in to adhere the repair into place. I generally do this for patching large areas, especially the feet.


The vitrified clay body itself is quite soft tbh. Drilling these holes into the structure was pretty easy. I noticed on the other feet, the structure of the foot isn't completely flat, there's a raised ridge in the middle of the foot and this lends itself to having some room to apply a little bit of reinforcement.


The vitrified clay body itself is quite soft tbh. Drilling these holes into the structure was pretty easy. I noticed on the other feet, the structure of the foot isn't completely flat, there's a raised ridge in the middle of the foot and this lends itself to having some room to apply a little bit of reinforcement.
lieuz
Chumono
Here's the repaired foot, it took me a little bit to realize there is that ridge. There is a piece of wire that runs in those drilled holes. Skinny wire, but it anchors the foot well. I'll be applying polishing urushi to fill in all the small holes.
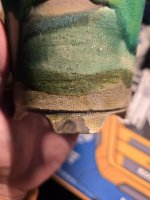
Notice that small ridge in the middle. Very very subtle but definitely missed when the composite was shaped. I came back and added that ridge with the sabi urushi which is the filling material consistency. You can see the two tones, the lighter material is the material that has the wood fibers in it, that's the composite. Then the darker material is just urushi with the tonoko (clay fines). See the parts that's missing surface, the sabi urushi fills in very nicely.

Notice that small ridge in the middle. Very very subtle but definitely missed when the composite was shaped. I came back and added that ridge with the sabi urushi which is the filling material consistency. You can see the two tones, the lighter material is the material that has the wood fibers in it, that's the composite. Then the darker material is just urushi with the tonoko (clay fines). See the parts that's missing surface, the sabi urushi fills in very nicely.
lieuz
Chumono
Another small chipped project is this beautiful beautiful Benda pot. Man, I love this pot.

A friend noticed a chip in the lip and asked if I could repair it and I was just absolutely thrilled to. To hold this pot in my hands was just BLISS.

So one of the things I need to look out for is to recreate the edges. The curved vertical edge leads up the lip which in itself comes to a cornered tip. Then the top lip has a small little ridge that runs the perimeter of the entire pot lip. It's small but it has a lot to consider.

A friend noticed a chip in the lip and asked if I could repair it and I was just absolutely thrilled to. To hold this pot in my hands was just BLISS.

So one of the things I need to look out for is to recreate the edges. The curved vertical edge leads up the lip which in itself comes to a cornered tip. Then the top lip has a small little ridge that runs the perimeter of the entire pot lip. It's small but it has a lot to consider.
lieuz
Chumono
Here is where I filled the chip area by shaping the structure with kokuso urushi which is the composite material. Then I shaped it down roughly and then came back with sabi urushi which is the filling material to fill and shape the rest of the edging.
Note the filled-in AREA, this is honestly invisible to the touch, it may feel tacky because of the material. The finger does stop when touching it because of the slightly tacky feel.
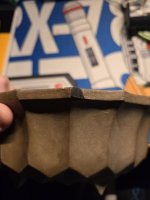
In this image you can clearly see the shaped corner where the curved edges all meet at a corner point. This took a few passes to get right. I'm very very pleased because it looks very clean and subtle. The curved lip also has a vertical edge, very subtle but it is there.

Here's that top lip I was mentioning. It's extremely subtle but it fits. The corner may be very sharp, I will have to tone that sharp corner down a bit.

I had a great time repairing this chipped Benda pot. Next step is to finish with polishing urushi to fill in all the small holes. I'll sand it again and reapply to get a flawless surface. Probably 2-3 more passes before I add the gilding.
Note the filled-in AREA, this is honestly invisible to the touch, it may feel tacky because of the material. The finger does stop when touching it because of the slightly tacky feel.

In this image you can clearly see the shaped corner where the curved edges all meet at a corner point. This took a few passes to get right. I'm very very pleased because it looks very clean and subtle. The curved lip also has a vertical edge, very subtle but it is there.

Here's that top lip I was mentioning. It's extremely subtle but it fits. The corner may be very sharp, I will have to tone that sharp corner down a bit.

I had a great time repairing this chipped Benda pot. Next step is to finish with polishing urushi to fill in all the small holes. I'll sand it again and reapply to get a flawless surface. Probably 2-3 more passes before I add the gilding.
lieuz
Chumono
lieuz
Chumono
lieuz
Chumono
Wood
Chumono
This really fits the showiness of Bushuan
lieuz
Chumono
Finally, the Benda pot is repaired. I really enjoyed this repair. It's pretty stupid and simple, but you know what they say, simple is hard to get right. The chip couldn't have been more perfectly placed, exactly where there are so many edges, ridges, and curves.
Because the pot was so intricately beautiful with all of its curves and angles, I did a slow-motion light pass to showcase all of the features. It also shows the gilding a lot better than what a picture can show. Quite sensual if I do say so myself.
Here are some pictures to showcase the details.
Word's can't tell you how much I love this pot. It's so mathematically portioned. Very symmetrical.

Different angles to show off the repair. Note the small bit past the ridge.

Close up to showcase the convergence of all the corners. Quite pleased with this.

Close-up of the top ridge to showcase the small edge. This is incredibly satisfying.

This pot will be cured a little bit longer and then will be returned back to its owner. He'll be pleased.
Because the pot was so intricately beautiful with all of its curves and angles, I did a slow-motion light pass to showcase all of the features. It also shows the gilding a lot better than what a picture can show. Quite sensual
Here are some pictures to showcase the details.
Word's can't tell you how much I love this pot. It's so mathematically portioned. Very symmetrical.

Different angles to show off the repair. Note the small bit past the ridge.

Close up to showcase the convergence of all the corners. Quite pleased with this.

Close-up of the top ridge to showcase the small edge. This is incredibly satisfying.

This pot will be cured a little bit longer and then will be returned back to its owner. He'll be pleased.
Last edited:
JudyB
Queen of the Nuts
I just want to touch and hold this pot. Well done, it enhances the whole IMO.Finally, the Benda pot is repaired. I really enjoyed this repair. It's pretty stupid and simple, but you know what they say, simple is hard to get right. The chip couldn't have been more perfectly placed, exactly where there are so many edges, ridges, and curves.
Because the pot was so intricately beautiful with all of its curves and angles, I did a slow-motion light pass to showcase all of the features. It also shows the gilding a lot better than what a picture can show. Quite sensualif I do say so myself.
Here are some pictures to showcase the details.
Word's can't tell you how much I love this pot. It's so mathematically portioned. Very symmetrical.
View attachment 585570
Different angles to show off the repair. Note the small bit past the ridge.
View attachment 585571
Close up to showcase the convergence of all the corners. Quite pleased with this.
View attachment 585572
Close-up of the top ridge to showcase the small edge. This is incredibly satisfying.
View attachment 585573
This pot will be cured a little bit longer and then will be returned back to its owner. He'll be pleased.
LuZiKui
Shohin
This is one of my favorite threads on Bnut, love what you're doing.
Quick question, on a pot like the Benda, what's the general rule of thumb on the positioning of the repair when you repot? I'd absolutely have it in the front how you have the pot shown just below the video, but curious if that's the standard.
Quick question, on a pot like the Benda, what's the general rule of thumb on the positioning of the repair when you repot? I'd absolutely have it in the front how you have the pot shown just below the video, but curious if that's the standard.
lieuz
Chumono
Man, I love that!This is one of my favorite threads on Bnut, love what you're doing.
Quick question, on a pot like the Benda, what's the general rule of thumb on the positioning of the repair when you repot? I'd absolutely have it in the front how you have the pot shown just below the video, but curious if that's the standard.
I'd love for the pot to be mine haha; but, sadly it isn't. I'd say that if it were mine, I'd position it per the usual. I like a more sturdy look so no foot should be right in the middle. So in this case, the repair, it'll always be slightly off to the side, exactly like how the first picture shows it.
lieuz
Chumono
lieuz
Chumono
Oh, Joy! A new pot to fix!
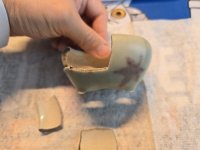
A friend asked me to repair this tiny Imaoka Machinao pot for him. It's literally one of his favorite pots and while reaching for something, it fell and broke. Fortunately, only the walls broke vs the whole pot breaking in half. I could hear his shock when this fell. I'll say, it's definitely an honor to work with this pot. Its glaze is what makes the pot so desirable. It's double glazed and it's definitely extra thick, to create this ethereal look. It feels like, looking at foliage through heavy fog, which is so very interesting.
Chop for reference:

I've already started processing this pot. The edges are filed down a bit to create more surface area for the adhesive to grab on. It's porcelain so it's going to need that extra care. It's also got a great patina, that's going to need every point of dexterity I have.



lieuz
Chumono
Processed and put back together. I had to get a little creative to hold the pieces together. Kintsugi adhesion state generally doesn't worry too much about glazed surface. But bonsai kintsugi is different because we worry about pantina. So I built up these connections points and bridged them to hold the pieces in place.
Why do I do this? When the urushi oozes out, if I add tape or add hot glue to the broken joints where the urushi has beaded out, I risk staining the area because the hot glue will push the urushi down and potentially create a stain on the surface.
Here's my solution:

Note the built up anchor points. Anywhere where there weren't any urushi oozing out was good for me to apply hot glue.


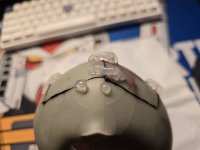

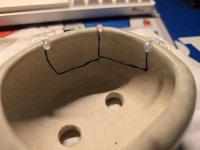
The back side, I didn't want to risk because none of it is glazed and I definitely didn't want to stain the porcelain surface. I felt there was enough support on the front end. It's a very tight joint, a lot of urushi oozed out. Quite happy I was able to create such a tight repair.
More to come!
Why do I do this? When the urushi oozes out, if I add tape or add hot glue to the broken joints where the urushi has beaded out, I risk staining the area because the hot glue will push the urushi down and potentially create a stain on the surface.
Here's my solution:

Note the built up anchor points. Anywhere where there weren't any urushi oozing out was good for me to apply hot glue.


The back side, I didn't want to risk because none of it is glazed and I definitely didn't want to stain the porcelain surface. I felt there was enough support on the front end. It's a very tight joint, a lot of urushi oozed out. Quite happy I was able to create such a tight repair.

More to come!
lieuz
Chumono
The pot has cured for a week now, and the pieces can stand by themselves. The fit was very tight, so I feel very confident I can remove the glue bits now. It shouldn't shift anymore.
I have to start to prep for filling in the cracks with the filler material so the masking tape goes on.


Fortunately, I'll say that the back is more flush than the front. When I scraped away the mugi urushi, the cured adhesive filled the cracks on the back of the pot, so it's pretty much filled in. I don't really have to come back in to use sabi urushi to back fill. Since the back can stain, I would rather not touch that spot, honestly.
Next, use sabi urushi to fill in the front crack and let it cure.
More to come!
I have to start to prep for filling in the cracks with the filler material so the masking tape goes on.


Fortunately, I'll say that the back is more flush than the front. When I scraped away the mugi urushi, the cured adhesive filled the cracks on the back of the pot, so it's pretty much filled in. I don't really have to come back in to use sabi urushi to back fill. Since the back can stain, I would rather not touch that spot, honestly.
Next, use sabi urushi to fill in the front crack and let it cure.
More to come!
lieuz
Chumono
Filling material was added to fill the repaired joints with sabi urushi. The tape was then removed from the pot surface.
Note the very thick repair filler. Next few images show much much filler was used. At least the thickness of the applied tape.

Note the processed repair line with the excess material scraped away. The two images show the flush vs the built up filler material.

The joint is very clean. Feels extremely smooth.

There's a small slight staining. It'll be removed with Clorox wipe. Interestingly enough it does a fantastic job at removing stains by lacquer.

It'll cure now, all the larger non superficial cracks will be filled in with the polishing urushi.
See you in a week.
Note the very thick repair filler. Next few images show much much filler was used. At least the thickness of the applied tape.

Note the processed repair line with the excess material scraped away. The two images show the flush vs the built up filler material.

The joint is very clean. Feels extremely smooth.

There's a small slight staining. It'll be removed with Clorox wipe. Interestingly enough it does a fantastic job at removing stains by lacquer.

It'll cure now, all the larger non superficial cracks will be filled in with the polishing urushi.
See you in a week.
Similar threads
- Replies
- 20
- Views
- 3K


