Juniper wiring tips? Guidelines? Rules of thumb? Personal spins?

DonovanC

Chumono
Messages
524
Reaction score
616
Location
Ohio, U.S.
USDA Zone
6a
I’m pretty much new to wiring junipers... I mean I’ve done it, but I’ve never really known what I’m doing. And I’ve really only started taking the practice more seriously this year. I have a number of cuttings from the last 2 years and a few of them have grown enough to start working on - or at least to practice with. So I’ve Ben doing that.

Basically I’ve just been giving the trunk a fun shape then wiring all the branches down and giving them some movement. I’ve seen a few videos that have shown decent detail as to how to do this which is how I’ve gotten to this point. But it still feels like I’m missing something...

Any advice? What is your favorite technique/method? Am I missing some obvious rule of thumb or is it just a matter of experience?

Any books that specifically cover wiring?

Any help is appreciated!

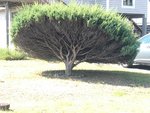
Here’s one I did today for practice - don’t hold back. Honest critique please, I can handle it lol.90E9B364-8A60-4D30-8A63-DB6B4368B0D3.jpeg
087F503F-25FE-4806-BAE6-6EADE2510287.png
 
An above view of the first juniper and a couple other attempts.

Also another question: after wiring, do you put them in the ground? I would like to put these in the ground - but I’m assuming I should wait until after they’ve accepted the shape and I’m able to remove the wires. I’m thinking of this work as just the initial bump in the direction that I want the tree to go - after the trees accept the shape and spend some time in the ground to thicken up, I’ll wire them again.

Is this correct? Or is it madness?

Above view of first tree:
406ED640-D590-46D9-8911-F7925352CC27.jpeg

A couple more attempts:
E0E5FA8D-0E9C-4E6C-B178-3223B603DE6C.jpegC1695A8F-D747-4F05-97DF-9841E7AB71C1.jpeg8CDDE16B-B4A0-4125-AACE-626B826120BD.jpeg
 
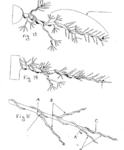
I've included several attachments I'll refer to. Both the juniper branching images give an example of how juniper branches grow. The first, as I understand it, is in the Sierras in California. (One of these days...) The last attachment shows branching on a much less regal juniper on the opposite coast, near Kitty Hawk NC, but with an ultimately similar pattern of branching. If there is movement, it's toward the trunk. Out at the ends, the movement gets more and more subtle. Not non-existant, but if you're going to have (believable) movement in the branching of your junipers, it starts w/ the trunk and moves out from there decreasing as it goes.

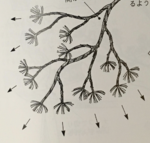
As far as wiring goes, the picture 9.06.05 shows how to wire branches. You start with the thickest wire, then you use that wire to anchor the smaller wire, always wiring 2 branches with one wire.

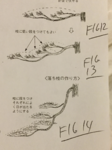
9.07.20 shows that branch pads (this is a pine, but you get the idea) extends outwards. Branchlets in the pad don't have to snake and wiggle. Getting the structure right in the pad, makes a cleaner image in the short run, and eases maintenance later.

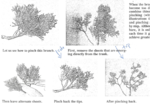
9.09.56 shows how to clean a juniper branch. I've seen very few examples of this. Learning to clean is the single fastest way to improve your bonsai. It's also the single fastest way to improve your wiring ability as well. Notice where the resulting foliage is. (If that makes you uncomfortable, refer back to the branching pictures.)

9.06.58 shows how to develop branches. Notice that the bottoms of the pads are clean. Pay special attention to where the branches come from (the top). That means, when you're cleaning, you can't remove ALL of the top branches.
 

Attachments

  • juniper-branching-study.jpg
    juniper-branching-study.jpg
    119.7 KB · Views: 129
  • Screen Shot 2020-09-02 at 9.06.05 PM.png
    Screen Shot 2020-09-02 at 9.06.05 PM.png
    95.4 KB · Views: 128
  • Screen Shot 2020-09-02 at 9.07.20 PM.png
    Screen Shot 2020-09-02 at 9.07.20 PM.png
    215.2 KB · Views: 129
  • Screen Shot 2020-09-02 at 9.09.56 PM.png
    Screen Shot 2020-09-02 at 9.09.56 PM.png
    250.5 KB · Views: 135
  • Screen Shot 2020-09-02 at 9.06.58 PM.png
    Screen Shot 2020-09-02 at 9.06.58 PM.png
    317.2 KB · Views: 128
  • juniper-branching.jpg
    juniper-branching.jpg
    244.9 KB · Views: 116
I've included several attachments I'll refer to. Both the juniper branching images give an example of how juniper branches grow. The first, as I understand it, is in the Sierras in California. (One of these days...) The last attachment shows branching on a much less regal juniper on the opposite coast, near Kitty Hawk NC, but with an ultimately similar pattern of branching. If there is movement, it's toward the trunk. Out at the ends, the movement gets more and more subtle. Not non-existant, but if you're going to have (believable) movement in the branching of your junipers, it starts w/ the trunk and moves out from there decreasing as it goes.

As far as wiring goes, the picture 9.06.05 shows how to wire branches. You start with the thickest wire, then you use that wire to anchor the smaller wire, always wiring 2 branches with one wire.

9.07.20 shows that branch pads (this is a pine, but you get the idea) extends outwards. Branchlets in the pad don't have to snake and wiggle. Getting the structure right in the pad, makes a cleaner image in the short run, and eases maintenance later.

9.09.56 shows how to clean a juniper branch. I've seen very few examples of this. Learning to clean is the single fastest way to improve your bonsai. It's also the single fastest way to improve your wiring ability as well. Notice where the resulting foliage is. (If that makes you uncomfortable, refer back to the branching pictures.)

9.06.58 shows how to develop branches. Notice that the bottoms of the pads are clean. Pay special attention to where the branches come from (the top). That means, when you're cleaning, you can't remove ALL of the top branches.
These are helpful, thanks 🙏
I appreciate the illustrations, it helps to visualize the process.
I think 9.09.56 kind of sums up what I feel like I’m missing. Like I understand the basics - but it’s the fine tuning like this that’s eluding me.
Thanks for the help!
 
The stuff that @bwaynef has offered is all about more advanced trees and is of little use to these tiny babies.
Your approach is very sound. It is what I believe the nurseries in Japan do to develop pseudo yamadori junipers now they are no longer allowed to collect wild ones and is also what I have been doing here to develop shimpaku trunks.
Take a thin cutting (I actually strike long runners to get this sort of stock) Wire the trunk. It does not really matter if you wire over needles or small shoots because all of that will be well gone by the time the trunk has grown. Bend and twist the trunk. Your 10" cutting is now only 2" or 3" tall. The more random and uneven the bends are the better as it will look less contrived when grown. Allow 6 months for the trunk to set then remove the wire. Sometimes the trunk is now too soft to support the weight but it will soon stiffen up. It will usually pay to allow the little tree to grow some more long runners. Wire and bend those too, even the ones you don't intend to use in the end because straight jins on a twisted trunk just doesn't look right and at this early stage you really don't know which is the final trunk line or branches and which will be sacrifice branches.
When you finally have enough basic trunk (which can take 2-4 years) you can them plant it in the ground. Don't try planting wired trunks unless you are happy to have scars and embedded wire.

some other hints: Try for some really tight bends as well as the more relaxed ones I see on the trees above. You are aiming for really random so need a mix of all sorts of bends and twists. If you an't get really tight bends initially go as far as you dare (expect a few breakages while trying) then allow the tree to relax for a day or 2. You should then be able to bend even further and tighten up some bends. Twisting the trunk as you bend will also allow far tighter bends than a straight bend. Allowing the trunks to dry out a little before bending will make them far more flexible.
Initially I had difficulty bending close to the roots. Wiring the just rooted cuttings when they are bare rooted at potting on solves that problem and you can wire right from roots to tip and bend before potting them up.
Bark tends to slip when the trees are growing so expect some dead sections if you do this in summer. Bending in late summer or winter is safer.
I do have some failures using the above. Tight bends will cause the occasional breakage and if that happens to be low on the trunk it can well kill the tree completely. I have since come up with an alternative approach. Instead of taking cuttings, wire the long runners on your developing trees. Now it doesn't matter if some break as you have not invested time and effort into rooting cuttings. They will also grow faster with the resources and roots of a larger tree to support them. When the shaping is done just layer the good ones and you have well developed twisted trunks ready to go in the ground or grow pot.

Definitely keep on with the wiring and twisting of these little junipers. Anything is better than straight trunks or those terrible corkscrew semi advanced junipers.

Thanks so much!
This is the basic method that I’m looking to master. Thanks for all the input, this is very helpful and exactly what I’m looking for.
The tight bends is definitely something I need to work on - I am very hesitant when bending. But like you said, more twisting will help with that.
I saw a video a long time ago out of Japan, it was just a couple guys sitting with a bucket of rooted runners - they’d grab one, wire it then quickly wire it all random and mangled and throw it into the next bucket. So that’s what I’ve been working on. I’ve been rooting long runners the last two years and earlier this year I wired 5 or 6 of them and mangled them (none of which have nice right bends). And lately I’ve been adding wire to the secondary branches.

So tighter trunk bends - twisting helps accomplish this.
Grow them in the pot for a couple years? Then remove the wire and finish growing them out in the ground for a couple/few years?

Also wiring the runners while still on the tree is a great idea - I have a nursery stock chinensis that I’ve been holding onto the make some more cuttings. It has a bunch of long thing runners. So maybe instead of starting cuttings from it I’ll do this.
Earlier this year when I started some chinensis, I wired and bent the runners as I cut them off - but this will have been a waist for any that choose not to root. So it’s not a practice I’ll continue.

I’m going to work on battling threw my fear of snapping my cuttings while wiring - I think those tights bends are a big part of what’s missing in my technique.

Thanks for all the input!
 
You gotta find the Collin Lewis wiriing tutorial. Ryan Neil also has an excellent one that wonderfully covers pruning appropriately to have something to wire.

Like Shibui inferred, there is a giant difference between wiring small stuff, and wiring advanced stuff. You simply won't find the visual satisfaction with small stuff, but that doesn't mean skip out on fundamentals. (Not that you are).

Fundamentals are everything and nothing.

To me it's a sliding scale, because the green on young material will be wood when the tree is "finished", we can be haphazard with it until it contains the green we'll look at. Ruin it. Like Vance Says, "be nature", be the damage, the landslide, the cow, the weather, the lightening.

So with young material the haphazard to good fundamentals ratio should be 80/20. Knowing that the more damage we create, the longer it will take, for a better outcome. Balance that.

On finished material, where we need to keep that green tidy to view, our ratio flip flops, and we use 20 haphazard and 80 good fundamentals.

The point is, we will never get everything done without being creative. And creativity makes a green helmet more interesting, cuz at the end of the day, green is green, and wood is wood. They're all the same.

Took me a while to stray away from seeking the joy of wiring things that will never bring the joy I was seeking, so for 3 years or so, I've been focused on pruning appropriately, in order to have something worth wiring out. The balance being, it must be wired out before it can't be bent. Still going, three years strong, wiring what must be wired when it must be, but everything else is just pruning to get something to wire out. This saves a lot of time and energy.

But still we must practice, so while we are allowed haphazard on young material, the more we practice our fundamentals on them, the better we become, because let's face it. It takes 80% of our time to get fundementals right. It takes 2 seconds and a moron to throw a rock on a branch, or a screen on a seedling, or to knock a pot over and let light change a trees direction.

So do not skimp on fundementals...ever! But do not be enslaved by them.

Your tight bends might be more achievable with a dry plant.

I don't wire in winter because a kinked hose won't allow water to flow, either will a kinked branch. It's harder to kink a hose with water than a dry hose. So I wire between the start of fall growth and dormancy.

Sorce

I found what appear to be some good Ryan Neil wiring demos. I’m searching for something of his closer to pruning methods. I don’t think I’ve found the Collin Lewis one, but thanks for the direction. At least I know what I’m looking for. I also came across a Bonsai U videos which was helpful.


The journey towards balance - that’s where I’m at. And not just in the art of bonsai. I tend to reach for level 10 when I’ve barely gotten through level one - then I’m at a loss as to why I’m lost. I’m working on that.
So, fundamentals.
But yes, I’ve thought plenty about finding a balance between pruning and wiring. I tend to lean more towards clip and grow techniques, which I suppose is why I’ve hesitated to venture into these methods until now. So I appreciate the idea of using more pruning along with wiring. The idea of wiring only when necessary, but then relying on clip and grow as much as possible sits well with me. I’ve (even with my lesser experienced eyes) have seen trees that were grossly over wired and unnatural looking. I never want one of those trees.

I’d definitely be interested in more about your pruning methods, and thoughts on the subject. Specifically “...focused on pruning appropriately, in order to have something worth wiring out”.

Thanks for taking the time 🙏
 
focused on pruning appropriately, in order to have something worth wiring out”.

This is surely more this than "clip and grow", though I am a fan of clip and grow and my whole thing is a hybrid.

This should take you to a Google search. The Mirai video I was talking about I believe is the long one. Though it may have been "structural wiring", but not the beginner series one here. I don't think. That Mauro masterclass is probly great too!

Sorce

A hybrid, yes. That’s what I’m working towards. A well balanced hybrid with pine and citrus notes 🤔

Thanks for the links, I’ll check them out!
 
Some species you can be successful with only doing clip and grow. Some, you can’t.

There is no species that can’t be wired.

“clip and grow” and “wiring” are both tools you can use for bonsai. Wiring is a technique that’s unique to bonsai. No other horticultural practice involves spiral wiring branches. Wiring is an essential skill to become proficient in bonsai.

The Colin Lewis tutorial was free on a website called “Craftsy.com”. That web site has been purchased by another company. But, the link used to still work. I don’t know if it’s still free or not. If you try it, search for “Colin Lewis”, and you should find it. It’s excellent.
I searched a little bit for the Colin Lewis video, @sorce mentioned it as well.
I found this channel on YouTube, I don’t know if these videos are what you’re talking about. I’m going to check them out later.
 
I searched a little bit for the Colin Lewis video, @sorce mentioned it as well.
I found this channel on YouTube, I don’t know if these videos are what you’re talking about. I’m going to check them out later.

It was on Craftsy, but that closed or something I think. I thought someone else might know for sure.

Sorce
 
I searched a little bit for the Colin Lewis video, @sorce mentioned it as well.
I found this channel on YouTube, I don’t know if these videos are what you’re talking about. I’m going to check them out later.
It looks like it still exists, at least the previews do. You have to create an account (was free, I assume it still is but not sure) and log in to view the full video. Let us know if it works:

Craftsy Wiring Class by Colin Lewis

Edit to add - those may actually be the full videos, I don't remember how many or how long they were.
Thanks!
 
Back
Top Bottom