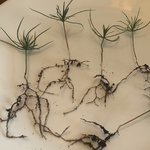
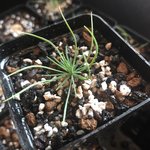
Japanese Red and Black Pines from seed

AnacortesSteve

Yamadori
Messages
79
Reaction score
89
I have been growing JRP from seeds collected from the mother tree in my yard so no lack of source seeds, This year I started with JBP seeds I bought online and those have been pretty successful so I thought I would share some of what I have learned (thanks to those that have taught me).
I start my seeds by a 24 hour soak.
I take the floaters and put them in a separate bag, over 50% sprout so don't be so quick to throw them away and with my method there isn't a lot of waste.
Take a paper towel and either use the ones that are already 1/2 size or cut it yourself.
I spray water on 1/2 the towel, then put maybe 20+ seeds
Fold the towel over and slide your hand under and place in sandwich size baggie, fingers all the way to the back, then pinch from outside and slide your fingers out, hopefully the towel is flat in the bag.
Spray water on the towel so that its damp.
I place the baggies on the shelf above my T8 grow light so they are a little warm, I put the date or other notes like "floaters" on the baggie.
After a week I start looking for roots, you can hold it up to a sunlit window or another light source.
You should see a line where the root starts growing away from the seed, easy to see with JRP, much smaller with JBP.
If I see a root I open the bag and remove any with roots.
I take a lettuce container that has a lid and fill with seed starter but make sure you have room once they sprout to keep a lid on it.
I put a layer of over 1/4 inch of sterile play sand
I spray the whole box several times so that there is moisture through the sand and some in the seed starter mix
I then take a wooden skewer for JBP with a piece of tape at 1/4 inch from the end and put holes 5 across till 1/2 the container is done or 1/4 depends on how many seeds you started
For JRP I don't wet the sand and make it a little deeper, I then just push the root end of the seed into the sand with larger spacing maybe 4 across. Once all the rooted seeds are added I use my sprayer and give them a good bath.
Then I drop the seed into the hole and push the sand over one at a time so I don't put 2 in the same hole (guess how I figured that out)
Put the top on the box and keep them misted till they lose their seed hull and are less susceptible to drying out
I spray a fungicide on the sand weekly to help stop damping off, the sand works pretty good and keeps the bugs down
all this is on a shelf under a grow light, I have a 4' T8 and 4' LED so I will see which works better. The shelf is in an un heated/cooled south facing room.
Next post with cover cuttings20200715_064731 First Cut JBP.jpg20200715_103754.jpg20200808_062934.jpg20200808_062951.jpg
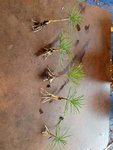
 
The cuttings above were after a first cut so pretty nice roots as they are.
After the cuttings sprout their first true needles and start turning purple they are ready for cuttings
I sterilize my xacto knife with alcohol
I use Hormodin #3 as a rooting compound
I prepare a salad container like I did for first growth
I pull the cutting using the non taped side of the wooden skewer to dig under the pine seedling, just break up the soil so I don't break it
I cut the trunk about 1" below the cotyledons and have begun cutting even shorter, specially on 2nd cuts. Cut cleanly across, don't tear with a dull blade
I put the cutting into a large stainless bowel filled with room temp water so as not to shock the cutting
I then use the skewer to poke holes in the sand which was dampened to hold it's shape, dry sand will just collapse
Take a wet cutting, shake off the water, then dip 1/8" or a big more in the Hormodin rooting compound
Tap my hand which is holding the cutting on the table so as to shake off the rooting compound, too much will kill the cutting
drop the cutting in a sand hole and use a finger to push the sand on it.
Once they are all loaded I wait about 20 minutes, then I give them a good misting and put the top on the container, I have some holes poked in so it's not totally air tight
This goes on a shelf that has a temp controlled heat mat at 80 deg, I have 2 mats on the control and only 1 container has the temp probe
I try to keep the room cool, open the window and close blinds on a hot day
 
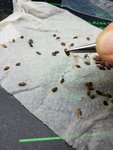
Here are the JRP Japanese Red Pine seeds that have sprouted a root after a week, I get 100% this way and don't end up with valuable grow light space with seeds that don't sprout. Also the speed sprout at different rates, I fill a tub with seeds on the same timing and will mostly be at the same stage, some seeds can be weeks behind.20200730_180102.jpg20200709_205529.jpg
 
Keep misting your cuttings and after about 2 weeks I can tug on a few a bit and if they don't slip vertical you know you have roots growing.
Once they look like they are growing like crazy and starting to crowd each other out I will nudge them out using the chop stick and put each into a 4" pot with 60% Perlite and 40% peat moss as a growing medium.
I start fertilizing once the cuttings start showing growth.
I move the cuttings from the 4" pots in about a year once they start outgrowing them and put them in 1 gal nursery pots. The pots are filled with a mix I buy by the yard that is sand & compost from a local soils company. They seem to thrive in that soil and some that are 2 years old are really getting a large trunk.
With my new trees I have been keeping an eye for whorls and removing them so that I only have 1 branch per location unless it's low and adding to the flair of the trunk.20200428_180713.jpg
 
Cool operation
Thanks, most of the techniques are what Jona and Mark and others do, my main point is sprouting the seeds first and growing in a common container and moving to a 4" container when you have a viable cutting. This save space and expense, I have close to 200 plants outside, I put them in a loop house during the winter with wine bottles painted black and filled with water to moderate the temps, it is only really freezing here in Washington for a month, I am across from the ocean.
 
Nice to see experimentation with these.......maybe I will try a batch of red pine.
You have red pine pictures?
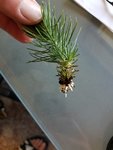
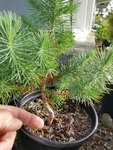
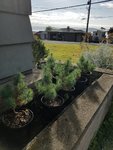
Here are some pics of the JRP, my seed stash from this years pine cones, my setup and crop under the grow lights, you see how much bigger they are than the JBP, a pic of the 2 yr old JRP at the front of my house facing the moist ocean breeze. The table has all the cuttings in their own pots outside.
You can see how much bigger the same JRP is that I put in a clay pot a year ago and the one growing in the bulk soil mix, almost twice the trunk size. I didn't do cuttings with the 2 yr olds so will be excited to see the nebari on this years trees next spring when they go into 1 gal pots.20200825_082212.jpg20200825_082045.jpg20200825_082033.jpg20200825_082952.jpg20200825_083053.jpg20200825_083004.jpg20200825_083109.jpg
 

Attachments

  • 20200825_082952.jpg
    20200825_082952.jpg
    231.2 KB · Views: 70
Here are some pics of the JRP, my seed stash from this years pine cones, my setup and crop under the grow lights, you see how much bigger they are than the JBP, a pic of the 2 yr old JRP at the front of my house facing the moist ocean breeze. The table has all the cuttings in their own pots outside.
You can see how much bigger the same JRP is that I put in a clay pot a year ago and the one growing in the bulk soil mix, almost twice the trunk size. I didn't do cuttings with the 2 yr olds so will be excited to see the nebari on this years trees next spring when they go into 1 gal pots.View attachment 325053
You can see on the table I have some Madrona and Smoke Bush grown from collected seeds.
 
Very nice. Just last night I did the essentially the same thing to 5 JBP seedlings.
Sweet, it's amazing when you dig them up how diff the roots are, if a seedling has a great root spread I just pot it, do cuttings for the "Journey to the Center of the Earth" seedlings.
 
Re: the floaters, I had a similar experience. I soaked about 30 seeds overnight and five floated. Instead of throwing them away I dropped them in a thin layer of sand on top of organic mix and all five grew. The rest are in the refrigerator.
 
Re: the floaters, I had a similar experience. I soaked about 30 seeds overnight and five floated. Instead of throwing them away I dropped them in a thin layer of sand on top of organic mix and all five grew. The rest are in the refrigerator.
Yes. This floating of seeds is not reliable. I always use all seeds and see which ones grow.
 
I've grown a fairly large amount of JRP. The amount of juvenile foliage after two years on yours makes me suspicious of their true origin. So does the size of those seeds..
Mine started with adult needles after the first year. The seeds are a similar size to JBP.

I know three types of pines that take so long to make adult needles: Italian stone pine, halepensis and longaeva. And only one makes huge seeds, which are also edible.
 
Yes now that someone mentions it how big is that tray that the red pine seeds are in for size comparison they look huge absolutely huge
 
I've grown a fairly large amount of JRP. The amount of juvenile foliage after two years on yours makes me suspicious of their true origin. So does the size of those seeds..
Mine started with adult needles after the first year. The seeds are a similar size to JBP.

I know three types of pines that take so long to make adult needles: Italian stone pine, halepensis and longaeva. And only one makes huge seeds, which are also edible.
Stone pine certainly does explain it, the seeds are large with the wing and coated in black powder. The mother tree does look different, I will get some pictures. I tried to eat a seed once and it was like a chemical. It does have vertical bark but many branches are down at the bottom, maybe in all the pictures they have been trimmed to a single trunk.
 
Back
Top Bottom