Mike123
Shohin
Barberry 


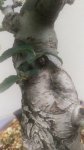
@BobbyLane You sure have that carving thing down...how hard to do carve per session?


Yes. Got a few for $2.! A woman in a high end community of the bay area had them made as drip trays for 1/2 gal. whisky barrels on her flat roof but they were so heavy the roof sagged. They must have been quite expensive. Heavy copper with a rolled edge. Currently it's the image at the top of my FB page. Glad it inspired you. Oh, it's the icon here too! Duh.
Bruce Winter
 Sweet score!

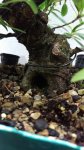
Which one?Uro is carved out deciduous ? Nice trees!
Geezzzz, how about some details? Or; how about a video??View attachment 88306
Here's one in the process of being created;
Sorry, no video.Geezzzz, how about some details? Or; how about a video??