First Try at Juniper Restyling! Need Critiques

kevinw

Seedling
Messages
5
Reaction score
6
Location
Virginia, USA
Hello everyone!
I recently tried my hand at bonsai making by restyling a nursery stock juniper. Comments and suggestions are welcome! I am very new so I'd love to improve. I was originally going to let the trunk grow out more before I started, but I just grew too impatient lol. Some questions and concerns I have are that I accidently snapped a branch, the branch wrapped in white on the right. I have kept the wire and wrapped it in tape, hoping for the best. It was on a branch the width of a pencil, with only 1/3rd the cambium connected. Can I expect the rest of the branch to reconnect? Also, I am considering on making the left branch wrapped in white into jin, as to keep the triangle silhouette of the tree.
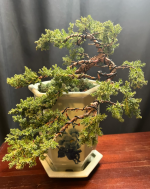
bonsai.pngbonsai2.png


Thank you for reading!
 
Knowing procumbens it could either connect or fare on that little strip left, but there is a chance it will drop the branch too.
If it ever connects, it will be a weaker point in the future because of the way the scar tissue forms.

As far as styling goes, I see most branches leave the trunk at a horizontal line, straight to the side. One thing conifers do is letting their branches hang a little. I would try to mimic that by dropping them down and curving them slightly up again near the tips.
On the bottom branch we see a fork into three branches, this can lead to uneven swelling and inverse taper. I would reduce that to 2 branches.

Good luck!
 
Appears to be a much neater wiring than we see from most beginners. Well done.
It's hard to see exactly where wires start and finish but looks like most branch wires start close to the base of each branch. That means you can shape most of the branches but have no control over the base of the branch and, therefore, the angle it emerges from the trunk cannot be altered. We would normally start branch wires with at least a couple of turns of wire following teh trunk wire around the trunk to anchor it. Even better, one single wire can connect 2 branches, following the spiral of the trunk wire between the 2 branches. This uses a little more wire but is much more secure and allows much more flexibility in bending the branches.

The styling is well thought out. Cross between cascade and windswept by the look of it and quite dramatic. The question is, where is the viewing point. We usually work with one particular 'front' in mind so the viewer gets to see all the best features of the tree. Your first view is dramatic branching but many of the branches hide the lower trunk which should be a major feature anchoring the tree in the soil. There may be another point where we can appreciate both branching and trunk? Maybe some of those branches crossing the trunk could be moved or removed?

Some questions and concerns I have are that I accidently snapped a branch, the branch wrapped in white on the right. I have kept the wire and wrapped it in tape, hoping for the best. It was on a branch the width of a pencil, with only 1/3rd the cambium connected. Can I expect the rest of the branch to reconnect?
Branches with 2/3 cracked can often heal and survive but, as @Wires_Guy_wires has pointed out, that area will always be weaker than the rest of the tree. It will often heal completely. Next time you wire and bend you'll forget it was damaged and it will snap again.
Sometimes the damage is worse than it appeared and the section of branch past the break will die.
My guess is your wire spirals were a bit too far apart in that part so less support on the wood which can lead to breakage.

Also, I am considering on making the left branch wrapped in white into jin, as to keep the triangle silhouette of the tree.
I suspect that both the branches with white tape could go. That would help open up the view of the lower trunk.
Nothing for scale but you mention the branch is around pencil thickness. That may just be thick enough to leave enough wood for a jin. Need to remember thickness of bark on both sides of a branch. After the bark is removed there's not a lot of wood left so the resulting jin appears flimsy and will break off easily when dry. Always have a go at jin first. Can always cut a jin off if it doesn't look right but much harder to put it back if you've cut first and then had second thoughts.
 
As far as styling goes, I see most branches leave the trunk at a horizontal line, straight to the side. One thing conifers do is letting their branches hang a little. I would try to mimic that by dropping them down and curving them slightly up again near the tips.
On the bottom branch we see a fork into three branches, this can lead to uneven swelling and inverse taper. I would reduce that to 2 branches.
Thank you for the reply! I'll try and implement the dropped branches and curved tips on my next bonsai. I wasn't sure if I should've achieved something similar, as I was going for a semi cascade windswept style (very ambitious as a beginner), but now reflecting, I think it would have been the better choice. I was also limited by not knowing to wire the base of the branch, so I tried to work with the angle the branches shot out naturally. As for the bottom branch, I'm debating on which fork to cut. I think the top one, but it looks too strange with so much empty space between the cascade and the top. Very happy to hear there is a remote chance the branches will survive!

Appears to be a much neater wiring than we see from most beginners. Well done.
It's hard to see exactly where wires start and finish but looks like most branch wires start close to the base of each branch. That means you can shape most of the branches but have no control over the base of the branch and, therefore, the angle it emerges from the trunk cannot be altered. We would normally start branch wires with at least a couple of turns of wire following teh trunk wire around the trunk to anchor it. Even better, one single wire can connect 2 branches, following the spiral of the trunk wire between the 2 branches.

The styling is well thought out. Cross between cascade and windswept by the look of it and quite dramatic. The question is, where is the viewing point. We usually work with one particular 'front' in mind so the viewer gets to see all the best features of the tree. Your first view is dramatic branching but many of the branches hide the lower trunk which should be a major feature anchoring the tree in the soil. There may be another point where we can appreciate both branching and trunk? Maybe some of those branches crossing the trunk could be moved or removed?

I suspect that both the branches with white tape could go. That would help open up the view of the lower trunk.
Nothing for scale but you mention the branch is around pencil thickness. That may just be thick enough to leave enough wood for a jin. Need to remember thickness of bark on both sides of a branch. After the bark is removed there's not a lot of wood left so the resulting jin appears flimsy and will break off easily when dry. Always have a go at jin first. Can always cut a jin off if it doesn't look right but much harder to put it back if you've cut first and then had second thoughts.

Thank you for the reply! I will make sure to anchor branch wires. That was a very good catch which completely left my mind while wiring. All your compliments on wiring and styling are very appreciated. The intended viewing point is seen best in the second img, although I know the pot is not well aligned with it. I will eventually repot it in the future when the juniper has recovered from the restyling. Trust me, the back does not look good lol. I'm fairly confident in making the left branch in white tape as jin, just to add some uniqueness, although I'm worried about cutting the right branch, as it seems to connect the cascade with the apex. Otherwise the gap might feel unnaturally large and the silhouete. My logic might also be flawed though, and I'd love to hear if this is good justification.

I've attached a new img of the bonsai at its intended angle and also after pruning the cascade a little more

bonsai3.png
 
…. Adding on a couple thoughts.

Great first effort! Styling the first 3-4 trees is always the hardest. It’s where one inevitably makes the mistakes that provide ann experience base for future trees.

In first styling a bonsai one usually:

- assesses each branch for position, length and (esp) taper.

- goes through a tree and removes branches from junctions with more than two branches coming from the same spot.

- Next thins out the branches to give an alternating pattern of branchlets as much as possible, consistent with having foliage distributed all along the branch.

- Also remove bottom growth and any stray branching not in the basic design….

Broken branches occur from a number of causes. Undergauging wire is one reason, multiple flexing back and forth is another, flaws is a third, flexing two branchlets away from a junction is another. Thus, it is better to slightly overguage the wire than under .

At branch junctions (for conifers esp) each branchlet is moved together to an acute angle, then further away from the junction the branchlets move out away from each other.

Finally, in my experience, keeping as much foliage as possible on a conifer, consistent with allowing wire access and bending, is highly desirable on a first styling. The reason being these inner branches give one future styling options, allowing for shortening and to create branch taper.

Thakd for posting! Looking forward to your next effort.

Cheers
DSD sends
 
I'm fairly confident in making the left branch in white tape as jin, just to add some uniqueness, although I'm worried about cutting the right branch, as it seems to connect the cascade with the apex. Otherwise the gap might feel unnaturally large and the silhouete. My logic might also be flawed though, and I'd love to hear if this is good justification.
The new photo does give a better view of the tree.

Not wanting to leave a big gap is valid but there may be other options around that problem.
By 'right branch' do you mean the one that starts close to the big fork where the cascade heads down and apex goes up? That branch has very little going for it and several potential problems - grows very close to another junction so risk of over thickening. I also count another 2 or 3 smaller branches growing from the same vicinity so even more potential for inverse taper there in future. It's long, bare and has little taper and no character.
The smaller branch with the curl in it is providing foliage in that gap area. I see that one as having much better potential to fill that open space. You may also be able to lower the apex more to reduce the openness.

Having a large apex with a strong cascade never seems to look great IMHO. In this case you have a T shaped junction that attracts my eye when I look at the tree and stops the view flowing down to the cascade branch. The strong apex also attracts the viewer away from the cascade which, I believe, should be the main feature. I've been reducing apices on cascades back to the minimum and finding they seem to improve as a result.
It also seems much more natural to have little upright growth where there's a strong cascade. The forces that make trees grow down (katabatic winds, snow, rockfalls, etc) will also be acting on the apex so why would it grow strongly up?

Please remember that all my observations are from 2D image so I may be missing vital cues that are present when viewed in full 3D.
 
That branch has very little going for it and several potential problems - grows very close to another junction so risk of over thickening. I also count another 2 or 3 smaller branches growing from the same vicinity so even more potential for inverse taper there in future. It's long, bare and has little taper and no character.
The smaller branch with the curl in it is providing foliage in that gap area. I see that one as having much better potential to fill that open space. You may also be able to lower the apex more to reduce the openness.

Having a large apex with a strong cascade never seems to look great IMHO. In this case you have a T shaped junction that attracts my eye when I look at the tree and stops the view flowing down to the cascade branch. The strong apex also attracts the viewer away from the cascade which, I believe, should be the main feature. I've been reducing apices on cascades back to the minimum and finding they seem to improve as a result.
It also seems much more natural to have little upright growth where there's a strong cascade. The forces that make trees grow down (katabatic winds, snow, rockfalls, etc) will also be acting on the apex so why would it grow strongly up?

Please remember that all my observations are from 2D image so I may be missing vital cues that are present when viewed in full 3D.
Thanks for replying! These are really helpful pointers for my bonsai. I agree now that the right branch in question should be cut off. There is no personality or interest in it, and it simply covers the view of the trunk. I think I will try and jin it for practice, as perhaps it will look better jinned and with movement. But most likely, I will cut it off. As for the apex, I will move it more left and down and thin it out. There isn't much I can do about the T shaped junction without cutting off the current apex, which is something I don't want to do as the intention was to create a semi cascade style. Although, I will try my best to make it less prominent as the cascade should be the center of the focus. Maybe I can move the jinned right branch upwards as to redirect the view of the T junction. Thank you for all the advice; I will try and apply it.
 
In first styling a bonsai one usually:

- assesses each branch for position, length and (esp) taper.

- goes through a tree and removes branches from junctions with more than two branches coming from the same spot.

- Next thins out the branches to give an alternating pattern of branchlets as much as possible, consistent with having foliage distributed all along the branch.

- Also remove bottom growth and any stray branching not in the basic design….

Broken branches occur from a number of causes. Undergauging wire is one reason, multiple flexing back and forth is another, flaws is a third, flexing two branchlets away from a junction is another. Thus, it is better to slightly overguage the wire than under .

At branch junctions (for conifers esp) each branchlet is moved together to an acute angle, then further away from the junction the branchlets move out away from each other.

Finally, in my experience, keeping as much foliage as possible on a conifer, consistent with allowing wire access and bending, is highly desirable on a first styling. The reason being these inner branches give one future styling options, allowing for shortening and to create branch taper.

Thakd for posting! Looking forward to your next effort.

Cheers
DSD sends
Thank you for the reply! While I tried to keep branch placement in mind, I felt conflicted at the T junction where the apex splits off from the cascade. Are there usually exceptions to this rule? As I found myself violating it at the two junctions at the top and bottom. I have also forgotten to distribute foliage across more of the branch, and I fear that the branches now have a "q-tip" look to them, although I suppose there isn't much I can do about it now other than wait. I think I will either cut or jin the two branches wrapped in white tape, as I agree that they seem to be astray. I did not know that under gauging wire or flexing two branchlets away from a junction could cause snapping, thank you for that. I also realize now that I shouldn't have cut so much foliage away, in order to have more avenues for future growth, although I suppose I was too excited to create a finished look. I will be sure to post my next bonsai soon. Thank you for all the advice!
 
Back
Top Bottom