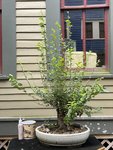
Chuhin Broom Elm

What does the tree look like now @markyscott? Loving this progression!!! I just chopped mine back after taking it to our monthly meeting mainly to get it back into the car easier.

Next year I'm going to repot and cutback VERY hard, do some carving to close the chop site...
 
What does the tree look like now @markyscott? Loving this progression!!! I just chopped mine back after taking it to our monthly meeting mainly to get it
back into the car easier.

Next year I'm going to repot and cutback VERY hard, do some carving to close the chop site...

E6617D80-DB5B-4F47-B04F-16CCF9FED701.jpeg

Night shot. I’ll try and get a better one tomorrow.


S
 
It has come a long way!
I am giving chinese elm a try.An early start in hydro room.
Once that chop heals completely over I think it will change everything about this tree.Nice work
 
Plan this year is to:
  1. Repot and work in the nebari. I’ll probably put it into an Anderson flat. I may plant it on a board
  2. Prune off the root grafts
  3. Cut back
  4. Rewound the callous edge
Scott,
Do you use the Kirikuchi-Naoru green liquid paste on the scuffed callous edge?
 
I did a bit of maintenance as well. The center had rotted a bit (Ants appear to have been involved) and callous growth appears to have stalled. I carved out the rotted wood with a hand tool, then filled in with a hardening putty. I then wounded the live edge of the tissue to stimulate new callous growth and covered it with cut paste.
image.jpg
 
This has been a great, inspiring thread. Thank you! I may try to imitate you and look for a clearance lacebark this fall.
 
Scott:

This is the only picture I have from the magazine, maybe I can get another:

View attachment 100949

But you are roughly at the first picture on the right, the one marked '80.

But look at the partial photo to the right of it, marked '76. See the bit of wood with the concave carved end?

I believe Ebihara did that to his zelkova. Removed a good bit of the heartwood at the very beginning. Then, once he got the buds, and selected the ones to grow into his main branches that we see in the 1980 picture, he had carved V cuts in between them. Having the center carved out before made it much easier.

My question would be "what about the water in the cup of the trunk?"

In the 1983 picture, there appear to be more branches growing towards the interior of the main ones pictured in 1980. I wonder if he grafted those in?
I'm curious how or what tools were used to get that perfect concave carved end out of the trunk. Also curious how the water was dealt with.
 
Back
Top Bottom