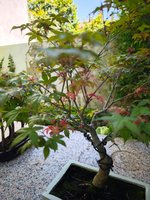
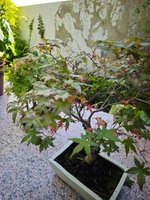
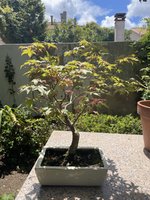
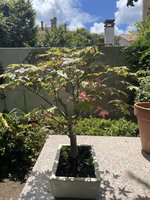
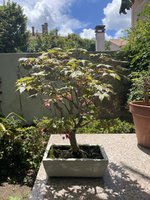
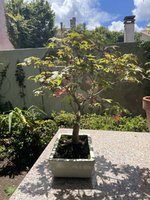
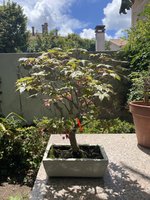
Can anyone give me advice how to finish styling this maple?
- Thread starter isaaquitas
- Start date
TrevorLarsen
Chumono
I personally would use some guy wires to pull down some of the branches. I find wire marks up these trees so easily. I would bend down all the branches but just a bit since they are very brittle. I would use the leader in the front and lower the rest. Just do a bit of lowering and then wait until you can do more once the tree adjusts.
isaaquitas
Mame
Thanks for the reply, however, I was considering cutting the the leader the furthest away in the picture as it would be weird with two leaders. Do you think it would be better to cut it or wire it down?I personally would use some guy wires to pull down some of the branches. I find wire marks up these trees so easily. I would bend down all the branches but just a bit since they are very brittle. I would use the leader in the front and lower the rest. Just do a bit of lowering and then wait until you can do more once the tree adjusts.
TrevorLarsen
Chumono
It’s hard to tell from the picture but you can always cut it off. You just want to be sure to have a back branch of some kind so it has depth.
isaaquitas
Mame
I have this picture as wellIt’s hard to tell from the picture but you can always cut it off. You just want to be sure to have a back branch of some kind so it has depth.
Attachments
River's Edge
Imperial Masterpiece
The first thing I would suggest is remove all the wire.I have this picture as well
Second is take a picture of each of the four sides and post those for people to see.
Pictures should be from eye level with focus approx 2/3 of the way up the trunk but showing the whole tree.
If you take the above steps the responses will be more focussed.
isaaquitas
Mame
Thanks, I will do that but could you explain please what it wrong with the wiring so I don't repeat the same error again?The first thing I would suggest is remove all the wire.
Second is take a picture of each of the four sides and post those for people to see.
Pictures should be from eye level with focus approx 2/3 of the way up the trunk but showing the whole tree.
If you take the above steps the responses will be more focussed.
Shibui
Imperial Masterpiece
Crossing wires over other wires not only looks untidy but the wires can put extra pressure in the one below and mark the bark much quicker.
Are your wires actually holding the branches in a new position? We see lots of beginners who just put wire on branches but don't actually bend - because they believe that wire makes a bonsai. Only wire where you need to change position of a branch.
Plan the wiring so each wire is making some bends
Plan each wire so they don't cross each other. Usually start with a lower branch and work up through the branches. Wind wires around in the same direction so they don't cross.
Avoid wiring opposite branches together. Combine a lower branch with a higher branch so the wire makes at least 1 full turn round the trunk as an anchor before reaching the next branch. You may sometimes need to skip a branch and go up to the next to get better anchorage.
Your tree currently has opposite lower branches. That will become a problem in future as the trunk is almost certain to swell where 2 branches are close together. Where possible remove one of opposite branches.
Need to decide where the best view of the trunk is which will be the 'front' That should help decide which lower branch is better placed.
The next fork has 3 branches again. 1 needs to go but which one will depend on which of the lower branches is removed.
From the limited info from those 2 photos I would probably retain the lower right branch, remove the opposite one. Also remove the left side upper branch and keep the rear one there. Even though it is quite thick it looks like it is better placed (but that could change when we can see the trunk from front on). I would not 'lower' branches on Japanese maple. They naturally grow with ascending branches. Just need to prune to side branches that go up and out to form branch planes.
The front upper trunk has a left branch that will help fill that side of the tree I think.
New styled deciduous often look very bare. That doesn't last as new shoots from the branches you've kept will grow and fill most of the spaces. Leaving way too many branches is a common beginner error.
BTW, add a location to your profile. So much of bonsai work is seasonal. A location allows us to give advice suited to your region rather than general ideas that may not be appropriate for the time of year where you live.
isaaquitas
Mame
Thanks, I really appreciate this extremely detailed response and it helps a lot. Do you think that if I sent you some higher quality pictures around the whole tree you could help me decide on which branches to cut, please or should this be a decision which I have to make in order to learn? I will also remove the current wire and start again. Also I have updated my profile
Orion_metalhead
Masterpiece
If you send new photos with Riversedge's guidelines, we can give you some advice on what may be the best locations to prune but ultinately it is your tree and you will have to make the cuts you want.
Agree with shibui and riversedge. Remove the wire and redo.
Agree with shibui and riversedge. Remove the wire and redo.
isaaquitas
Mame
I have attached some photos in another reply and any advice would be greatly appreciatedThe first thing I would suggest is remove all the wire.
Second is take a picture of each of the four sides and post those for people to see.
Pictures should be from eye level with focus approx 2/3 of the way up the trunk but showing the whole tree.
If you take the above steps the responses will be more focussed.
isaaquitas
Mame
Here are some photos, any advice would be greatly appreciatedCrossing wires over other wires not only looks untidy but the wires can put extra pressure in the one below and mark the bark much quicker.
Are your wires actually holding the branches in a new position? We see lots of beginners who just put wire on branches but don't actually bend - because they believe that wire makes a bonsai. Only wire where you need to change position of a branch.
Plan the wiring so each wire is making some bends
Plan each wire so they don't cross each other. Usually start with a lower branch and work up through the branches. Wind wires around in the same direction so they don't cross.
Avoid wiring opposite branches together. Combine a lower branch with a higher branch so the wire makes at least 1 full turn round the trunk as an anchor before reaching the next branch. You may sometimes need to skip a branch and go up to the next to get better anchorage.
Your tree currently has opposite lower branches. That will become a problem in future as the trunk is almost certain to swell where 2 branches are close together. Where possible remove one of opposite branches.
Need to decide where the best view of the trunk is which will be the 'front' That should help decide which lower branch is better placed.
The next fork has 3 branches again. 1 needs to go but which one will depend on which of the lower branches is removed.
From the limited info from those 2 photos I would probably retain the lower right branch, remove the opposite one. Also remove the left side upper branch and keep the rear one there. Even though it is quite thick it looks like it is better placed (but that could change when we can see the trunk from front on). I would not 'lower' branches on Japanese maple. They naturally grow with ascending branches. Just need to prune to side branches that go up and out to form branch planes.
The front upper trunk has a left branch that will help fill that side of the tree I think.
New styled deciduous often look very bare. That doesn't last as new shoots from the branches you've kept will grow and fill most of the spaces. Leaving way too many branches is a common beginner error.
BTW, add a location to your profile. So much of bonsai work is seasonal. A location allows us to give advice suited to your region rather than general ideas that may not be appropriate for the time of year where you live.
Attachments
Orion_metalhead
Masterpiece
Some notes:
1. Soil/substrate does not look great. May want to consider repotting next year.
2. You can always reducd locations of new shoots from three branches per node to two, usually removing the middle branch to gain movement.
3. Remove the low left branch in photo 1 (front) as its on an inside curve.
4. Wire the primary branch (first low left branch) Down slightly.
I have a similar palmatum I can show some styling points on a little later for you.
River's Edge
Imperial Masterpiece
Please 8nderstand that everyone will have a different point of view. I take the approach of asking the following question?
How can I make the most out of this material? I begin by selecting the basics that appear positive and begin development at the point that I fell correction would need to be made. In other words what would need to change. in this case it is primarily the movement and taper above a certain point in the trunk development. The upper foliage is not developed or refined at this point so it is not a consideration.
Looking at image #6944 the nebari appears to be evenly spread as best I can see in the picture. The main trunk appears to be coming forward towards the viewer. ( more welcoming). The first branch on the left is coming off at a nice angle creating a change of direction, beginning of taper and the section below is an appropriate internode length for the position on the tree. I would grow out the trunk from this point and develop new branching above that point.
Priorities in my view are as follows.
1. Begin to improve and develop the root base and nebari with a major repot next spring before buds break. Use this opportunity to improve the soil and root structure.
2. Use this season to improve the health, reduce the strong material higher up and strengthen the branch that will become the new apical leader for development purposes.
3. The tree has the beginnings of nice form in the early stages. Once the tree is very healthy, in proper substrate and the root work established then serious development can begin. Rebalance the growth to the portions that will be used to develop movement, taper and change of direction in the trunk. Retain new buds and lower branching to strengthen the tree during trunk development.
The reason I would not use upper portion is due to the similar thickness of the trunk continuation. ie: lack of taper and movement in that portion.
I have attached a picture showing the location of the chop to begin development. I would delay the chop until the tree is stronger, in better soil and the root work has been completed. Roughly a year after the other priorities have been accomplished. I would prune to balance growth toward the expected new apical leader as suggested. This is a trickier process get an experienced person to guide you.
# Remember it is your tree, so make the decision on the basis of your desired direction. My response is designed to point out a direction that is possible and it is based on developmental process for building trunks with higher quality of movement, taper and change of direction. Providing a solid foundation on which to build a refined structure. Paying attention to thickness, length of section in proportion to position on the trunk. I do think the basic beginnings of nebari and lower trunk are a good starting point.
Attachments
Srt8madness
Omono
Man, such an excellent quality reply.Please 8nderstand that everyone will have a different point of view. I take the approach of asking the following question?
How can I make the most out of this material? I begin by selecting the basics that appear positive and begin development at the point that I fell correction would need to be made. In other words what would need to change. in this case it is primarily the movement and taper above a certain point in the trunk development. The upper foliage is not developed or refined at this point so it is not a consideration.
Looking at image #6944 the nebari appears to be evenly spread as best I can see in the picture. The main trunk appears to be coming forward towards the viewer. ( more welcoming). The first branch on the left is coming off at a nice angle creating a change of direction, beginning of taper and the section below is an appropriate internode length for the position on the tree. I would grow out the trunk from this point and develop new branching above that point.
Priorities in my view are as follows.
1. Begin to improve and develop the root base and nebari with a major repot next spring before buds break. Use this opportunity to improve the soil and root structure.
2. Use this season to improve the health, reduce the strong material higher up and strengthen the branch that will become the new apical leader for development purposes.
3. The tree has the beginnings of nice form in the early stages. Once the tree is very healthy, in proper substrate and the root work established then serious development can begin. Rebalance the growth to the portions that will be used to develop movement, taper and change of direction in the trunk. Retain new buds and lower branching to strengthen the tree during trunk development.
The reason I would not use upper portion is due to the similar thickness of the trunk continuation. ie: lack of taper and movement in that portion.
I have attached a picture showing the location of the chop to begin development. I would delay the chop until the tree is stronger, in better soil and the root work has been completed. Roughly a year after the other priorities have been accomplished. I would prune to balance growth toward the expected new apical leader as suggested. This is a trickier process get an experienced person to guide you.
# Remember it is your tree, so make the decision on the basis of your desired direction. My response is designed to point out a direction that is possible and it is based on developmental process for building trunks with higher quality of movement, taper and change of direction. Providing a solid foundation on which to build a refined structure. Paying attention to thickness, length of section in proportion to position on the trunk. I do think the basic beginnings of nebari and lower trunk are a good starting point.
isaaquitas
Mame
I totally agree, so much valuable informationMan, such an excellent quality reply.
isaaquitas
Mame
Wow, this is truly an amazing response. Thanks so much this helps a lot but I just have a few more questions. Would new branches grow beneath where I made the cut so my bonsai wouldn't look like ugly? So do you think that the angle shown in image 6944 should be the new front? Also, to strengthen the branch that will remain should I just cut a few of the strongest branches at the top of the tree? Should I fertilize more during this period to get the tree healthier?Please 8nderstand that everyone will have a different point of view. I take the approach of asking the following question?
How can I make the most out of this material? I begin by selecting the basics that appear positive and begin development at the point that I fell correction would need to be made. In other words what would need to change. in this case it is primarily the movement and taper above a certain point in the trunk development. The upper foliage is not developed or refined at this point so it is not a consideration.
Looking at image #6944 the nebari appears to be evenly spread as best I can see in the picture. The main trunk appears to be coming forward towards the viewer. ( more welcoming). The first branch on the left is coming off at a nice angle creating a change of direction, beginning of taper and the section below is an appropriate internode length for the position on the tree. I would grow out the trunk from this point and develop new branching above that point.
Priorities in my view are as follows.
1. Begin to improve and develop the root base and nebari with a major repot next spring before buds break. Use this opportunity to improve the soil and root structure.
2. Use this season to improve the health, reduce the strong material higher up and strengthen the branch that will become the new apical leader for development purposes.
3. The tree has the beginnings of nice form in the early stages. Once the tree is very healthy, in proper substrate and the root work established then serious development can begin. Rebalance the growth to the portions that will be used to develop movement, taper and change of direction in the trunk. Retain new buds and lower branching to strengthen the tree during trunk development.
The reason I would not use upper portion is due to the similar thickness of the trunk continuation. ie: lack of taper and movement in that portion.
I have attached a picture showing the location of the chop to begin development. I would delay the chop until the tree is stronger, in better soil and the root work has been completed. Roughly a year after the other priorities have been accomplished. I would prune to balance growth toward the expected new apical leader as suggested. This is a trickier process get an experienced person to guide you.
# Remember it is your tree, so make the decision on the basis of your desired direction. My response is designed to point out a direction that is possible and it is based on developmental process for building trunks with higher quality of movement, taper and change of direction. Providing a solid foundation on which to build a refined structure. Paying attention to thickness, length of section in proportion to position on the trunk. I do think the basic beginnings of nebari and lower trunk are a good starting point.
Last edited:
River's Edge
Imperial Masterpiece
The answer to each of your questions is yes. Maples are easy to thread graft if ne branching is sparse. The lower portion of the trunk that would remain would not require more than one or two branches for most designs. Also when the chop is performed the normal response is buds forming below the site of the chop. Some of those will likely be selected for additional branching. It is also wise to retain buds on the new apical leader for branch development above.Wow, this is truly an amazing response. Thanks so much this helps a lot but I just have a few more questions. Would new branches grow beneath where I made the cut so my bonsai wouldn't look like ugly? So do you think that the angle shown in image 6944 should be the new front? Also, to strengthen the branch that will remain should I just cut a few of the strongest branches at the top of the tree? Should I fertilize more during this period to get the tree healthier?
isaaquitas
Mame
Thanks for all the advice, I will carefully follow everything you told me thanks once againThe answer to each of your questions is yes. Maples are easy to thread graft if ne branching is sparse. The lower portion of the trunk that would remain would not require more than one or two branches for most designs. Also when the chop is performed the normal response is buds forming below the site of the chop. Some of those will likely be selected for additional branching. It is also wise to retain buds on the new apical leader for branch development above.
Shibui
Imperial Masterpiece
I would see the approach proposed by @River's Edge as just the start of growing a new bonsai. The trunk and new branches would all grow and develop over the next 5-10 years and probably be above - where your tree is now.Would new branches grow beneath where I made the cut so my bonsai wouldn't look like ugly?
Frank's proposal and reasoning are valid but, as he says, others will see other options. Please see below.
The new photos give much better look at the trunk and branches - where they start and which directions they grow in which is all valuable info when making design decisions. I can also see there's a lower branch that was hidden behind the trunk in the first image.Here are some photos, any advice would be greatly appreciated
Unfortunately I'm not so good at making a 3D vision in my head from a series of 2D images. I can provide some possible options but you will still need to make sure what I imagine is really there.
ALWAYS take online advice with plenty of salt and check carefully before committing to any course of action. What someone sees in a phot may not necessarily be there in real life.
Another couple of possible design options for your tree.
Because I can't make out where some of the branches end up I can't fully commit to either.
Both are probably lesser quality that could be developed with Franks harder chop but these will give you something like a bonsai in less time - say 2-4 years. both appear to make better use of the existing trunk bends and direction.
Option 2:

Cut at red lines. Lower left branch to be removed entirely. Most of the others cut back to encourage more shoots to emerge to create better branching. Remaining branches bent in teh direction of yellow arrows to spread the canopy.
Option 3 is from the other side.

Again, remove branches marked red entirely. Cut branches marked blue short to encourage more shoots and branch ramification. Bend remaining branches in direction of arrows.
One of the reasons for 2 opposite options is that I can't fully make out where the upper branches that will be the new trunk lines go. The new apex needs to be slightly forward of the trunk base. Not sure if the ones I've chosen are coming forward enough or too much - need on ground proofing to decide.
2nd option tries to use that lowest branch but it needs to grow toward the side rather than directly to the front. Need to check whether that can be physically achieved or just remove it and go for a larger tree.
Sorry for giving you so many different options to think about. In the end only one will become the tree. If all seem to be good then it does not matter which you choose.
Similar threads
- Replies
- 5
- Views
- 1K
- Replies
- 4
- Views
- 1K
- Replies
- 30
- Views
- 5K
- Replies
- 0
- Views
- 5

