How to maintain JBP sacrifice branch?

TimIAm

Mame
Messages
105
Reaction score
199
Location
Sydney, Australia
USDA Zone
10b
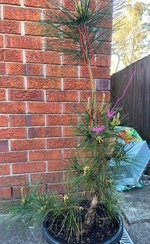
I want to keep the sacrifice going on this tree for now, but I do not know if, what or when I should be removing candles or buds or anything else from the sacrifice for the best possible outcome. Aim is to continue to thickening the base while maintaining vigor below the eventual cut point.

Picture of tree. Pink arrow points to pink line where eventual top will be once the sacrifice is removed.
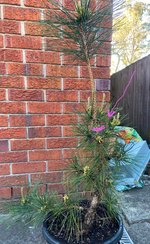
IMG_5512.jpg

Picture showing the a closeup of the area where I eventually plan to have as the top.

IMG_5514.jpg

Last picture shows the top of the sacrifice branch:
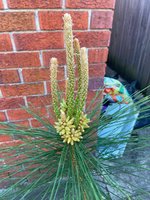
IMG_5513.jpg

I'd also appreciate if someone can tell me how to refer to the parts growing around the base of the candles? Are they called buds or something else?


- In the second picture, just above the eventual top, do I need to remove anything or everything that is not needed around the sacrifice?
- In the picture of the top just above, do I need to remove everything except for a single candle?
- When or should I remove all of the needles around the base of the current top? I assume the candle(s) above will extend and I will have more needles above by mid summer.

My questions are based on seeing pines with a single tall sacrifice, I have no real idea of what I'm doing, just trying to copy what I see while I build an understanding. So my questions may be way off the mark.
 
You only want two buds on the sacrifice branch. One main one and one backup. Basically the tree sends out chemicals to stimulate bud growth, and if your sacrifice only has 2 buds (or candles) then the trees chemicals go to the part of the tree you will actually use and you will get more buds down low.
 
If it’s mine, I’d remove those lower shoots, and most of the needles along the dominant shoot along the sacrifice branch. Leave 12-15 pairs of needles around extending year’s candles. Then remove all but 2-3 of those candles at the very top. Repeat again in your fall.

BF047DC1-0BA7-4237-B17A-0F7C25E2144B.jpeg
 
If it’s mine, I’d remove those lower shoots, and most of the needles along the dominant shoot along the sacrifice branch. Leave 12-15 pairs of needles around extending year’s candles. Then remove all but 2-3 of those candles at the very top. Repeat again in your fall.

View attachment 565348

Just a question on timing. In Sydney, we are essentially in Spring now (today is 84F). When should I do the work to remove the shoots?
 
on the lower you want to build ramification already. decandle per guides counting back from last frost. this is June/July in parts of America.

You can wait until then to remove the top ones as well as removal will send auxin and cause back budding. you want to be building the lower branches, while building the trunk. Also do Brian's advice.

A second flush of growth will occur as advantageous buds push. they harden and then you remove needles again in fall.
 
Just a question on timing. In Sydney, we are essentially in Spring now (today is 84F). When should I do the work to remove the shoots?
Since you are in Sydney check out David’s bonsaiworx YouTube channel. He lives down there and has tons of videos on developing JBP, junipers, maples, etc. I think he is also president of the local bonsai club and very active in the bonsai community of Australia.
 
decandle per guides counting back from last frost. this is June/July in parts of America.
That will be hard for Tim. Sydney hardly has frost except up in the hills away from the harbour. Mid December seems to be about right through most of Southern Australia.
Since you are in Sydney check out David’s bonsaiworx YouTube channel. He lives down there and has tons of videos on developing JBP, junipers, maples, etc. I think he is also president of the local bonsai club and very active in the bonsai community of Australia.
David is in Melbourne which is some 700km south of Sydney and Pres of Bonsai North West which is just one of the clubs in Melbourne. Conditions are not very different between Melb and Sydney.

I'd also appreciate if someone can tell me how to refer to the parts growing around the base of the candles? Are they called buds or something else?
The smaller buds around the base of the candles are the male pollen cones. They will mature later in spring then on warm days release clouds of pollen. Doesn't seem to cause any harm or decrease the growth rate. After releasing pollen they turn brown and gradually fall off.

@Brian Van Fleet has given good advice. No problem removing excess shoots any time.
 
@Shibui @Brian Van Fleet

Can you offer basic guidelines for using a sacrifice branch (or trunk)?

1. I understand that anything growing above a point will help thicken anything below that point. Why would we want to reduce buds on the sacrifice itself? Do they take up too much of the tree's energy, thereby leaving less for the actual branches we want to keep?

2. Do the basic principles of sacrifice branches used on JBP also apply to other pine species?
 
1. I understand that anything growing above a point will help thicken anything below that point. Why would we want to reduce buds on the sacrifice itself? Do they take up too much of the tree's energy, thereby leaving less for the actual branches we want to keep?
Not sure about reducing buds on sacrifice but I often remove lower needles and branches. Branches or foliage close to the parts you want to retain can shade out the main tree and cause it to lose vigour. Removing those branches and needles close to the main trunk allows more sun in to keep it healthy. Sacrificing a little thickening is vastly prefferable to losing the trunk you want to keep.

2. Do the basic principles of sacrifice branches used on JBP also apply to other pine species?
I've used similar strategies to develop Mugho, JRP and JWP as well as Shimpaku and J. procumbens. Seems to work with all those so I assume it will be OK for other pines too.
 
@Shibui @Brian Van Fleet

Can you offer basic guidelines for using a sacrifice branch (or trunk)?

1. I understand that anything growing above a point will help thicken anything below that point. Why would we want to reduce buds on the sacrifice itself? Do they take up too much of the tree's energy, thereby leaving less for the actual branches we want to keep?

2. Do the basic principles of sacrifice branches used on JBP also apply to other pine species?
1. We reduce the number of buds on the sacrifice branch to keep some balance between it and final branches that are concurrently being developed lower on the tree. Look at most pines in nature, they want to be tall telephone poles and they shed lower limbs in favor of the strong upper ones. We need to keep those lower ones strong for development into the final design. Removing needles and reducing buds on the sacrifice branches help that balance by allowing sunlight to reach the lower branches, and reduces the auxin buildup in the sacrifice branch. Auxin is a growth inhibiting hormone that effectively tells the branches below it to not grow.

2. Yes, although black pines are much stronger/faster-growing than white and red pines.
 
Great advice from everyone above, I'll add this thread in case you haven't seen it yet. @Ryceman3 is also southern hemisphere and his pine thread produced some crazy results in a very short amount of time with lots of detail on timing/steps/processes:

 
Calling on a couple guys who have helped with my JBPs in the past:
@Shibui
@Brian Van Fleet
@River's Edge

On this little guy, I have identified a branch I want to use as the initial sacrifice branch (in blue). I would like it to help thicken the trunk. The blue part will not be a part of the final design. This tree obviously still needs a lot of work and design. It will get a repot into a small grow box with a change of angle so the trunk isn't coming straight out of the ground.

Based on what I've read above, I need to remove the needles and any extra shoots along the blue line. I guess I'm looking for a 👍 before I go F-ing up my tree.

This tree's thread: https://www.bonsainut.com/threads/wulfskaars-japanese-black-pine-3.70405/

sac.png
 
Calling on a couple guys who have helped with my JBPs in the past:
@Shibui
@Brian Van Fleet
@River's Edge

On this little guy, I have identified a branch I want to use as the initial sacrifice branch (in blue). I would like it to help thicken the trunk. The blue part will not be a part of the final design. This tree obviously still needs a lot of work and design. It will get a repot into a small grow box with a change of angle so the trunk isn't coming straight out of the ground.

Based on what I've read above, I need to remove the needles and any extra shoots along the blue line. I guess I'm looking for a 👍 before I go F-ing up my tree.

This tree's thread: https://www.bonsainut.com/threads/wulfskaars-japanese-black-pine-3.70405/

View attachment 620240
Technically that is the right direction. I would tailor the approach by following this thought. We are just entering the " winter " even in California. I would remove all but one of the side shoots ( on the outside where it will not shade any lower portion of the tree) in late winter for your area. I would thin the apical buds on the sacrifice leader to the central bud plus one smaller bud. This leaves you with two backup options if the Central bud is damaged. In late winter I would also remove any needles that may shade the lower branches/needles from the sun. ( not too likely at this stage of development ) or at least according to the photo posted.
My first rule is to keep as much growth as possible for stronger development, so if it is not causing a problem I prefer to retain more foliage. I also prefer to keep more foliage for health throughout the winter. No advantage to removing it earlier in my view.
Note: I understand that is not the generic approach!
One additional step to consider is wiring the apical sacrifice leader away from the design portion to create less shading and create a nicer outcome when it is removed down the road. Simply put if desired change the angle with wiring rather than having to remove too many needles. In this case I would likely wire it to the back of the design but keep the apical tip above the rest of the tree to maintain dominant growth.
when done check your wiring of the shorter branches in the design for 360 degree balance . ( top view) When the development is at this stage it is very beneficial to check that when wiring the branches you moved the branch both up/down and side to side as well as setting the main position for the primary branches. So not only movement in direction but within the branch itself to prevent straight sections that are very hard to correct later.
Hope the comments make sense and help.
This is exactly the kind of experience I was looking for. Thank you!
 
Back
Top Bottom