Backwards BC

Backwardsvg

Shohin
Messages
472
Reaction score
354
Location
Chicago
USDA Zone
5b
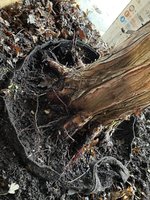
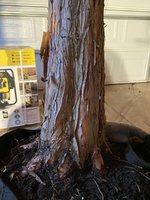
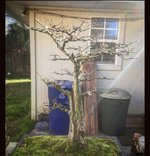
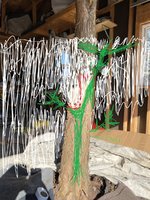
Got a really nice BC from a local nursery. Going to give it a good repot and root prune then let it run wild this summer. Next year will depend , maybe another year of unbridled growth, maybe some carving who knows. I love the look of it and think it’s got great Potential.

Pictures are not doing it justice. The taper looks very minimal in pics but in person it looks very nice and natural. I don’t know if I’m just a bad photographer or what haha

For reference that is a 15 gallon grow bag which are about 17 inches wide I think. At present it’s about 8-9 inches at the soil line and I’ve traced out some roots to about 13-14 inches. I’m excited to really get under the dirt and see what she’s got.

I also wanted to leave it extra tall so I have choices on what style I want to do. I have a few in mind. I am thinking maybe a immature pyramid, or a double apex hollowed out look, or a mixture of the two.

Let me know your thoughts!
 

Attachments

  • 560ED420-E872-48CF-A9DF-47782F03D00B.jpeg
    560ED420-E872-48CF-A9DF-47782F03D00B.jpeg
    392.3 KB · Views: 144
  • 7BFA7DFA-9CD8-42F0-A252-3F9AA10BF7A1.jpeg
    7BFA7DFA-9CD8-42F0-A252-3F9AA10BF7A1.jpeg
    376 KB · Views: 120
  • 76D60A72-14BD-47B6-A8AE-30E880F04BCC.jpeg
    76D60A72-14BD-47B6-A8AE-30E880F04BCC.jpeg
    207.6 KB · Views: 125
  • F9463D65-9AA4-4C84-B717-D097DAFFA7C9.jpeg
    F9463D65-9AA4-4C84-B717-D097DAFFA7C9.jpeg
    218.4 KB · Views: 159
I’m Southwest if the city but it’s easier to say chicago haha. Tree was originally 25+ feet tall. They looked at me sideways when I said I was gonna chop it in half Hahahah
 
Thinking I may do a 55 gallon drum if I can find another. But I am going to cut this one much more shallow. Maybe 6 inches max.

I am itching to do a repot on this beast but I am holding.

I think I’m going to do peat moss and mushroom compost so it stays very wet these next few years before a bonsai pot
 
So I am starting to think long term down the road with this tree. I have it cut much higher but in the end I’m thinking I’m wanting a look like the pic to the right. A big old fat gnarled weathered stout tree. I did a light draw of a future carving like the right. Do you think it makes sense for this tree?

It has a wide flare of about 13-14 inches at the roots. But would the proportions look whacky if I cut it to be a stout tree?
 

Attachments

  • 73701132-3006-4C07-81AD-C8AB179FE378.jpeg
    73701132-3006-4C07-81AD-C8AB179FE378.jpeg
    218.9 KB · Views: 117
  • 01D80822-411F-4997-B927-7E18CFA83EBC.jpeg
    01D80822-411F-4997-B927-7E18CFA83EBC.jpeg
    231.3 KB · Views: 122
The tree is from Jim Osborne for credit of the pic
 
So I am starting to think long term down the road with this tree. I have it cut much higher but in the end I’m thinking I’m wanting a look like the pic to the right. A big old fat gnarled weathered stout tree. I did a light draw of a future carving like the right. Do you think it makes sense for this tree?

It has a wide flare of about 13-14 inches at the roots. But would the proportions look whacky if I cut it to be a stout tree?

If the goal is a gnarled stout tree, this spring is the time to get at it. First the pot it is in for the photos is way to small to develop a wide, flat radial root system. If the root spread is 14 inches, you need a box or maybe the bottom of a 55 gallon drum at least 24 to 30 inches in diameter. The wider the better. If you used the bottom 6 or 8 inches of a 55 gallon plastic drum, and put no drainage holes in the bottom, but rather put the drainage holes a couple inches up on the sides, you would have a nice pot that would keep saturated soil. I'm retired, back in the day, I used to get used drums that had held Caramel coloring for free. But those days are gone. You might even shop wading pools, or small ponds to find a container wide enough to properly develop the root system.

You do not need or want a deep container. Remember, almost zero bonsai containers "off the shelf" are deeper than 4 inches, except the narrow skinny cascade pots. Most are only 3 inches deep or less. So plan to eventually have a wide, flat radial root system.

Next height of the tree. Well, that is up to you, but there is a general plan, the first third is usually the main trunk, then the second third is the secondary branching, the the final third of the height is the twigs and leaves. In the case of cascading and slanting styles, its the distance from the roots, that is divided into thirds. This is a rough generalization, you do not have to slavishly follow this suggestion. But if you don't know what to do, this plan tends to produce a pleasant tree.

Now with the above in mind, look at photos of real Bald Cypress and plan how you can make yours look like one. Note, BC in the wild do not have gently curving branches, all branches are ram rod straight, changes in direction are sharp angles. Any BC over 100 years old has a broken top, there are very few old cypresses with a "natural" crown, they all have jagged, broken, damaged shapes.

In the "My Media" part of my Bonsai Nut profile, I have pictures from the northernmost fully developed bald cypress swamp in north America, the Lower Cache River Cypress Bottoms, the oldest tree in the photos is 1300 years old. The second oldest is 800 to 900 years old. In the groves and lanes are a fair number of 400 to 550 year old trees, and then the cypress domes are mostly 100 year old trees. Take a look, and browse other's photos of bald cypress. Our Louisiana, Florida and Texas members have posted some amazing bald cypress in nature photos.

5446-31aba34699262fb86d6aca55ac5db4cc.jpg
 
So my thought for your tree is something like the BC in the photo above, a short segment of trunk, then cut and carve to make it look like it was broken by a storm, then continue the height of the tree as a twin or triple trunk, much like the photo.

More photos in my profile.

https://www.bonsainut.com/members/leo-in-n-e-illinois.14479/#xfmgMedia

Just about every tree in the photos, especially every tree standing in water is a bald cypress. Winter is the only sane time to paddle around the BC swamps, in summer, mosquitoes and cottonmouths make the trip unpleasant and somewhat dangerous.
 
Last edited:
So on the same day, repot to a much wider, shallow container in order to develop a wide flat root system. The pot should be 2 or 3 times the width of the root system.

Same day, while the tree is out of its pot, saw that puppy short, down to about a third of the "final height" you envision. You said the trunk is 13 or 14 inches wide at the flare of the nebari, well it is perfectly reasonable to cut this trunk down to maybe 12 inches tall, or maybe just a little taller. This would put you near 36 inches tall as your finished height.

Angle the top of your cut, plan on carving it. Over the next few years you can car our and hollow out the stump.

BC do respond well, meaning they back bud well. So just do it.
 
I have a cement mixing tub I am going to repot it into. it has much more room, and I am going to try to keep the soil at about 4 inches to really make sure I start to develop the right roots. Would it be crazy to do the below @Leo in N E Illinois ? If I cut the the red lines this spring with root pruning and repoting? Then let it recover then next year carve it down to the green shape? Or would you do all of this carving at once this spring when I repot?

I will refine the actual cuts / look but as a rough outline I have drawn the below.
 

Attachments

  • bc 1.jpg
    bc 1.jpg
    228.6 KB · Views: 101
  • bc 2.jpg
    bc 2.jpg
    308.6 KB · Views: 79
@Leo in N E Illinois I just re read the last bit of your post. You say do it at an angle and then carve from that. Is there any concern with an angle cut that it won’t bud at the top compared to a flat cut?
 
@Leo in N E Illinois I just re read the last bit of your post. You say do it at an angle and then carve from that. Is there any concern with an angle cut that it won’t bud at the top compared to a flat cut?

Angle was just an artistic thought, I was not thinking about horticulture. Flat cut or angled, it won't matter much. It will back bud where ever it wants to. Do the cuts you need to, to get close to your green outline. Do it when you repot this year. Don't draw it out. Go drastic, and then let recover a couple years is better than every year doing something major, dragging out the whole process. BC are pretty vigorous. Get it all done at once. Then baby it for a year, and then ignore it a second year. Then attack again.
 
On an angled cut there is a tendency to have slightly more dominant buds appear at the upper end of the sloped angle, but that is not reliable.

Most angled cuts you see start as flat cuts, and then after buds have sprouted and grown a year or two, an angled cut is done from the uppermost sprout down to fake the appearance of taper. If you use deadwood techniques, no need for the attempt to fake taper with an angled cut.

It all depends on how much carving you want to do.
 
I have a cement mixing tub I am going to repot it into. it has much more room, and I am going to try to keep the soil at about 4 inches to really make sure I start to develop the right roots. Would it be crazy to do the below @Leo in N E Illinois ? If I cut the the red lines this spring with root pruning and repoting? Then let it recover then next year carve it down to the green shape? Or would you do all of this carving at once this spring when I repot?

I will refine the actual cuts / look but as a rough outline I have drawn the below.
On an angled cut there is a tendency to have slightly more dominant buds appear at the upper end of the sloped angle, but that is not reliable.

Most angled cuts you see start as flat cuts, and then after buds have sprouted and grown a year or two, an angled cut is done from the uppermost sprout down to fake the appearance of taper. If you use deadwood techniques, no need for the attempt to fake taper with an angled cut.

It all depends on how much carving you want to do.
I like your idea on the pictures here, but I think that if you want a tree like the one you posted a few posts above you need to go slightly lower than that so the trunk thickness ends up being much thicker than the new leaders. If you repot try to get as close to the base of the trunk as you can and screw a tile or a board underneath it to help the roots grow laterally and expand the base flare more. The is what @Mellow Mullet does and what I started doing with my BC's since day one.

100% in agreement with Leo, once you do the flat cut you will get a lot of back budding, select a leader and a first branch/secondary trunk and depending on your growth rate you can carve the angle after post flush, summer solstice, or next spring.
 
Since I am an over thinker / visual learner I put my thoughts into this picture. I broke it out into thirds with the blue lines. From there the thick red line is where I plan to cut this winter. Then the diagonal red cut would be where I would carve. The green lines are ideas of where branches could go.

Any thoughts on this? Should I cut shorter than what I have here? I am afraid of cutting too short and it looking wonky. @Maiden69 @Leo in N E Illinois

Or would you move my thick red line down to the first blue line? I just thought that the proportions may be off if I did that

1675718930405.png1675719301623.png
 
Have you considered going down to about an inch or two below the top blue line? It wouldn’t be as chunky but I think the taper peters out about there and the rightward curve of the trunk starts. It might make for a taller more elegant alternative to the more stocky design. Just a thought.
 
I think I am liking the left side picture for the front of the tree, does anyone else have an opinion?

1675898695168.png
 
Back
Top Bottom