Brian Underwood
Chumono
I always enjoy styling these little trees, and this one was actually an interesting challenge.
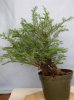
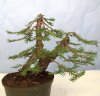
PIC1: This is how you usually find these trees. They start off as little redwood bushes.
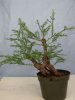
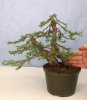
PIC2: My first step is always to clean out the tree, removing any small suckers off the trunk, branches that are too short, too long, or redundant. This leaves you with maybe 1/3-1/2 of the total foliage to work with. I also think about where I want the top of the tree to be, and what branch would make the best top, then chop the trunk just above it. I have taken to using cut paste to prevent the wood from drying out, which seems to result in dieback in the trunk and branches, then cover the cut paste with vertical strips of bark to better hide the chop. Some may consider this cheating, but it looks a lot better than just leaving that brown "Elmer's Glue" patch.
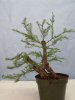
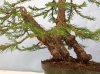
PIC3: I started by wiring the lower trunk. The branches are wired down slightly, and foliage spread out and separated. At this point I ran out of #20 copper, so I had to run and get more the next day.
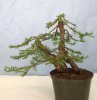
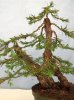
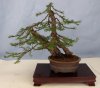
PIC:4 The top is always a challenge for me. Figuring out where the branches would best be placed is difficult. I started by wiring everything, and doing placements at the end.
PIC1: This is how you usually find these trees. They start off as little redwood bushes.
PIC2: My first step is always to clean out the tree, removing any small suckers off the trunk, branches that are too short, too long, or redundant. This leaves you with maybe 1/3-1/2 of the total foliage to work with. I also think about where I want the top of the tree to be, and what branch would make the best top, then chop the trunk just above it. I have taken to using cut paste to prevent the wood from drying out, which seems to result in dieback in the trunk and branches, then cover the cut paste with vertical strips of bark to better hide the chop. Some may consider this cheating, but it looks a lot better than just leaving that brown "Elmer's Glue" patch.
PIC3: I started by wiring the lower trunk. The branches are wired down slightly, and foliage spread out and separated. At this point I ran out of #20 copper, so I had to run and get more the next day.
PIC:4 The top is always a challenge for me. Figuring out where the branches would best be placed is difficult. I started by wiring everything, and doing placements at the end.