You are using an out of date browser. It may not display this or other websites correctly.
You should upgrade or use an alternative browser.
You should upgrade or use an alternative browser.
Deep Sea Diver
Imperial Masterpiece
Good you are practicing hanging wire. Practice and study is the only way to get better.
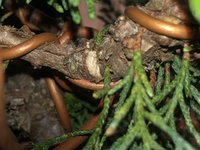
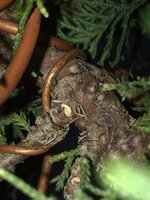
Not to feel too bad, this is a fairly common mistake, esp when laying heavier wire on junipers and bending right at tree junctions, radically forcing larger sub branches out and away from each other. I’ve made this mistake myself, particularly when working in tight spots and bending aggressively without carefully studying the layout.
The easy answer is likely not if the branches are bent back together right off. Even have slipped zip ties over the junction similar to #3 after rejoining split to ensure junction is closed. Works. Needs about a year to seal… or more depending on tree growth.
Junipers are tough and the sub branches may survive if not bent back together , but likely structurally integrity will be compromised for one or both branches. If not dead, when removing the wire the most affected sub branch, even if not dead, may break the .
Good Luck!
Cheers
DSD sends
Dav4
Drop Branch Murphy
- Messages
- 13,758
- Reaction score
- 33,843
- USDA Zone
- 6a
If the tear isn’t greater than 50% of the diameter of the branch, it’ll probably be fine. Moving it back to close the year will help, as will applying some cut paste. As DSD said above, it’s a common mistake to make. The trick moving forward is to envision where you’re moving/bending the branch before applying the wire, then applying the wire to facilitate the bending safely… easier said then done!
jevanlewis
Mame
Similar to @Deep Sea Diver 's suggestion, the break in #3 is suitable for raffia wrap to hold it together while it heals. Raffia can also be used before bending for certain bends and/or for trees that are prone to cracking.
Should be fine judging by the size of the tears and especially that the foliage is still present on branches to help healing. Not sure about aesthetics down the line. I've had a juniper with a broken apex this summer and it healed well but formed a nasty looking bulge..
bwaynef
Masterpiece
One of the reasons your branches tore at the crotch is because you placed wire too far down the crotch. You support the crotch (THE weak spot on junipers) better when you place the wire further onto the shoulders (legs?) of the crotch. It doesn’t look like much but if I’d placed this wire further down the trunk the crotch would’ve split.
When they split, seal it. Depending on the situation you may want to put a toothpick or something in the crack (to force the angle and solidify what is cracked) or you may want to adjust the branches so that the crack closes back together. In either case I’d suggest puttying over/around the crack.
When they split, seal it. Depending on the situation you may want to put a toothpick or something in the crack (to force the angle and solidify what is cracked) or you may want to adjust the branches so that the crack closes back together. In either case I’d suggest puttying over/around the crack.
Attachments
River's Edge
Imperial Masterpiece
From the pictures it would appear the wiring is not properly anchored prior to the figure three used for the two branches in the crotch sections. This will contribute to the type of breakage shown as the branches easily move independently rather than as a unit.
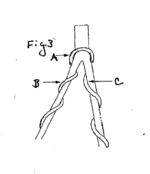
Not certain if that is the case but I do not see a third similar diameter or heavier wire on either side of the figure 3 wiring pattern. Figure 3 is the common term used for the loop over or under at the beginning of the crotch. The picture above clearly ( post #6) shows the application of a figure three wiring pattern without a proper anchor coming from below the crotch.
Not certain if that is the case but I do not see a third similar diameter or heavier wire on either side of the figure 3 wiring pattern. Figure 3 is the common term used for the loop over or under at the beginning of the crotch. The picture above clearly ( post #6) shows the application of a figure three wiring pattern without a proper anchor coming from below the crotch.
Joelshack2362
Shohin
I had a similar issue when I was wiring one year. I actually saved a branch with two toothpicks and ducktape. It was basically a splint holding things together. I left the tape on for about a year. Used a knife to cut it off and the branch never died or browned.
River's Edge
Imperial Masterpiece
The other trick you can use to prevent similar occurrences during bending is positioning your hands prior to the bend. Secure the joint with a thumb and forefinger and then bend in areas that have wire on the outside of the bend with the other thumb and forefinger.
If it happens and it does to all of us. Secure tightly, use some liquid cut past and wait. Most of the time it heals just fine over time. My favourite method for securing tightly is electrical zip ties.
If it happens and it does to all of us. Secure tightly, use some liquid cut past and wait. Most of the time it heals just fine over time. My favourite method for securing tightly is electrical zip ties.
bwaynef
Masterpiece
Figure 3 LITERALLY is depicted the way I showed it above.From the pictures it would appear the wiring is not properly anchored prior to the figure three used for the two branches in the crotch sections. This will contribute to the type of breakage shown as the branches easily move independently rather than as a unit.
Not certain if that is the case but I do not see a third similar diameter or heavier wire on either side of the figure 3 wiring pattern. Figure 3 is the common term used for the loop over or under at the beginning of the crotch. The picture above clearly ( post #6) shows the application of a figure three wiring pattern without a proper anchor coming from below the crotch.
Attachments
River's Edge
Imperial Masterpiece
Exactly, without any additional anchor to secure that portion of the wiring. Figure three by itself is only effective with small weak branching that requires very little bending. I believe that is the point I was trying to make. Without the anchor from further back in the branch it is less effective and will not provide protection for the crotch. The anchor would come from wire securing the branch prior to the bifurcation, a minimum of 1 1/2 turns extending on one side of the bifurcation. As illustrated in the attached picture that illustrates the continuation of using figure three to secure branches. generally speaking the wire from the previous branch is a bit thicker in diameter and provides a good anchor for the next piece of wire used for the next figure three that wires together two branches. My comment was that if the anchor was missing it would contribute to the issue experienced. Hope that helps if my comment was misunderstood. When figure three is properly anchored it is obvious from one side showing two wires for a distance. One is usually thicker than the other and extends from the thicker portion of the branch closer to the trunk.Figure 3 LITERALLY is depicted the way I showed it above.

sorce
Nonsense Rascal
No.
Sorce
Sorce
Deep Sea Diver
Imperial Masterpiece
Apex37
Chumono
I should have stated that pic 3 was not wire related but just me being dumb and trying to visualize and moved those branches with my hands and it tore. I’ll raffia that portion. I’ll try and keep that wrap tighter at the crotch, which I think was my biggest issue. The other issue was knowing which direction things were going to end up and wrapping clockwise/counter-clockwise in accordance with the direction the branch ended up needing to go. This was just an initial wiring job on this juniper. I gotta say, I have REALLY started enjoying wiring though. I only have a few trees that require a lot of heavy wiring, so it’s nice to get some practice with copper.
Thank you all for your comments and suggestions!
Thank you all for your comments and suggestions!
Thank you
Similar threads
- Replies
- 1
- Views
- 759


