panda’s satsuki azalea ‘flame creeper’

pandacular

Masterpiece
Messages
2,484
Reaction score
5,485
Location
Seattle, WA
USDA Zone
9a
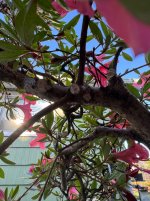
I won this azalea at the club auction this June. @Deep Sea Diver had told me to consider it, and I am pretty pleased with the winning bid.
IMG_6031.jpeg
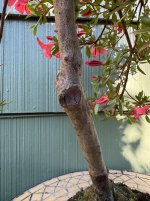
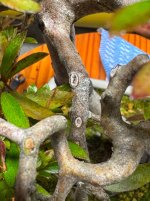
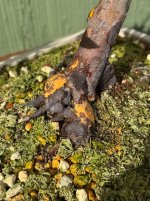
When I was inspecting the tree, a few issues came to light. The pot is far too small and does not match the tree, and the scar had a number of wounds that lacked attentive care. Both of those are easy enough to address, especially as I plan to grow the tree on to be somewhat thicker.

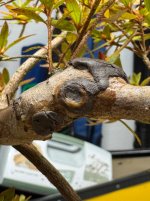
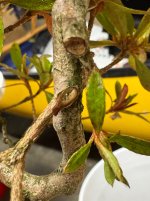
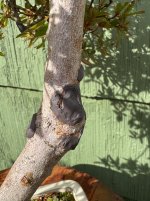
I got right to work on addressing the scars, which were double sealed with Top Jin M followed by putty. I also undercut a branch that I plan to remove to get a jump on healing the wound.
 

Attachments

  • IMG_5984.jpeg
    IMG_5984.jpeg
    809.5 KB · Views: 25
  • IMG_6032.jpeg
    IMG_6032.jpeg
    426.5 KB · Views: 19
  • IMG_6028.jpeg
    IMG_6028.jpeg
    491.9 KB · Views: 16
  • IMG_6030.jpeg
    IMG_6030.jpeg
    499 KB · Views: 17
  • IMG_6029.jpeg
    IMG_6029.jpeg
    450.7 KB · Views: 16
  • IMG_6001.jpeg
    IMG_6001.jpeg
    567.7 KB · Views: 15
  • IMG_5997.jpeg
    IMG_5997.jpeg
    478.1 KB · Views: 14
Earlier this week, this tree was knocked off its stand. The tree and pot were both unharmed, but their connection was damaged—the tree was improperly secured to the roots, and seemingly recently repotted, so the tumble made the tree very loose in the pot.


I had already planned to change to a larger more subtle pot at the first opportunity, and since the tree was healthy and I was having trouble keeping it watered in the small pot before the fall, I repotted it today (really more of a slip pot, but that term can be misleading.)

I noticed some signs that this tree was created from an air layer—there were chunks of sphagnum moss as well as large woody stumps under the soil. I removed the sphagnum and cut some dead stumps for a flat bottom, but otherwise left the roots untouched.
IMG_6288.jpeg
Previously, the tree had been tied down directly over the soft roots. Because the root ball was stable, but small, I staked in one side for the tie down. The other was tied down to some woody surface roots as the other side of the roots were very solid.
IMG_6290.jpeg
Plan is to allow the tree to recover in morning sun and keep a close eye on it.
IMG_6292.jpeg
 

Attachments

  • IMG_6293.jpeg
    IMG_6293.jpeg
    408 KB · Views: 15
  • IMG_6291.jpeg
    IMG_6291.jpeg
    547.8 KB · Views: 14
  • IMG_6289.jpeg
    IMG_6289.jpeg
    568 KB · Views: 24
Wow, the root base and trunk line are incredibly similar! I appreciate this reference image, John. Maybe I’ll bring it in and we can look at it together sometime.

I plan to hold off on any pruning until at least fall, maybe this time next year. It could use some cuts, but with the out of season repot, I figure it’s best to wait.
 
John. Maybe I’ll bring it in and we can look at it together sometime.

I plan to hold off on any pruning until at least fall, maybe this time next year. It could use some cuts, but with the out of season repot, I figure it’s best to wait.

Sure thing.

Likely will be ok to cut back in Sept. the upside is better ramification. The down side is no followers in these sitters.

Cheers
DSD sends
 
Pulled this one for some priming and as I was sealing the wounds, I noticed some accidental cut paste experiments. In the first photo, you can see several cuts from summer that were not sealed. The other pics show some of similar sizes that were sealed. The unsealed cuts have had practically no healing, while the sealed cuts are starting to roll.
 

Attachments

  • IMG_7125.jpeg
    IMG_7125.jpeg
    407.5 KB · Views: 14
  • IMG_7124.jpeg
    IMG_7124.jpeg
    393.8 KB · Views: 13
  • IMG_7123.jpeg
    IMG_7123.jpeg
    443.6 KB · Views: 15
Great images Will. Wondering if I can use a couple of these images for classes?

…and folks always try to tell me azaleas take forever to heal! Wonder why?

If I can expand upon your thoughts…

IMG_0789.jpeg

- #3 shows good wood due to proper sealing technique. Well done!

- Yet one can see rot beginning in the center of cut #2. The crack lets water inside to rot the lifeline.

- it’s easy to see rot is well along in the center of cut #1. If all the rot isn’t carved out down to good wood and properly sealed, the rot will continue down the lifeline to the roots.

This is the key reason azaleas get hollow trunks…internal rot… caused by improper sealing Once the rot gets down the lifeline it’s extremely hard to stop. It is also the reason many folks think azaleas don’t live long… which they can.

Cheers
DSD sends
 
Absolutely feel free to use them, happy to contribute to education. I meant to note that I went back and cleaned up the cuts I missed and sealed them. When the top jin dries, I’ll add paste over top of the larger wounds.

…and folks always try to tell me azaleas take forever to heal! Wonder why?
It’s definitely true that they are poor healers if not treated correctly, but the results of proper treatment speak for themselves.
 
After pruning. Main goal was to cut back for structure, including preparing poor branches to be removed in the future.
IMG_7133.jpeg
I believe the tree has not been pruned in some few seasons at least, so promoting new growth I can build off is the aim. The top was somewhat weak and I made an effort to leave clusters of three in the crown and leave leggier pieces than I did only the stronger lower sections.

I also ended up managing some old wounds. IMG_7130.jpeg
This photo shows one of the basal wounds after I began to treat it. First it was rough cut with branch cutters, then carved by hand. I created a smooth, convex surface while minimizing expanding the exterior of the wound. After, it was covered with top jin, and will get cut paste when it dries.
IMG_7131.jpeg
 

Attachments

  • IMG_7134.jpeg
    IMG_7134.jpeg
    594.1 KB · Views: 3
  • IMG_7135.jpeg
    IMG_7135.jpeg
    448.9 KB · Views: 2
Back
Top Bottom