New shimpaku. Ideas please?

Myrki

Yamadori
Messages
97
Reaction score
62
Location
Wisconsin
Hello. I picked this up at the Midwest bonsai show today. I love the height and the work Ken has done already (Ken’s world of bonsai). It needs some cleaning up, removing old wire, but what I really want help with is the straight chop down at the base. It is deadwood in the middle, and even Ken said it’s not finished but that’s my question. What would be your recommendation to make the chop more natural? It’s a straight flat cut now, I don’t know if just chiseling it a little to make it more rough, or what you all think.

Thanks for any general ideas and ideas on the Deadwood chop.
 

Attachments

  • IMG_2307.jpeg
    IMG_2307.jpeg
    376 KB · Views: 233
  • IMG_2312.jpeg
    IMG_2312.jpeg
    432.4 KB · Views: 195
  • IMG_2311.jpeg
    IMG_2311.jpeg
    300.6 KB · Views: 144
  • IMG_2310.jpeg
    IMG_2310.jpeg
    370.6 KB · Views: 139
  • IMG_2309.jpeg
    IMG_2309.jpeg
    354.9 KB · Views: 142
  • IMG_2308.jpeg
    IMG_2308.jpeg
    413.8 KB · Views: 174
Interesting.

It appears from your images that present chop was quite a bit harsh. Did the past owner chop two trees apart for some odd reason?

First would take a nylon brush and water and gently clean the bark of the entire tree with a downward motion. This will help you how the trunk is inclined to grow at any point.

Then would be inclined to bring the deadwood much further up the trunk. There is deadwood right above the chopped area already, so the initial path is clearly shown. Once this path is apparent up the trunk, it’s best to make cuts on either side of the bark and slowly strip the bark off. Be sure you follow the way the vein goes. When is doubt, stop and reassess over time. Do not strip under any branches along the way as this will kill the branch.

Once this is done, would think about also slightly (or not hollowing out the deadwood above the chop. Have the hollow flow into and through the top of the chop. Then wait and fertilize the tree well.

Over time the live vein will expand and things will become even clearer what to do next.

btw - almost looks like there may be deadwood present on the other side of the trunk. If so, a similar deadwood path can be made there… but not now. Would wait 2-4 years to let the live vein expand before considering doing this job.

Cheers
DSD sends
 
Did the past owner chop two trees apart for some odd reason?
Yes, I have one like this because I did just that and it looked exactly the same. And I buried that part. It rooted above the cut site and now the issue has been resolved.

My train of thought was: it's either going to rot below ground and add character to the wood, or it's going to be rooting and I'll be able to remove it during a repot.

An option to consider for Myrki as well.
 
I buried that part. It rooted above the cut site and now the issue has been resolved.
This is exactly what I was going to suggest: Add a very tight wire half an inch about where the dead part stops and then bury that part at least an inch deep.

Develop the tree as normal, and by fall next year you can clip the whole cut site off.

In my opinion it will take a long time before you get that site fixed, as you have massive taper challenges now.
 
Burying and reroofing above the cut is a great idea. Likely better than deadwood attempts on the bottom of the trunk unless one is patient.

Would still look at applying deadwood above this area.

Best
DSD sends
 
Find someone throwing out a large landscape juniper, take a large interesting branch from that juniper and create a matching cut to attach to the low tree.

Strike an air layer of the top part of the tree and wind it around the newly attached deadwood and let it grow out.

My idea.

IMG_2307.jpeg
 
Interesting.

It appears from your images that present chop was quite a bit harsh. Did the past owner chop two trees apart for some odd reason?

First would take a nylon brush and water and gently clean the bark of the entire tree with a downward motion. This will help you how the trunk is inclined to grow at any point.

Then would be inclined to bring the deadwood much further up the trunk. There is deadwood right above the chopped area already, so the initial path is clearly shown. Once this path is apparent up the trunk, it’s best to make cuts on either side of the bark and slowly strip the bark off. Be sure you follow the way the vein goes. When is doubt, stop and reassess over time. Do not strip under any branches along the way as this will kill the branch.

Once this is done, would think about also slightly (or not hollowing out the deadwood above the chop. Have the hollow flow into and through the top of the chop. Then wait and fertilize the tree well.

Over time the live vein will expand and things will become even clearer what to do next.

btw - almost looks like there may be deadwood present on the other side of the trunk. If so, a similar deadwood path can be made there… but not now. Would wait 2-4 years to let the live vein expand before considering doing this job.

Cheers
DSD sends
First off, thank u for the input. For the deadwood right above the chop, how am I identifying what is deadwood there? I agree that pulling the deadwood up the trunk more would be cool, I just want to make sure I’m cutting bark from the already deadwood.
 
That’sa tricky business to tell over the forum.(Also one doesn’t need deadwood to create deadwood)

But saplines are normally almost straight up to-a branch… unless the trunk is twisted. Then the m sap line will follow its respective place on a bend +\-.

To help read the trunk.

First clean the tree and let it dry,

Next, choose a spot wherever the grain of the wood is obvious and follow it up and down the tree. See if it goes into a branch between branches or under a branch.. etc.

Then choose a vein to create deadwood out of. Take a exacti knife or razor knife and cut on either side of the vein. Then across and slowly peel off a sliver of bark. The bark will show the way from there on.

Examples - most just done last week

Straight with slight bend
IMG_2140.jpeg

Slowing twisting around the trunk
IMG_2139.jpeg

Curved up the base and sharp turn down a branch

IMG_2145.jpeg

Trunk twisted with deadwood following around the twists.

IMG_2142.jpeg

Best
DSD sends
 
I think I'd be in the market for some deadwood you could attach. The flat cut will make it easy to attach, though hiding how its attached might be a little more complicated. I'd use wood glue but would pin it somehow as well.
 
But saplines are normally almost straight up to-a branch… unless the trunk is twisted. Then the m sap line will follow its respective place on a bend +\-.
Very important point this!
(I have just yesterday been recording a video about eedling development where I express the need to not just fold, but also twist the trunk when shaping youngsters, in order to make more interesting deadwood later on.
 
This is great material because it's really going to push you in terms of technique and patients if you stick with it - take it slow and steady and you'll get there year by year!
 
This is great material because it's really going to push you in terms of technique and patients if you stick with it - take it slow and steady and you'll get there year by year!
Thanks!
 
I wired some pads, pulled them down, fanned out. At the top, I wired the branches some but I really want to pull the top left branch down and over, putting more movement and making a pad, and using the other larger pad up top as the apex . I bought some of the self sticking silicone tape I figured I’d try using that and wire to get more extreme bends out of it because as it sits I couldn’t bend much more than I did without feeling that breaking point.
Still trying to save the top for future work.
 

Attachments

  • IMG_2362.jpeg
    IMG_2362.jpeg
    500.8 KB · Views: 80
Good start, would use copper to make your proposed bend and wait until mid October,

yet there is little to no taper in either the present or the proposed design, also there is a good deal of dissonance in the desired design

To achieve taper, might want to step back and look at pruning off the heavy apical branches… Jin the remaining stubs . This will relieve the heavy look. Also still allow one the basics needed to

IMG_0400.jpeg

Then look at bending near #1 area… and possibly also #2 area. However for any of these bends. One would use copper and raffia. To do either of these and wait until mid October.

IMG_0403.jpeg

Just a couple thpughts

Cheers
DSD sends
 
I did some work, used self adhesive silicone tape, instantly made bending easier. I’m no where complete obviously, but I’m trying to salvage the top branches. I think if I thin out and maybe shorten the top left branch, I may be getting somewhere. Maybe I angle it downward a little more. Oh yea, I didn’t wait so we’ll see if that was a bad idea… I can envision an apex/crown a bit more, but the tip of the top branch I feel needs to come down and forward a little still
 

Attachments

  • IMG_2363.jpeg
    IMG_2363.jpeg
    427 KB · Views: 80
a little more work and night shots shortened, thinned and little wire on some smaller branches and on the larger top left pad
 

Attachments

  • IMG_2373.jpeg
    IMG_2373.jpeg
    451.5 KB · Views: 46
  • IMG_2372.jpeg
    IMG_2372.jpeg
    463.8 KB · Views: 42
  • IMG_2371.jpeg
    IMG_2371.jpeg
    484 KB · Views: 61
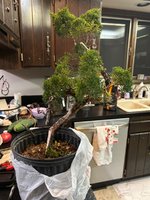
You think I’m getting somewhere keeping these top branches in the mix?
I like it, and I think the top branches are creating a nice apex/“head” to the tree.

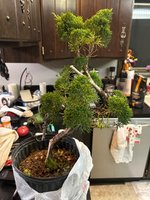
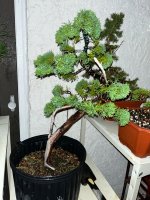
I also wonder what rotating the tree left or right would do in terms of orientation of the tree. Currently, the base of the trunk features an abrupt nearly straight up and down line (on the deadwood side) and then ascends and soon leads to a mirrored 45 degree angle up to the right then terminating at left, which looks 2-dimensional. Curious to know if rotating either a little left or right, making the trunk go away from the viewer then towards the viewer, would add depth, interest, and allow the tree to “bow towards the viewer” from the apex/head you are creating up top with the smaller branching.

It definitely is a beautiful tree (I really like it!) and am just posing the possibility of rotating to add some interest, more trunk movement, etc. Also wondering how the bent and jinned branch would appear upon rotating. Seems like a cool feature and still valuable upon rotating the tree (but it could be removed just as well to show off the slender trunk movement).

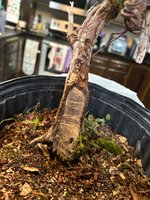
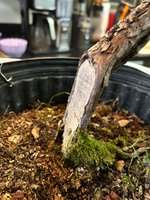
The issue with the trunk near the bottom (at left):

At the base of the trunk (at the current left side) where the deadwood and live vein interact, the deadwood part thins drastically almost disappearing before taking a right hand turn down toward the soil surface. It all almost creates the illusion of (or enhances) inverse taper.

The feature circled in the attached pic is where the eye is held captive upon first glance at the tree, and the viewer has to figure out what has happened at that portion of the trunk before viewing the rest of the tree.
IMG_8975.jpeg
 
Back
Top Bottom