Just wanted to share how I make cement rock pots. I promised @Silentrunning @Woocash & many other B-Nuts that I would take pics and show a step by step how to?
So I hope this helps someone create their own")
First, I start with an idea in my head sometimes I draw it out but usually just imagine what I am shooting for. Once I have a mental plan or drawing I start to form my armature out of expanded aluminum mesh, be careful it’s sharp stuff!!!

Now I have the shape I’m wanting I cover it with a metal window screen. I sew the screen to the expanded metal with a thin thread like wire. Some spots I will use hot glue to attach it.

Now I’m ready to start applying my cement, but before I do I cut out the area of screenwhere my drain hole will be located I don’t worry about tie-down holes at this point, I use a masonry drill bit after it is totally cured for them with no issues and I can put them right where I need them.
Here’s the cement I like to use it’s tough stuff once it’s fully cured. I have been using it for years and have yet to see a crack.

I also add a small amount of nylon reinforcing fibers to each batch I mix up. I also add any desired color pigments at this point as well. Add only a little water at a time then mix, you don’t want it too wet or not enough water or it will not stick to the armature. It’s a somewhat fluffy peanut butter consistency if that helps any?

I only mix small batches of cement for each layer to prevent waste, because the cement will get tougher to work as it begins to cure. I use a 5 gallon bucket to mix it up in. I also like to use a drill with a mud mixer to ensure I get a very thorough mixing.

now apply a thin layer to coat and fill the armature I try and fill any gaps and hollows if possible.

Here it is completely covered, you may have to coat the top half and then let it sit overnight covered in plastic to prevent it from drying and flip it over and coat the bottom the next day. Once you have coated and let it cure for a day it’s ready to start the next layer.

it’s important not to let it dry out between layers. I have a spray bottle that I apply a light mist to it as needed, just don’t get it too wet and make sure to cover it well with plastic sheet or garbage bag between layers.
I ended up applying 3 roughly 1/4” layers and let the 3rd layer set up overnight which seems to be perfect for the carving process, too soon and it’s like trying to carve frosting. Wait to long to start carving and it’s like trying to carve cement") 8-10 hours cure covered overnight seems to be perfect.
8-10 hours cure covered overnight seems to be perfect.

I use a variety of tools, a small point and a paint brush seem to be my most used. I continue carving until the details I desire are complete, because you will not be able to work it the next day it will be too hard.
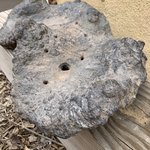
Well here’s my new cement rock pot that I completed this morning. I think it took about 5-6 days to complete?

After the carving was completed I highlighted and applied some surface pigment which consists of small amount of powdered cement dye mixed with concrete acrylic bonding agent brushed on lightly and rubbed off in spots.
Here’s the finished pot after a little color was added. Now I will leave it covered and moist in my basement to prevent it from freezing then I’ll place it outside in the elements for a few months. After that it’s ready for a tree.

Hope this helps someone? Let me know if you have any questions?
So I hope this helps someone create their own
First, I start with an idea in my head sometimes I draw it out but usually just imagine what I am shooting for. Once I have a mental plan or drawing I start to form my armature out of expanded aluminum mesh, be careful it’s sharp stuff!!!
Now I have the shape I’m wanting I cover it with a metal window screen. I sew the screen to the expanded metal with a thin thread like wire. Some spots I will use hot glue to attach it.
Now I’m ready to start applying my cement, but before I do I cut out the area of screenwhere my drain hole will be located I don’t worry about tie-down holes at this point, I use a masonry drill bit after it is totally cured for them with no issues and I can put them right where I need them.
Here’s the cement I like to use it’s tough stuff once it’s fully cured. I have been using it for years and have yet to see a crack.
I also add a small amount of nylon reinforcing fibers to each batch I mix up. I also add any desired color pigments at this point as well. Add only a little water at a time then mix, you don’t want it too wet or not enough water or it will not stick to the armature. It’s a somewhat fluffy peanut butter consistency if that helps any?
I only mix small batches of cement for each layer to prevent waste, because the cement will get tougher to work as it begins to cure. I use a 5 gallon bucket to mix it up in. I also like to use a drill with a mud mixer to ensure I get a very thorough mixing.
now apply a thin layer to coat and fill the armature I try and fill any gaps and hollows if possible.
Here it is completely covered, you may have to coat the top half and then let it sit overnight covered in plastic to prevent it from drying and flip it over and coat the bottom the next day. Once you have coated and let it cure for a day it’s ready to start the next layer.
it’s important not to let it dry out between layers. I have a spray bottle that I apply a light mist to it as needed, just don’t get it too wet and make sure to cover it well with plastic sheet or garbage bag between layers.
I ended up applying 3 roughly 1/4” layers and let the 3rd layer set up overnight which seems to be perfect for the carving process, too soon and it’s like trying to carve frosting. Wait to long to start carving and it’s like trying to carve cement
8-10 hours cure covered overnight seems to be perfect.I use a variety of tools, a small point and a paint brush seem to be my most used. I continue carving until the details I desire are complete, because you will not be able to work it the next day it will be too hard.
Well here’s my new cement rock pot that I completed this morning. I think it took about 5-6 days to complete?
After the carving was completed I highlighted and applied some surface pigment which consists of small amount of powdered cement dye mixed with concrete acrylic bonding agent brushed on lightly and rubbed off in spots.
Here’s the finished pot after a little color was added. Now I will leave it covered and moist in my basement to prevent it from freezing then I’ll place it outside in the elements for a few months. After that it’s ready for a tree.
Hope this helps someone? Let me know if you have any questions?
Last edited: