JeffS73
Chumono
I'm enjoying your posts Lieuz. Regarding your unidentified pot in post #224, I believe it is Teizan, have a look at Japanese Bonsai Pots
You're my hero, I've been looking all over and couldn't find it. Probably having eye fatigue.I'm enjoying your posts Lieuz. Regarding your unidentified pot in post #224, I believe it is Teizan, have a look at Japanese Bonsai Pots


Suruga Seizan (駿河政山) - Shohin Square - Analysis
I've recently had the great pleasure of having this Seizan pot come across my repair table from one of our own, @MACH5 Sergio Cuan. Unfortunately, this pot broke; however, it gets to have a new life as a reassembled kintsugi pot. We also get a good education about how some pots are created.
A bit of background on Suruga Seizan: he was born in 1945 and, to the best of my knowledge, is still living. Seizan began his artistic journey as a bonsai practitioner long before turning to ceramics, a path that may sound familiar to many who discover pottery through their passion for bonsai.
After dedicating forty years to the art of bonsai, Seizan shifted his focus to ceramics about eighteen years ago. His motivation that springboarded him into bonsai ceramics was simple yet profound: to create the ideal pot for his own trees (this should definitely sound very familiar). Despite being relatively new to the world of bonsai ceramics without familial associations or past ceramic experience, Seizan has developed a reputation for producing exceptionally beautiful and meticulously crafted works of the highest quality.
I realized I had mischaracterized this pot during my initial analysis with Sergio. One of the most fascinating aspects of examining a broken pot is the opportunity to uncover clues about how it was made. When Sergio and I first looked at this piece, we both noticed the absence of visible seams. Initially, I thought this might suggest the pot had been made using a mold, where, at each seam joint, a coil of clay is pressed into the corners to eliminate the seam, followed by smoothing and finishing work to refine the surface. However, after researching Seizan’s methods further, I discovered something distinctive: Seizan is known for carving his pots from a single solid block of clay.
This approach was born from his observation that the feet of bonsai pots are often their weakest point; over time, they tend to be the first parts to fail, even when the rest of the pot remains intact. You can see this in examples like the Heian Kouzan Shohin Rectangle, where all four feet eventually broke off. In contrast, Seizan’s method of carving the entire pot, including the feet, from one continuous block ensures that the feet are structurally integral and less prone to failure. Realizing this was an enlightening moment, especially having a pot in hand that so clearly demonstrates his concept in action.
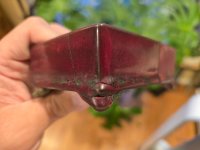
Here is the broken, painted Suruga Seizan pot.
Note:
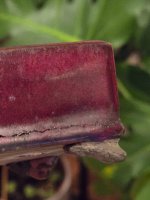
This pot broke in ways that showcase the carving technique that Seizan employs. At first, Sergio and I thought there was going to be no damage to the front face of the pot; however, upon closer inspection, the face has some pretty deep fractures. Those cracks do come apart and are very much separated. This means there will be a gilded kintsugi joint seam on every face.
View attachment 617391
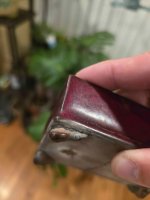
Obligatory chop mark presentation.
View attachment 617392
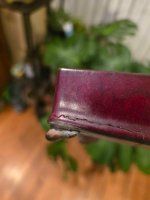
Note: The invisible fractures were not visible until a raking light was applied. The fractured cracks were further scribed open to make them visible and also wider so that lacquer can be applied later. Regarding the scene, it is a rather famous one, part of the 53 Stations of Tokaido by Utagawa Hiroshige.
View attachment 617393
Note the inscription, it reads the 東海道五拾三次之内 蒲原 "Fifty-three Stations of the Tōkaidō: Kanbara". It describes the front-painted scene.
View attachment 617394
Here is an actual image of Hiroshige's 15th plate showcasing the same scene and inscription.
View attachment 617395
An interior view of the front face. Note the cracks have come all the way through to the back side. They may not reflect the distance traveled in front, but they do traverse quite far past the front face.
View attachment 617396
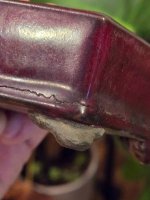
This piece is important as it gives the best evidence of this pot being carved from a single block of clay. Note how there are no seams from the side wall to the bottom plate with the feet.
View attachment 617397
View attachment 617398
The edges have been filed down so that the seam is much wider and can have more material, which means it'll have more strength to hold more. From this angle, I really love the shape of the feet. They are just so delicate and so aethetically pleasing to look at.
View attachment 617399
This concludes the analysis. The front could still use a little more scribing because the fractured seam is still a little too narrow for my liking. I need to be a little careful with the front to ensure the pot doesn't break as the goal is to impregnate the fractured seams with urushi vs breaking it.
Excited to put this back together. The front face piece will likely follow the Daisuke - Shohin Round pot approach, where I clamp the piece together and apply urushi.
More to come.


That’s cool you could identify those motifs in bonsai pots. I’m fascinated with how cultural influences over centuries are reflected in local aesthetic and material culture.Heian Kouzan (平安香山) - Shohin Rectangle - Sculpting
A few more weeks went by, and I was able to whittle the crude foot down. It was a super fun little project but it took a bit of time to whittle. I used a semi sharp scalpel to carve large chunks away, and then a fairly dull scalpel to scrape away the surface before I sanded some of it to shape. In the end, the foot came out looking pretty good.
View attachment 615862
Here's the side profile showing the side with the missing foot. That foot is whittled down to make it look like its companion foot.
View attachment 615860
Here's the other side, with the 25% missing foot filled back in. You can sorta tell how the two types of foot look different. Also note, those big holes have been filled in. I packed in the composite into those holes and cracks where I could.
View attachment 615859
Here's a front-on view of the corner perspective of the original foot.
View attachment 615861
Here's the other side with the sculpted foot. I think it could be a little bit slimmer.
View attachment 615858
Here's the underside. It's still quite crude and needs to be filled in with sabi urushi.
View attachment 615857
Here's the underside of the companion foot for reference.
View attachment 615848
Side profile of the companion foot, original.
View attachment 615849
I wanted to bring this foot's anatomical features to light. One of the things I love most about this foot is the portion that flips upward.
View attachment 615847
Here's the line highlighted for your viewing convenience. These types of feet remind me of the footwear of times long gone in China. The little flick upward looks quite elegant, giving it an exquisite classical look. Here's that footwear for reference.
View attachment 615863
View attachment 615850
Here's the sculpted foot with that upward motion sanded out. I'll add a little sabi urushi to fill in any pits.
Not bad for sculpting from a big chunk of composite.