Bonsai Nut
Nuttier than your average Nut
This is a quick tutorial to help people who want to post photos to the site using their cell phone. This is an Android tutorial, but functionality should be the same across different handsets/operating systems.
(1) First, take a photo (or photos) with your cell phone.
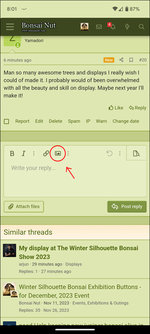
(2) Open bonsainut.com, and go to the thread where you wish to post your photo (or start your own new thread). At the top of the text entry box, you will see a small "image" icon. Press the icon (see below):
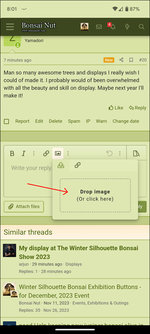
(3) A small box will pop up that says "Drop Image (or click here)". Click on the box:
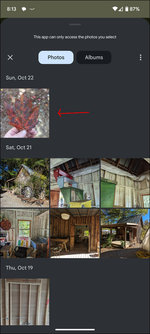
(4) A page will pop up showing the photos stored on your phone. Navigate to the photo you wish to post on the site, and click on it:
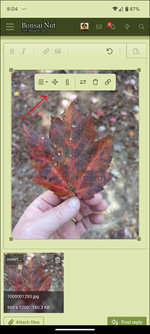
(5) When you click on your photo, it should upload to the site. It will appear in two places in your window. First, it will appear under your post in a little holding area with the message to "insert" or the garbage can icon to "delete". You can insert the photo more than once, or you can remove it from your post and it will still be here in the holding area so you can re-insert it somewhere else in your post. This allows you to play around with posting the image, without having to upload it numerous times. If you click the garbage can icon here, the photo will be deleted from the holding area and the site and you will need to re-upload it to use it again. Note also that you can repeat the process of pressing the image icon and adding images to your post - up to a maximum of 16 images per post. You will see all (up to) 16 images in the holding area for you to use as you format your post so that it is formatted the way you want.
The second area where your image will automatically appear is in the posting window itself. If you click on the photo here, you will see a small editing bar pop up that allows you to:
(a) Align the image to the left, center, or right
(b) Manually adjust image dimensions
(c) Enter an "alt text" description for the image.
(d) Replace the image with another image that is in your "holding area".
(e) Remove the image from your post (but it remains in your holding area and you can re-insert it somewhere else)
(f) Insert a link to another web page, so when people click on your image, they are taken to that link.
A quick comment about "image dimensions". Most cell phones have the ability today to take very high quality (and high resolution) images. Due to the high cost of hosting (and posting) large images, bonsainut limits the size of any single image to 4MB, with a maximum height or width of 1200 pixels (and no more than 16 images per post). If you try to post an image larger than this, the site will automatically compress the image to allow it to fit within site restrictions. The compression utility on the site may not be as good as what you have on your phone or PC - so if you find yourself uploading large images and you don't like how they look on the site (or they appear "changed"), you may be better off editing the image yourself first (on your phone or PC) to fit within size restrictions and THEN uploading it.
(6) You can enter text above or below your image - or enter no text at all, if you so desire. Sometimes it is easier to type your text first, move your text cursor to where you want your image to go, and then press "insert" in the holding area to insert the image. Note that when you press "insert" you are given the option to insert a thumbnail or a full size image, as you desire.
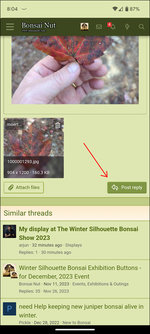
When you are satisfied with how your post looks, simply press the "Post Reply" or "Post Thread" button at the bottom of the page:
Respond to this thread if you have comments or questions!!
(1) First, take a photo (or photos) with your cell phone.
(2) Open bonsainut.com, and go to the thread where you wish to post your photo (or start your own new thread). At the top of the text entry box, you will see a small "image" icon. Press the icon (see below):

(3) A small box will pop up that says "Drop Image (or click here)". Click on the box:

(4) A page will pop up showing the photos stored on your phone. Navigate to the photo you wish to post on the site, and click on it:

(5) When you click on your photo, it should upload to the site. It will appear in two places in your window. First, it will appear under your post in a little holding area with the message to "insert" or the garbage can icon to "delete". You can insert the photo more than once, or you can remove it from your post and it will still be here in the holding area so you can re-insert it somewhere else in your post. This allows you to play around with posting the image, without having to upload it numerous times. If you click the garbage can icon here, the photo will be deleted from the holding area and the site and you will need to re-upload it to use it again. Note also that you can repeat the process of pressing the image icon and adding images to your post - up to a maximum of 16 images per post. You will see all (up to) 16 images in the holding area for you to use as you format your post so that it is formatted the way you want.
The second area where your image will automatically appear is in the posting window itself. If you click on the photo here, you will see a small editing bar pop up that allows you to:
(a) Align the image to the left, center, or right
(b) Manually adjust image dimensions
(c) Enter an "alt text" description for the image.
(d) Replace the image with another image that is in your "holding area".
(e) Remove the image from your post (but it remains in your holding area and you can re-insert it somewhere else)
(f) Insert a link to another web page, so when people click on your image, they are taken to that link.
A quick comment about "image dimensions". Most cell phones have the ability today to take very high quality (and high resolution) images. Due to the high cost of hosting (and posting) large images, bonsainut limits the size of any single image to 4MB, with a maximum height or width of 1200 pixels (and no more than 16 images per post). If you try to post an image larger than this, the site will automatically compress the image to allow it to fit within site restrictions. The compression utility on the site may not be as good as what you have on your phone or PC - so if you find yourself uploading large images and you don't like how they look on the site (or they appear "changed"), you may be better off editing the image yourself first (on your phone or PC) to fit within size restrictions and THEN uploading it.

(6) You can enter text above or below your image - or enter no text at all, if you so desire. Sometimes it is easier to type your text first, move your text cursor to where you want your image to go, and then press "insert" in the holding area to insert the image. Note that when you press "insert" you are given the option to insert a thumbnail or a full size image, as you desire.
When you are satisfied with how your post looks, simply press the "Post Reply" or "Post Thread" button at the bottom of the page:

Respond to this thread if you have comments or questions!!
Last edited:
