First step suggestions for nursery stock Chinese elm

Patric27

Seedling
Messages
9
Reaction score
15
Location
Camarillo, CA
USDA Zone
10b
IMG_0072.jpeg

Total newbie, educating myself online.

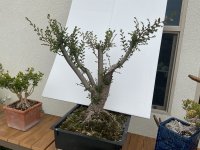
This Chinese elm came from a local nursery, where I had to chop the four trunks to get the tree in my car. I reduced the root mass to fit in this Anderson box in January.

I have not done much else, and from general online sources I suspect I shouldn’t think to do anything this year.

Is that correct?

The trunk is about 4 inches wide at the thickest, and it’s about 20 inches tall at its tallest. I am open to any styling and care suggestions you have to make.
 
It is a surprise to see a larger Chinese elm trunk from a newbie. Usually we get sticks in pots.
Definitely let it recover from the initial repot before any further stress so you have time to get opinions and work out a plan before launching into the next stage.


At most, reduce crowded clusters of shoots so they don't contribute to local swelling. See the masses of shoots around the large cut on right for example.

IMHO, The really straight trunks will be difficult to incorporate in any bonsai so I'd be looking at possible ways to either remove them or shorten them enough to stop the straight, no taper look.
 
IMHO, The really straight trunks will be difficult to incorporate in any bonsai so I'd be looking at possible ways to either remove them or shorten them enough to stop the straight, no taper look.
I agree. I would remove trunks #1, #2 and #3 (from the left) - making sure you make concave cuts and seal the wounds. The sooner this work is done, the better, and the sooner the tree will start to recover. This is work that can be done today... and the let the tree rest for the balance of the year. Leave all the small buds that will pop out everywhere. Then next spring you can reduce the main trunk by about 1/3... and you will be moving forward with material you will keep.
 
Last edited:
First - thank you for the guidance!

Yes, thick trunks from a newbie. I’m 66, and would rather work on taper, nebarie and the slow process of styling and have something before I pass from this world .

I can see how your suggestions, Nuttier, are good, and will likely follow them

I ask only because I’m fond of the look of multi-trunk bonsai, is there any case to be made for drastically reducing (from left to right) trunks 1 and 3, aiming for tapered replacements and holding onto #2, but only through its curve, while handling #4 as you suggest?
 
As a newbie remember to study the cause and effect aspect of what you do and take pictures before and after for reference. It helps a lot.

Also all that lower foliage starting to grow are potentially new lower branches for the future design. Not all but selected ones later on.

Usually from what I’ve seen. Deciduous multi trunks look good when the second or third trunk extends from an area closer to the nebari. You may be able to pull off with this one with the right help and guidance. You can see the trunk did split into two naturally. The swelling of the two growing close caused the slight reverse taper.
 
I ask only because I’m fond of the look of multi-trunk bonsai, is there any case to be made for drastically reducing (from left to right) trunks 1 and 3, aiming for tapered replacements and holding onto #2, but only through its curve, while handling #4 as you suggest?
The branches right now are too high on the trunk for a multi-trunk design. For a nice elm multi-trunk design you would want the trunks to all split at the soil level - or at least very low on the trunk. Instead what you have is three big straight branches that are giving you a knot of inverse taper where you don't want it.

dsc_0516-2.jpg

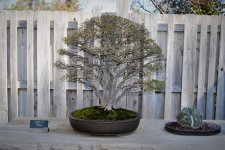
Regardless, there is nothing preventing you from doing a multi-trunk with this tree. Cut it back like I suggest and you will get buds all over the place that you can grow out as new branches - wiring and arranging them while they are small. Maybe you will get new sprouts from the roots, or very low buds. Regardless, it would be a very straight forward thing to grow out branches to use as cuttings or air-layers for new trunks which you could plant or approach graft very low on the tree. The important thing is that these new trunks will all be wired when young to give them each some character. Note in the example above how each trunk has some movement to it and they all have a degree of taper. What you are currently working with is stove-pipe straight sections of branch that have no character and will NEVER have any, so that if you continue to prune and develop the tree using those branches, you will just be wasting time and effort. Then you will look up, ten years will have passed, and you will realize - wow I need to remove those bad branches! :)

With an elm, do not be afraid of cutting back to the trunk in order to get new thin branches.
 
So… I bit the bullet, at least as far as I dared.

I went from this:


To this:

IMG_5249.jpeg

I was queasy the whole time…but I’m sure (if my little project survives) that I’ve done the right thing. I see, with any cooperation from future budding, a primary branch extending from the lower point on the left, like the upper point’s current possibilities.

Thank you again!
 

Attachments

  • IMG_5248.jpeg
    IMG_5248.jpeg
    1.1 MB · Views: 31
The deed is done now, but I wouldnt have reduced this material to one trunk line. Here's what I did with one a few years ago. It does depend on tastes though.
I would of kept your middle leader and chopped it, then removed the one left of it and kept the two on either side, but reduced them lower than the central trunk. Or cut to two trunks bit like below.
33270424782_6462d60729_c.jpgFB_IMG_1563378798721.jpg20190826_204615.jpg
 
Going forward, I would make my final cut here (more or less) removing the awkward straight upper trunk. You've got a nice shoot right there that you could use for your new leader.

cut.jpg

Do not worry about Chinese elm popping back from a hard pruning. Right now your tree doesn't look like much but you will soon have more branches to work with than you know what to do with. Don't let them get away from you! Make sure you put some wire on them while they are still young and pliable, otherwise you will just have a bunch of straight branches again with no movement and no taper.

elm1.jpg

I need to take a photo of what this tree looks like today. This was a quick shot that I took two years ago before I was going to do some work on it - which at least shows how many branches I had to work with.

elm2.jpg
 
So… I bit the bullet, at least as far as I dared.
You done good. There are tons of shoots on your tree and you will be able to replace what you cut with much better branching as the years go by. I second Bonsai Nut’s suggestion for where to chop the main trunk next and continue from there.

P.S. was happy to see a newbie with a large Chinese elm that wasn’t a taperless “S”. Have fun with this one.
 
So… I bit the bullet, at least as far as I dared.

I went from this:


To this:

View attachment 593124

I was queasy the whole time…but I’m sure (if my little project survives) that I’ve done the right thing. I see, with any cooperation from future budding, a primary branch extending from the lower point on the left, like the upper point’s current possibilities.

Thank you again!
Nice work! I agree with @Bonsai Nut on eventually removing that straight section at the top. This is really good material and it will be a lot of fun to work with!
 
First - thank you for the guidance!

Yes, thick trunks from a newbie. I’m 66, and would rather work on taper, nebarie and the slow process of styling and have something before I pass from this world .

I can see how your suggestions, Nuttier, are good, and will likely follow them

I ask only because I’m fond of the look of multi-trunk bonsai, is there any case to be made for drastically reducing (from left to right) trunks 1 and 3, aiming for tapered replacements and holding onto #2, but only through its curve, while handling #4 as you suggest?
Me too! I generally like most forms. Its pretty decent material and it could of went more than one way. One way isnt better than the other, its good to weigh up options. See whats available

Still, this is the type of thing I saw when looking. Maybe not with the deadwood bits. I always try to make best use of what the tree already has.
 
Thanks for the advice, and encouragement.

I’ll take everyone’s encouragement of a future trim on the long upper branch. It appeals to me, too.
 
Me too! I generally like most forms. Its pretty decent material and it could have went more than one way. One way isnt better than the other, its good to weigh up options. See whats available
Important stuff here. It’s not unusual to show the same material to various experienced practitioners and receive different suggestions. As someone with less experience, I’m trying not to allow perfection to be the enemy of good enough. At this point in my journey, I try to make the best with what I have and learn and continue to find better material for the next projects. Run with the decisions you made and then get more material for different styles and sizes. The hands on experience of working with the trees not only ups our development game, but also teaches us what types of material we want to work with in the first instance.
 
Back
Top Bottom