Boxwood Grove new to me. Could use some ideas.

Messages
50
Reaction score
36
Location
Santa Cruz CA
USDA Zone
9B
I was gifted this boxwood grove last fall, just in time for the "normal" heat wave to hit Santa Cruz, and a week before heading to Europe for a vacation. My friend planted this grove in 2007 with Buxus japonica.

Boxwood grove received copy.jpg

I love the cloud look but I would like to see more of the trunks. In doing that it might look like a pompom tree. I guess that makes me think I need to open up the canopy some "to let birds fly in".

The color is not great, heat last year and I think genetics during winter. There is also a family disagreement about too much sun :)
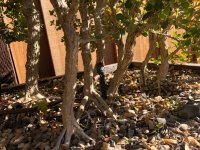
Boxwood grove trunks 1 copy.jpg

I think the roots are too exposed and could use a repot.

Any suggestions?
 
I was gifted this boxwood grove last fall, just in time for the "normal" heat wave to hit Santa Cruz, and a week before heading to Europe for a vacation. My friend planted this grove in 2007 with Buxus japonica.

View attachment 581208

I love the cloud look but I would like to see more of the trunks. In doing that it might look like a pompom tree. I guess that makes me think I need to open up the canopy some "to let birds fly in".

The color is not great, heat last year and I think genetics during winter. There is also a family disagreement about too much sun :)

View attachment 581209

I think the roots are too exposed and could use a repot.

Any suggestions?
Does the soil still drain well? If it still drains correctly I would say it is fine, and you can just top the soil off that has been lost to erosion.
 
I've never seen a boxwood forest like that! I think it's really cool. Once you thin out the canopy, it will be even cooler.
 
There is a lot there to work with! Thinning out the middle section and deciding on a group apex would be my next step.
 
Thank you for your comments, opening up the canopy seems like a good challenge.
I've never seen a boxwood forest like that! I think it's really cool. Once you thin out the canopy, it will be even cooler.
I have never seen a natural boxwood forest either, only trimmed formal hedges!
 
There's a real good video from Bonsai Mirai on YouTube of Rodney Clemons working on the nicest boxwood material I've ever seen. Rodney is amazing with boxwoods and highly knowledgeable. Yours is a forest but same concept, you want the trees to work in unity similar to a multi trunk, clump, or single trunk tree. I think it may help you.
 
There's a real good video from Bonsai Mirai on YouTube of Rodney Clemons working on the nicest boxwood material I've ever seen. Rodney is amazing with boxwoods and highly knowledgeable. Yours is a forest but same concept, you want the trees to work in unity similar to a multi trunk, clump, or single trunk tree. I think it may help you.
Thank you very much!
 
There appears to be a lot of shorter trees right in front. That may be blocking the view of the inner trunks. What does it look like from the other side?
I generally make groups with 'close up view' which means the main trunks are toward the front and smaller trunks in back to give the impression of distance.
 
I think the roots are too exposed and could use a repot.
Exposed roots can be a feature but, in a forest you need to have some sort of common thread. Some trees exposed and some not just confuses the viewer.
Exposed roots do not signify repotting is necessary. It may just mean the original designer did not really understand design or technique for planting.
You may be able to mound up the soil to cover those exposed roots.
Alternative would be to repot to try to get those exposed root trees lower to match the others. That could be more difficult than it seems as the roots will be well meshed by now. It will mean cutting some or all the trees out of the grouping and reassembling.
That may not be a bad thing. From what I'm seeing the original concept is amateurish and could be improved by reassembly.
I've already mentioned smaller trees to the rear. Other common faults with beginner groups are:
Trunks evenly spaced - until you try if seems easy but we seem to have an innate sense of space that's really hard to override.
Trunk lines follow a common theme - easy enough when all the trunks are straight but more tricky when you have curved or twisted trunks. In a forest most trunks will have a similar shape because they have all been affected by the prevailing conditions. In windy areas all trunks will lean one direction. Smaller trunks will bend out and away from larger trees trying to find light. I can't see enough of the trunks in the photos to gauge whether trunk lines are homogenous or all over the place. Even with good clear photos it's hard to judge because much of the movement is 3D which doesn't show up well in 2D photos.
 
Shibui, thank you for the critique, it is very much appreciated. I will try to turn the box for photos, perhaps I placed it looking at the back.

peter
 
I think that is a very nice grouping of boxwoods. Boxwoods are not commonly grouped. I suspect Shibui is correct in that the pics are of the back of the grouping as it was designed. Watching Rodney's video closely should help you understand how to prune the foliage to give it a more airy appearance.
 
Just for inspiration I once saw a group of Kingsville boxwood designed to resemble a Central Texas live oak motte.
 
Here are a few more pictures.
Big opening through the middle.. Not sure what his vision was but I originally chose the first side as the front.
The trees are not spaced evenly and they have nice bends towards the sides
This side has the largest tree in the back, just to the right of the opening.
I will see if I can remove some of the media to expose all of the trunks. If not I can add more media.

The front right side is way too dense to see the trunks, even to take a decent picture.
The other front.

Boxwood grove other side.jpg

Trunks

left side
Boxwood left side.jpeg


middle
The largest tree is to the right, its also the tallest. Located slightly behind middle of the grove.
Boxwood Middle.jpg

Right side, very dense with nice sizes of trunks.
boxwood right side.jpeg

This is really the only type of boxwood grove I have ever seen :)

Blenheim maze 2.jpg
 
Here are a few more pictures.
The new view has altered my opinion. Much better view of the trees from this side. Looks like trunk alignment is also well executed.
Big opening through the middle..
This is also common with early attempts at group style. I know I did it with my early tries. This usually stems from attempting to have a 'path' or 'trail' through the group. I think it looks much better when the path winds through the trees and exits slightly offset from the entrance point. That means the viewer does not look directly through the group but still has something winding off into the distance.
I've been able to quickly rectify several groups with this sort of gap. Simply cut the group down the middle then rotate one side slightly and slide it just a bit behind the other half. Aim is to have a rear tree blocking the straight through view but still leave some space for the trail to wind around and through the trees. Use forced perspective here. The front of the trail is wide but quickly tapers to much smaller toward the rear to really hammer home the impression of distance.

I can also see a couple of internal branches that I'd probably remove (after due consideration and a good 3D look). Dense forests have few internal branches because there's not enough light down under the canopy. Removing some of those might help open up your group.
The front right side is way too dense to see the trunks, even to take a decent picture.
I suspect a lot of this growth has developed more recently and may not have been part of the design. Box tend to produce plenty of new shoots from crotches and trunks. Without regular cleaning out they can get very overgrown. You'll need to go in and look for excess, crowded and redundant branching and remove some, maybe even a lot. You may find that some of the new branches are better placed or have better structure than nearby older ones so don't just clear out all new shoots. Look for spots where a new one will replace a less attractive older branch.
 
The new view has altered my opinion. Much better view of the trees from this side. Looks like trunk alignment is also well executed.

This is also common with early attempts at group style. I know I did it with my early tries. This usually stems from attempting to have a 'path' or 'trail' through the group. I think it looks much better when the path winds through the trees and exits slightly offset from the entrance point. That means the viewer does not look directly through the group but still has something winding off into the distance.
I've been able to quickly rectify several groups with this sort of gap. Simply cut the group down the middle then rotate one side slightly and slide it just a bit behind the other half. Aim is to have a rear tree blocking the straight through view but still leave some space for the trail to wind around and through the trees. Use forced perspective here. The front of the trail is wide but quickly tapers to much smaller toward the rear to really hammer home the impression of distance.

I can also see a couple of internal branches that I'd probably remove (after due consideration and a good 3D look). Dense forests have few internal branches because there's not enough light down under the canopy. Removing some of those might help open up your group.

I suspect a lot of this growth has developed more recently and may not have been part of the design. Box tend to produce plenty of new shoots from crotches and trunks. Without regular cleaning out they can get very overgrown. You'll need to go in and look for excess, crowded and redundant branching and remove some, maybe even a lot. You may find that some of the new branches are better placed or have better structure than nearby older ones so don't just clear out all new shoots. Look for spots where a new one will replace a less attractive older branch.
Again, thank you. You take the time to explain what needs to be considered and why.
 
Back
Top Bottom