Automatic Watering System Phase 1 Parts

AZbonsai

Masterpiece
Messages
2,486
Reaction score
5,343
Location
AZ
USDA Zone
9
Setting up the automatic watering system for the plants way prior to going on vacation in order to test the system for reliability. Thought I might document the procedure for your entertainment and edification. I also would like your feedback. I envision a three phase rollout of the process supplies and tools used being phase 1.View attachment 144530
From L/R:
Scissors
Thread Tape
1/4" hole punch
Faucet Connection Kit
4" long 1/4" support stakes
1/2" end closure
8" cable ties
1/4" barbed connectors
Bubblers 0-13 gph 360 degrees
Pressure Compensating Drippers 2gph
1/4 inch poly microtube
1/2 inch 80psi poly pipe

Get your tools and supplies together and I will take you through
Phase 2 Running the Tubing :)
 
Get your tools and supplies together and I will take you through
Phase 2 Running the Tubing :)


Hahaha do you really think you are teaching - automatic watering isnt new since you've discovered bonsai in the last year.
 
Thank you for offering to document. I have a very crude setup now so I'm interested to see what others do.
 
Funny, I just set up a quick system today with similar bubbler heads. I didn't put a pressure regulator and heads do more spraying than "bubbling". But I adjusted it at spigot to work for now. Let us know how you like those heads. I was going to switch to something like what markyscott has on his thread (downward spraying heads from Lowes).
 
Phase 2 Run the Tubing.
Here is the project. I converted this trellis into a bonsai bench by water sealing some boards and running them through.
20170429_073242-1512x2016.jpg
First I attach my 1/2" end closure to the end of the 1/2" poly tubing.
20170506_194457-2268x3024.jpg
Then I am going to attach my poly tube to the inside of the arch on both sides of the trellis with the 8" zip tie. Start at the furthest point away from your faucet and run pipe towards it.
20170506_195954-2268x3024.jpg
Next I will use the hole punch tool to punch holes in the poly 1/2" poly tube where I am going to want bubbler for each of the pots. FYI you do not want to run a 1/4" micro tube longer than 5 feet.
20170506_200226-2268x3024.jpg
Next I will be inserting the 1/4" barbed connector into the hole we put into 1/2" poly tube so we can connect the micro tube to the poly tube. I use pliers for this.
20170506_200421-3024x2268.jpg
If you happen to make a mistake and put a hole in your 1/2" pipe where you do not want one they sell dummy plugs to plug the holes.
20170506_200531-2268x3024.jpg
Now the 2gph Drippers or your 0-13gph bubbler can be attached to your micro tube.
20170506_200726-2268x3024.jpg
Attach your support stakes to your micro tube and you are ready to roll.
20170506_200857-2268x3024.jpg
I have 26 micro tubes and Drippers I have attached to the poly tube for this project.
20170506_132136-2268x3024.jpg
There you go!
Next up Phase 3: attaching your system to the faucet and timmer.
 
Oops I posted this in the wrong place before:

Just a thought, I have had better success with stake misters instead of drip emitters. Just much more water and coverage they soak everything instead of just dripping in one area.

I use Maxi-jet misters but Rainbird misters are good too.

You can just cut off the 2 gph red emitters and replace them with the stake misters. You can pick misters that shoot from 1-10'. I don't think the words "drip" and bonsai mix well together, go for more of a spray :).
 
Good idea. I have bubblers that I am going to attach as well to see how they work. I like the drip for the small pots I have. Maybe I will try all 3 and let the nuts decide :).
 
Phase 3 Attaching the System to the Faucet and Timer.
20170507_062711-2268x3024.jpg
Top to bottom:
Thread Tape
Faucet Connection Kit
Screwdriver
Orbit 3 Station Timer
Compression Adaptor
Coffee
20170507_063751-3024x2268.jpg
First attach the back flow preventor to your faucet. This is important if you are connecting straight to a faucet on your house to prevent stuff leaching into your water system. If you are attaching to a faucet in your irrigation system chances are it has a backflow preventor at the source.
20170507_064028_001-2268x3024.jpg
Next I attach a 25psi regulator to the back flow preventor. This prevents a jolt of water pressure coming through the line.
20170507_064431_001-2268x3024.jpg
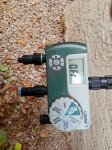
Then I attach my timer to the pressure regulator. I attached the compression adaptors to station 1 & 2. About the timmer: average price on these timers is about $50. I have had good luck with this one for several seasons. I have seen some bad reviews on it however so do your due diligence!
20170507_064943_001-2268x3024.jpg
Last up, attach your poly tube to the adaptors and you are ready to set your timer.
Phase 4: Testing & Additions
 
First attach the back flow preventor to your faucet.

Great addition for a lot of applications - Important as well.

Next I attach a 25psi regulator to the back flow preventor. This prevents a jolt of water pressure coming through the line.

I never noticed the "Jolt" as you described but perhaps it is because the temp system I setup for vaca/travel always has been open and such. Next time I will watch it more closely and add if need be - informative, Thank you ;)

Grimmy
 
Even though you might be New to bonsai you can still be very informative .
Keep up the good work and don't listen to the naysayers
Thanks I appreciate it. I have been gardening for over 40 years now so I am not a total novice :):):)
 
Thanks I appreciate it. I have been gardening for over 40 years now so I am not a total novice :):):)
It doesn't matter if you're a novice or not, as long as you're doing what you love that's what matters .
 
Phase 4 Testing & Additions
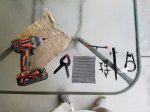
20170507_183651.jpg
Left/Right
Drill with small bit
Burlap
4 inch spring clamps
50% shade screen
1/4" barbed tee
Fan spray 360 degrees 0-20 fog
Mister 12" flexible tubing
20170507_154717-3024x2268.jpg
First up the shade screen and clamps were applied to the top of the trellis. I noticed some burnt leaves on new growth.
20170507_155132_001-2268x3024.jpg
I agree with Matt above about Drippers and bonsai they do not go well, however, this may be one application where they are beneficial. I used a tee to split the line and add two dripers to some mame bonsai I have. I drilled a hole in the wood shelf and stuck the stake in it to hold the drips in place.
20170507_154727_001-3024x2268.jpg
Next I put some burlap on the shelves for three reasons: to provide some evaporative cooling after watering...allows the water to drain off past the plants on the shelf below...trying to reduce radiant heat from wall. The burlap is from 50lb bags of green coffee.
20170507_183250_001-3024x2268.jpg
Attached 6 flexible misters to the 2nd poly tube on the front of trellis. Man do they mist! I really like the fan sprays Matt suggested and will go with them in the rest of the pots.
Well, that's it! On to the next.
 
Check your pressure regulator, the ones I looked at were not supposed to be under constant pressure and I put it on the timer side instead of faucet side.

I get burlap rolls from nursery/hardware store, it isn't the nice tight weave like your bags, but I don't have to drink 50lbs of coffee to get it!
 
Neither do I! I buy the coffee bags from local roasters for a buck or two a bag. Coffee roasting another hobby of mine.
Check your pressure regulator, the ones I looked at were not supposed to be under constant pressure and I put it on the timer side instead of faucet side.

I get burlap rolls from nursery/hardware store, it isn't the nice tight weave like your bags, but I don't have to drink 50lbs of coffee to get it![/QUOTE
 
Back
Top Bottom