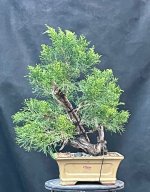
A stab at Tanuki

Eckhoffw

Masterpiece
Messages
3,319
Reaction score
5,924
Location
St. Paul Mn.
USDA Zone
4b
So You’ve probably seen videos of Peter Chan doing quick and easy Tanuki demonstrations.

After seeing him race through a couple of these, I was like, “yeah, that looks fun and easy enough.”
Since, I’ve collected a few pieces of driftwood as potential candidates.
The piece I chose came from Door county WI. 2 yrs ago.
A pic of the deadwood and my wife telling me what should be the front.
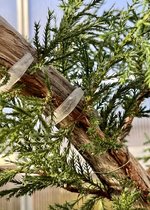
2A5E18CA-39B7-4858-A77E-9838AEA3F3D5.jpegHere are the 3 pieces of the composition.
9BED8CC3-5272-46D9-BE0C-F82BB9FAB019.jpegI got a 10$ sea green juniper, a 20$ production pot I had,D8093557-0F37-44CA-B730-ED3FEEB537D5.jpegand of course the driftwood. I believe it to be Thuja but probably am wrong.23BEBCFB-F267-4F9B-895A-F0DFAB8BC4F6.jpegI tried to find a juniper with multiple thin trunks. These young junipers are super flexible.

I tested some other options for the driftwood orientation, but ultimately had to go with the boss. 999C00D4-C20A-4D22-8871-D69633ACE7FF.jpeg6DF853B8-2C4F-49A1-B0F0-8ADC14404C73.jpegD682C522-75B9-47C9-8BB7-85F85FB00D01.jpeg
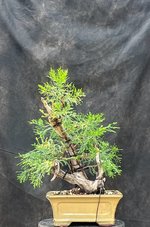
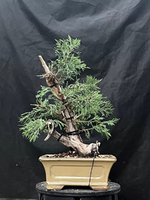
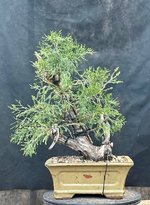
Well, after combing the roots out on the plant, and futzing around for awhile, here is my Tanuki in the rough. 0DD43B9D-D9FA-45B7-A7D7-50EDC937FCF2.jpeg
For now I will let the tree get established. At some point I will take the ties off, and route in a groove for the primary branches.

Any advice/suggestions are as always, welcome!
 
I just did one earlier this weekend. Haven't gotten any pics posted yet though.
 
So You’ve probably seen videos of Peter Chan doing quick and easy Tanuki demonstrations.

After seeing him race through a couple of these, I was like, “yeah, that looks fun and easy enough.”
Since, I’ve collected a few pieces of driftwood as potential candidates.
The piece I chose came from Door county WI. 2 yrs ago.
A pic of the deadwood and my wife telling me what should be the front.
View attachment 438077Here are the 3 pieces of the composition.
View attachment 438074I got a 10$ sea green juniper, a 20$ production pot I had,View attachment 438078and of course the driftwood. I believe it to be Thuja but probably am wrong.View attachment 438079I tried to find a juniper with multiple thin trunks. These young junipers are super flexible.

I tested some other options for the driftwood orientation, but ultimately had to go with the boss. View attachment 438073View attachment 438075View attachment 438076
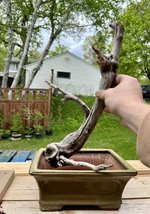
Well, after combing the roots out on the plant, and futzing around for awhile, here is my Tanuki in the rough. View attachment 438087
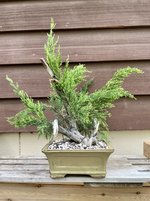
For now I will let the tree get established. At some point I will take the ties off, and route in a groove for the primary branches.

Any advice/suggestions are as always, welcome!

Starting to look convincing already!
 
I think the better method is creating a C shape channel with a dremel or something then put the Juniper inside, as it grows it achors itself and rolls over creating a similar efect of a living vein in a authentic Juniper, I dont like much the Peter way of make tanukis, is faster yes but in long term less convincing. Photos by https://bonsaikreativ.com/

13063262_528907880630464_5737000458209083146_o-2-min.jpg

2Bonsai-Tanuki-Juniperus-Cinensis.jpg
Nice example.
Yeah, now that I got the design pretty much sorted out, I will use my dremel to carve a channel for the branches instead of ties.
 
I seen a few tanuki making videos, the one that I think was more convincing was done using a ball head carbide burr. It was done by carving first with a straight cut bit, then following through with the ball bit. It allowed the whip to grow into the groove and anchor itself in. The explanation was that a regular C shape groove allows the tree to grow out of it.


I know... it's in Spanish, use autogenerated translation or just look at the presentation, it starts where he explains why he use a round hole.
 
Tanuki is looking a little wild. I like it. I’m sure I’ll like it more when I’m able to shape it next spring😁
1F74BAAD-382D-4ED6-932E-BDAA246CE1CB.jpeg
AFD52A83-E7C9-4A0A-882B-659588018F6E.jpeg
Like @Maiden69 mentioned, I will try to improve the channel with a ball bit to keep the whip secure without the ties.
Im pretty sure that as is, it will never really stay tight enough against the deadwood.
 
I think this is the main flaw in the work. It is not about planting a whip against a piece of dead wood.
Yeah this method is more like me putting on a wig instead of getting hair transplants. 🤣
Hopefully if I recess it tight in the deadwood with the ball bit, I’ll get them to stay in there as they grow. ?
 
Wonderful. Am looking for good wood to start mine.

Any words of advice a year on?
I’d say that I wish I would have done the proper channel carving as soon as I made the design. Fitting the new live stock into the deadwood proper. Now I’m still working at it when it should have been done right away.
 
I’d say that I wish I would have done the proper channel carving as soon as I made the design. Fitting the new live stock into the deadwood proper. Now I’m still working at it when it should have been done right away.
The right was meaning the round head carving bit to make the channel?
 
Took a peek at this today.

Looking pretty shabby. I’ll be doing some improvements with the channel carving soon.

Sometimes The sea green juniper foliage is problematic IMG_0547.jpeg
IMG_0546.jpeg
 
I haven’t touched this one all season. Since the family was away, I had some time to prune it up, and remove some wire.

Before. IMG_2314.jpeg
After. IMG_2316.jpeg
I hope to do some better channeling in the deadwood next season. For now the zip ties stay on.
 
Back
Top Bottom