As I understand it, the most accepted method for refined shimpaku foliage pruning, to do the following.
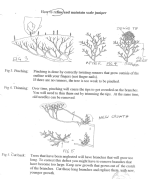
1. Clean out dead foliage.
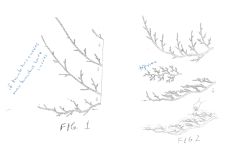
2. Remove downward growing stems and foliage.
3. On each foliage clump, cut the strong extended runners back to a vigorous fork in the foliage clump.
4. Remove the weak foliage that typically grows closer to the base or behind each branch's foliage clump.
The idea is that the very strongest and very weakest growth is removed, thereby balancing vigor on all areas of the
tree.
The work is typically done in very early summer and then again in mid/late summer.
Do I have it right?
1. Clean out dead foliage.
2. Remove downward growing stems and foliage.
3. On each foliage clump, cut the strong extended runners back to a vigorous fork in the foliage clump.
4. Remove the weak foliage that typically grows closer to the base or behind each branch's foliage clump.
The idea is that the very strongest and very weakest growth is removed, thereby balancing vigor on all areas of the
tree.
The work is typically done in very early summer and then again in mid/late summer.
Do I have it right?


")

 .
.